Manufacturing guy-at-large.

Filtering by Tag: essays

Share

My secret Manufacturing master plan

Added on by Spencer Wright.

Background: My day job is directing Undercurrent's strategy work with General Electric, but on the side I spend my time researching the state of the art in manufacturing - specifically, industrial 3D printing. I've written before about my approach to some of this work, but want to lay out here the way I see it fitting into my career.

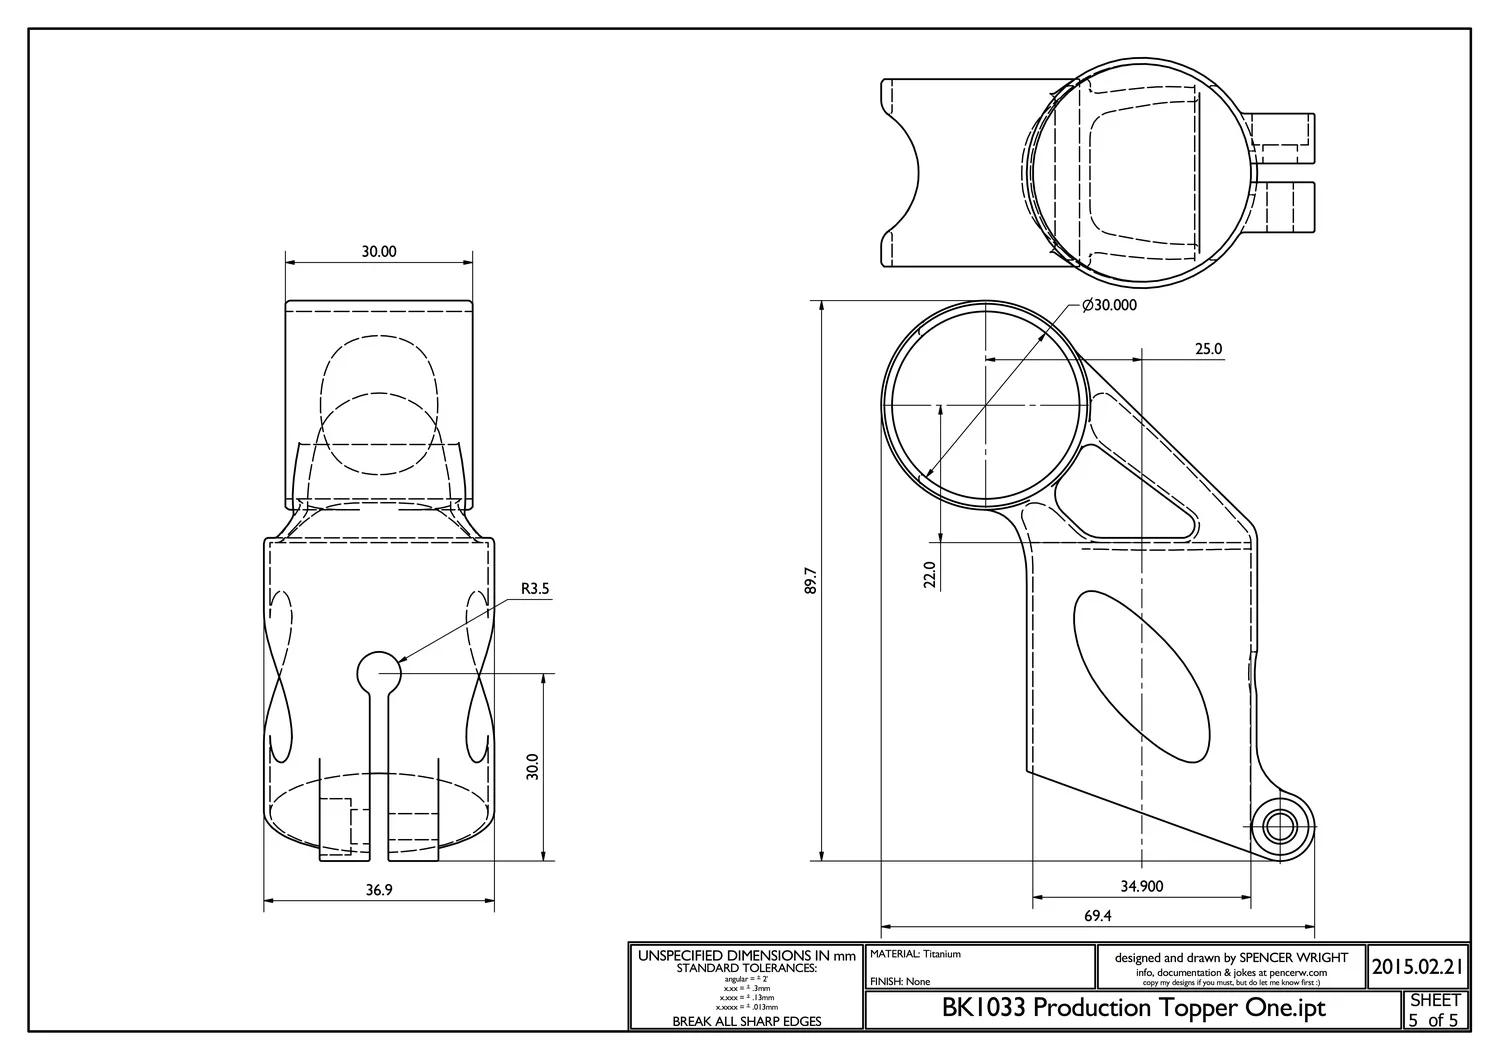
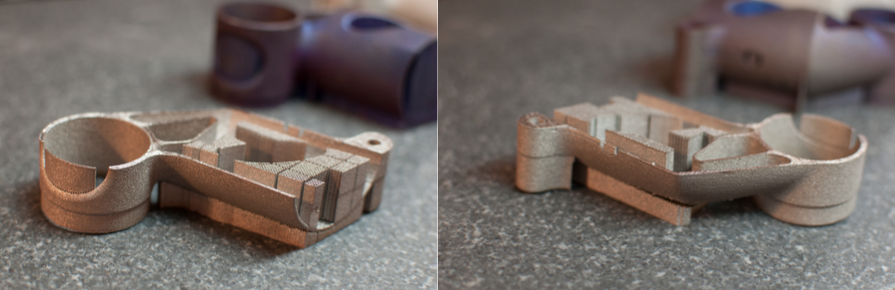
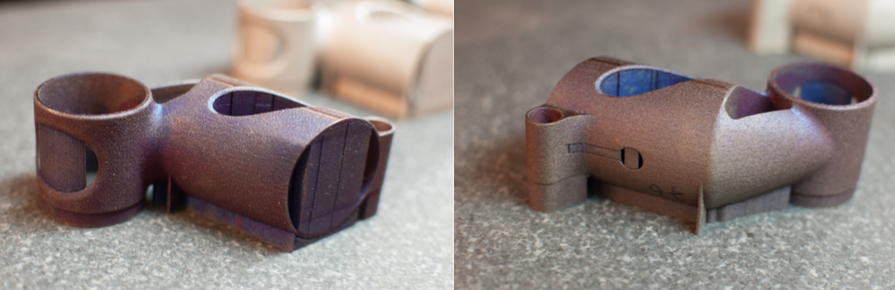
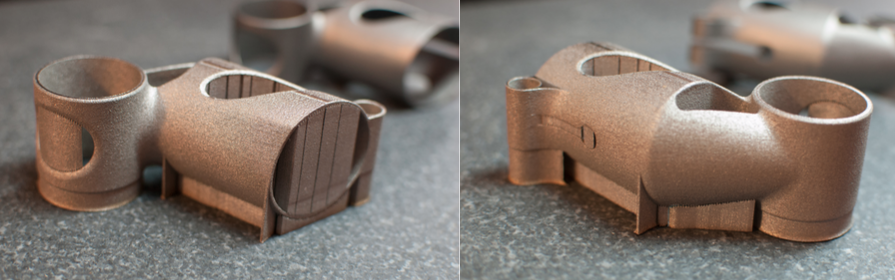
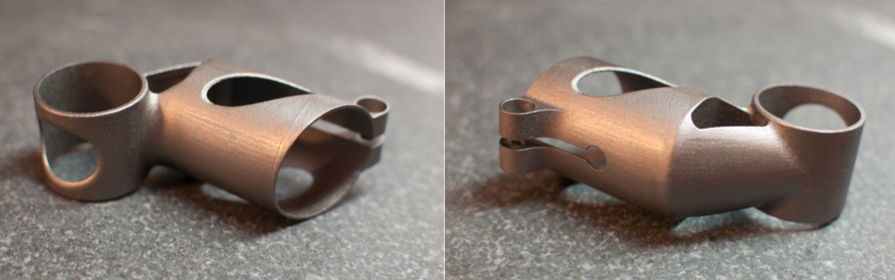
As you'll know from my blog (cf. one, two), a primary focus of mine is developing a line of high end metal 3D printed bicycle parts. However, it might not be clear that that's just one step in finding specific applications where 3D printed production parts make commercial sense. In the end, the purpose of my work is to help expedite the transition toward a more fluid, transparent, and efficient mode of product design, manufacturing, and distribution - one which properly accounts for its own externalities, and allows for rapid integration of feedback across and throughout a part's life cycle.

I should be made clear that my long term focus isn't specific to additive. Every manufacturing method has a purpose, and any claim that 3D printing is going to unseat other methods should be examined critically. I want product designers have perfect transparency into how a given process will affect cost and function, and to be able to tune their design such that it's well matched for the resources at their disposal - and the end user's needs. 

I do believe, however, that additive manufacturing offers a unique and historical opportunity. Partly because of the fact that 3D printed parts always begin as 3D models - and partly, to be frank, because of its sex appeal - additive has encouraged a new wave of people to people to work in an industry (manufacturing) that was due for a radical change. And while the effect of their naïveté is often to simply create churn, in the end I believe that manufacturing will benefit greatly from the influx of new ideas and working styles.

In order to harness this opportunity, I'm focused on developing the most compelling possible use case for the technologies at play today. For metal 3D printing to reach industrial maturity, designers need to understand its limitations - and how to best exploit its strengths. So I have begun my research with metal powder bed fusion, which is currently the 3D printing process best suited for industrial use. I'm developing parts which make good use of 3D printing's strengths (lightweight, low production volume, smaller than a breadbox), and an industry which prizes the traits that additive manufacturing is best suited for (has short sales cycles, rewards innovative design, benefits from customization).

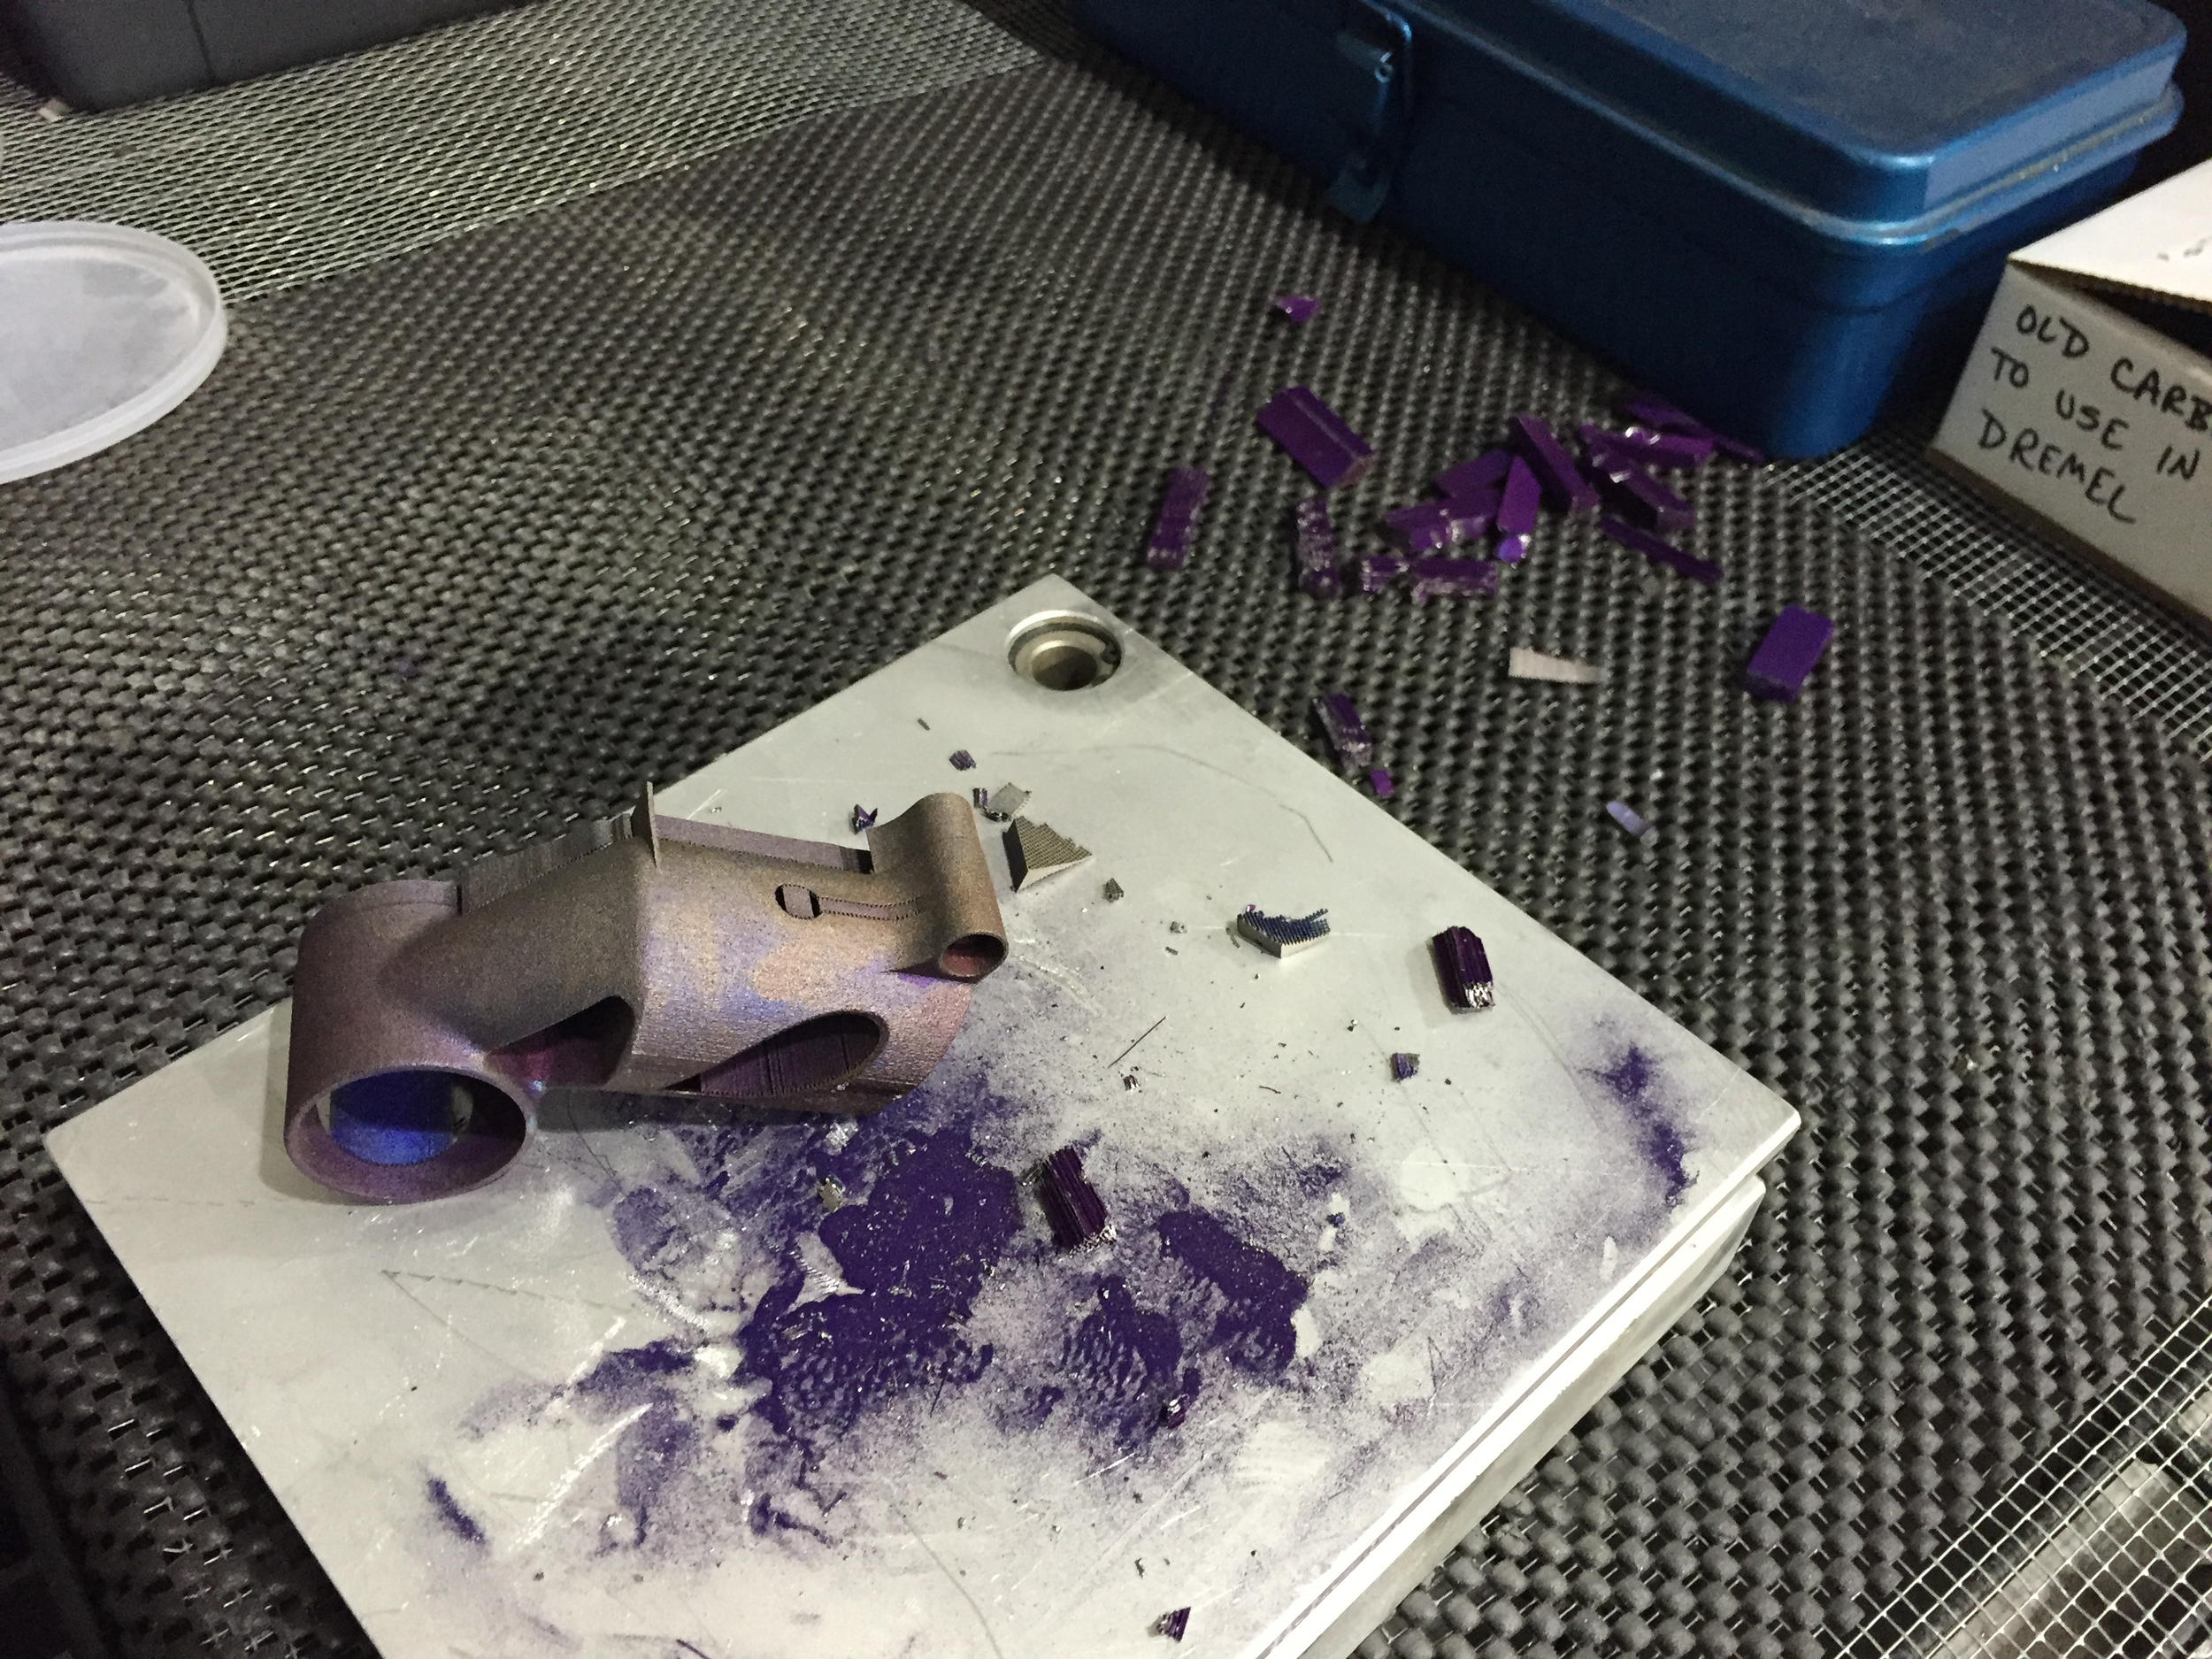
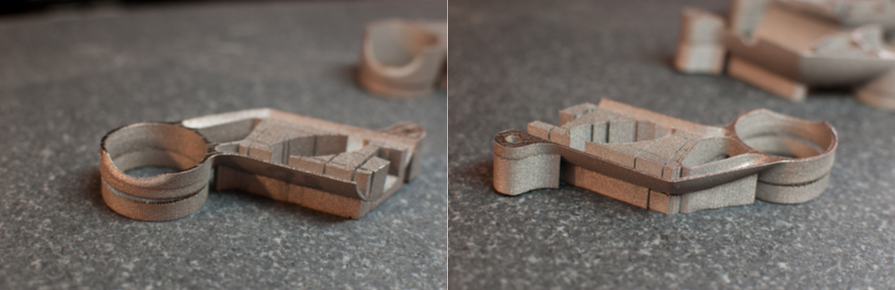
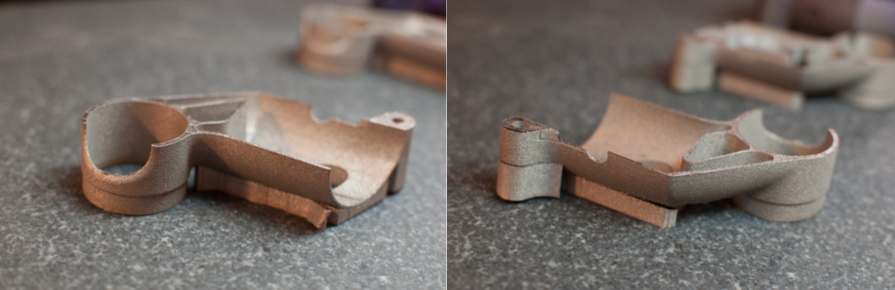
Today, developing metal 3D printed parts is an expensive process, and it's difficult to estimate how difficult a project will be. So to begin, an easy place for me to provide value has been to explain (in sometimes painstaking detail) the experience I've had over the past year and a half. Because there's so little public information about the realities of  metal powder bed fusion, writing on that subject has allowed me to boost my profile quickly. 

But more importantly, it has encouraged other people who are working on similar problems to offer collaborations. This has helped me twofold: First, it has in many cases resulted in decreased costs on my end, as the people and companies that I'm collaborating with have given me prototype parts in exchange for me writing long, in-depth descriptions of what they do. But even more significantly, these collaborations have given me unique opportunities to see past the marketing and sales messages and talk directly to the engineers who know the state of metal powder bed fusion best. This has allowed me to advance my own level of knowledge much more quickly than I otherwise could have, and has given me access to people who I can now turn to when I'm stuck.

To be sure, I have a *ton* to learn - and ultimately I'll never know as much as the seasoned professionals who I'm working with now. But between the hands on experience that I'm getting by building bike parts, and the access I now have to the most advanced research organizations in the world, I find myself in an ideal position to identify what aspects of today's manufacturing ecosystem most desperately need fixing - and who the most well positioned players are today. And that, plus the (I hope) sincerity, honesty, and intelligence that I've employed in writing about my own development process, puts me in a position to be a key part of whatever team ends up fixing them. 

So, in short, the master plan is:

  1. Build compelling 3D printed products.
  2. Use the exposure I get from that process to learn as much as possible about the industry.
  3. Use that knowledge to identify the biggest problems today, and find out who's best positioned to fix them.
  4. Form like Voltron with those people, and together make sustaining and powerful changes to the way that the product development life cycle works.

Don't tell anyone.


ps - Hat tip to Elon Musk, whose strategy (and how he communicates it) rocks.
pps - I also explicitly want to bring more advanced manufacturing development to New York City, which I believe is the best place in the world to do serious work.

Share

Wanting

Added on by Spencer Wright.

From a piece in The New Inquiry on the Women's World Cup, and how absent desire is from most women's public lives:

I never thought to put them together: that having role models who spoke to my extraordinary self-consciousness could have helped me reap the benefits of sports.

First: This piece is not about me, and I don't mean to make it about me. But I liked it, and there's something in it that really resonated.

As a kid I felt similarly self conscious, and had a really hard time expressing myself physically. It wasn't until well into my adult life that I felt comfortable trying at sports, but during high school an alternate physical activity presented itself: construction.

I began working on jobsites as a teenager. My dad was (and still is) a contractor, and he gave me a generous (I mean this sincerely) opportunity: I could start out like anyone else, as a laborer. My first summer in construction was spent largely in a basement crawl space, chipping cinder blocks out with a sledgehammer and then dragging the rubble upstairs, outside, and into a dumpster.

I loved it. It was the first time in my life where I had been assigned what amounted to a feat of strength, and there was no shame in me showing the signs of physical strain.

I think somehow that these experiences are directly related to the discomfort I feel about phrases like "hardware is hard." In my experience, basically everything is hard - if you're doing it right. It's something I've tried to keep in mind, especially as more and more of my identity has been tied to taking on big, challenging, physical projects.

Share

"Just Press Print"

Added on by Spencer Wright.

This is a total load of crap:

The high cost of tooling up a factory has long been a barrier to developing niche products. But now anyone with an idea and money could go into small-scale manufacturing, using computer-aided design software to create a three-dimensional drawing of an object and letting a commercial 3-D printing firm do the rest.

Some of the shit that's written about 3D printing *really* irks me. The above quote totally misses two key truths:

  • 3D printing - regardless of the technology - is highly immature. The idea that a designer can "let [someone else] do the rest" is just plain false.
  • Conventional manufacturing is actually *really* easy to do fabless; the "barrier" they refer to is a total misrepresentation.

I'm honestly excited for the future of manufacturing, but articles like this one only froth the market - resulting in less focus on the today's most interesting and pressing problems.

Share

Speed to product != Speed to learning

Added on by Spencer Wright.

When I joined Undercurrent, I found one phrase to be in particularly heavy use: "Speed is the new IP." I liked it, and I'm sure I used it in arguments from time to time. But over the past year I've developed some skepticism - especially given the wide variety of contexts in which we encourage our clients to go faster.

You see, I'm focused on learning as fast as I can. At times, that will mean releasing products really quickly. But immature products rarely teach you anything useful. In order to learn - in order to get the IP, the competitive advantage that you really want - you sometimes need to hold back. 

Sometimes that may seem slow; hell, sometimes it may actually be slow. But fast product cycles in and of themselves aren't worth shit. The goal is to know how to fulfill your customers' needs better than anyone else, and to be prepared to fill those needs. And if you can do that without a strenuous series of rapid product releases, all the better.

Share

Re: Makerbot's layoffs

Added on by Spencer Wright.

PREFACE to all of this: My heart goes out to the 20% of Makerbot's workforce - some 100 people - that were laid off this week. 


I think this - the layoff announcement, the Reddit thread about the layoff announcement, and the eulogies for what Makerbot used to be -  is mostly a sign of the industry (and Stratasys, though to be fair they probably knew this all along) realizing that desktop 3d printing is a relatively small market. Jordan - a colleague at Undercurrent - has this thing about "mean time to kitchen drawer," which is basically a measure of how sticky (or unsticky, if the customer ends up putting it in their kitchen drawer) your product is. I think most people don't use their Makerbots nearly as much as they anticipated, and anyone who uses a Makerbot a *lot* is likely to graduate to something a bit fancier (probably SLA). So the growth really isn't there, and what they're selling is commodity hardware and some really user friendly software, and that type of business can cut operating costs to something less than Makerbot's were while they were approaching the acquisition.

I think there are two ways forward with desktop 3d printing. The first is to drive the cost down as much as possible, which ultimately means reducing R&D and other fixed costs, and also probably paying less for labor by moving it somewhere other than Brooklyn. The second thing is to look *really* hard for the next technology. That CLIP stuff - Carbon3D - is one direction (though I don't think it's the next big thing). Or maybe it's closer to what HP is working on, though I suspect that machine will cost six figures. Regardless, I'm betting *against* FDM being the predominant desktop 3D printing technology in, say, 5 years.

Either way, you cut costs on anything that touches FDM, and invest a *lot* of money in R&D on the technology that will eventually kill it off. Which I suspect is exactly what Stratasys is doing.

Share

In his prime

Added on by Spencer Wright.

Libo is pretty much in his prime right now.

I got Libo as a puppy in the spring of 2009. At the time, I was single and living (and working) alone in Eastern Long Island. I was self employed building custom bicycle frames, and was working *hard* - and making little progress to speak of. I was pretty self conscious of my reasons for getting a dog: I was exhausted, and needed a distraction, and wanted to have someone around who would look up to me. 

I vastly underestimated the amount of concentration that owning a dog takes, and the experience was often more frustrating than I expected. It's funny to say it now, but I just assumed that communicating with a dog was going to be straightforward, and that our interests would generally be well aligned. But the truth is that Libo (like any person) has desires of his own, and it was only after striking out a *lot* that I learned how to identify & exploit the overlap between what we each wanted.

As we've both gotten older - it's really only over the past year or so - the corners of our relationship have softened a lot. I think we accept each other for who we are, and realize that a little generosity goes a long way. Which is to say that we've both grown up, and are beginning to display a little bit of maturity in our relationships.

But he still surprises me all the time. Libo is the most enthusiastic person in my life, and is more consistent and predictable than anyone I know. And while his ability to moderate himself often leaves something to be desired, I truly admire how outwardly natural he is with his emotions, and I continue to really enjoy and look forward to being his friend.

All of which is a bit weird to say, but there you go.

Share

3D printing titanium and the bin of broken dreams

Added on by Spencer Wright.

Note: What follows here describes my early experiences designing and building metal 3D printed parts. Since this post was published, I've had a number of parts printed successfully; you can read more about the current state of this work in a recent update, here.


Last December, in an industrial park in Cincinnati, I watched as Dave Bartosik set up a build platform on an EOS M280. The part he was printing is one that I began designing a full fourteen months earlier, before I had any idea of the intricacies of metals 3D printing, nor the complexity in bringing an additively manufactured part from design to prototype.

My part, being sintered from titanium 6/4 powder.

My part, being sintered from titanium 6/4 powder.

While consumer 3D printing community has coalesced around openness, the industrial market tends to be opaque. Sure, anyone can design parts with free software. But the process of bringing those designs to life requires hundreds of engineering hours, tens of thousands of dollars worth of software, and millions of dollars worth of tooling — and even then, developing a single working prototype is a long and expensive process.

To many people, 3D printing offers a new manufacturing paradigm. It stands for rapid iteration, customization, and distributed fabrication. But today it’s arduous and costly, and the knowledge base needed to enter the market is concentrated in a select few people.

Here, I’ll share what I’ve learned about 3D printing titanium parts so far — and what other designers should expect out of the process as well.

A primer on 3D printing metal

Within the maker and startup communities, a 3D printer is essentially an extremely accurate, robotic, hot glue gun, capable of making complex plastic parts within a few hours. For some people that means making functional models more quickly, and with less interaction with outside suppliers, than if they were machined or injection molded. For others it means a couple of desk trinkets, and for the really ambitious it provides a peek into a new way of bringing products to market, replete with on-demand, custom-to-order parts, produced just walking distance from where they’re used.

My background is in short-run manufacturing. I spent a few years building custom bicycle frames, and later ran a small prototyping shop, where I designed and tested robotic door assemblies on fast development cycles. When people talk about the need to iterate rapidly, I get it.

For five years, I worked in a shop that could make machined and welded parts on demand. There were always hiccups — prototype development is often more art than science — but in general we could, with a day’s notice and a bit of help from McMaster-Carr, take a 3D model and create a useable part from it. So when I think of 3D printing metal, I keep those kinds of capabilities (which are shared by easily thousands of shops around the US) in mind.

Metals parts are 3D printed in one of three ways:

  1. Binder jetting, in which powdered metal is sprayed with glue to get it to stick together — and later infused with a second metal to make the bond permanent. The most common binder jet printers are made by ExOne. In general, binder jetting is used to create prototypes or parts that require low strength.
  2. Directed energy deposition, in which metal is sprayed or fed at a part — and melted to that part by electric arcs or lasers upon contact. DED machines vary significantly; see DMG Mori and Sciaky for context. Directed energy deposition is even more niche than binder jetting; its application is mostly limited to repairs and very large aerospace parts.
  3. Powder bed fusion, in which a bed of powdered metal is selectively fused (through sintering or melting) by a laser or electric arc. The most common powder bed fusion machine is probably the EOS M280, but Concept Laser, Arcam, and Renishaw (among others) all have their own offerings. Powder bed fusion has a variety of uses in both production and prototyping. It supports a wide range of materials (the most common being titanium, stainless steel, and cobalt-chrome) and with care can be used to create lightweight, strong, and highly customizable parts — just like mine. But the process is far from easy and is definitely expensive.

Though it’s used extensively within the aerospace, medical, and tool & die industries, there are no metal powder bed fusion products on the consumer market today. Which made me think: why not?


The powder bed fusion process

When it comes to machine design, humans aren’t nearly as creative as you might think. The basic model for milling machines has been around for more than a century, and despite the fact that the process has changed significantly during that time, the overall layout of industrial tooling today is much the same as has been since the Civil War. Today’s powder bed fusion machines are no exception: If you squint just right, they look a lot like CNC vertical mills.

Powder bed fusion machines consist of three core parts: The build platform, a material source & recoater, and a source of thermal energy.

During operation, a thin layer of powder is spread by the recoater blade across the build platform. Then the heat source — either a laser or an electron beam — scans across the build platform, melting powder selectively as it goes. Where the metal is melted, it fuses to the metal around it, creating a solid part. After one layer is scanned, the recoater blade spreads another layer of powder and the process repeats.

Printing things this way is slow; a part the size of a juice glass might take ten hours. The recoater takes a few seconds to spread each layer, and although the laser is moving incredibly fast, it takes some time to scan the cross section of a part line by line. Add to that the fact that each layer is about eight ten-thousands of an inch thick, and you see how anything larger than a thimble would take a long time to complete.

Although powder bed fusion can be done by both lasers and electron beams, lasers are far more common. Electron beam melting (EBM) is notoriously difficult to control, and although it has some advantages, EBM parts tend to have very coarse surfaces and require more post processing as a result. EBM also suffers from relatively low market penetration; by my count, there are fewer than five service providers for EBM in the US.

By comparison, laser sintering (which I’ll refer to as DMLS, for direct metal laser sintering, though that is technically an EOS trade name) is almost ubiquitous. I’m aware of about seventy US shops offering metal laser sintering in-house, and even consumer-facing providers like iMaterialse offer DMLS. And although EOS sells far more metal laser sintering machines than any of their competitors, the market is still competitive — and that competition is beneficial to the industry as a whole.

Within the aerospace industry, DMLS has a high adoption rate — at least in an R&D context. In fact, my collaborators and primary tour guides to the industry (Dave Bartosik and Dustin Lindley) both began their careers in additive at Morris Technologies, the aerospace DMLS giant that was acquired by GE Aviation in 2012. Between the two of them there’s about as much experience printing titanium parts as anyone else in the world.

But for all the work that has gone into understanding the properties of additively manufactured parts, the process is still very much in its infancy. It is not in any sense a mature technology, and the result is that each new part you design for DMLS — and, indeed, each new copy of the part that you print — is very much an experiment. Small variations in geometry and orientation can have huge effects on the way that a part prints. The laser’s scanning path is a closely studied subject, but much is not yet understood about it. Even keeping those variables constant, it’s often the case that building the same part on a different machine will produce very different results.

All of which is to say that DMLS is anything but plug-and-play. Even when a design has been optimized specifically for the process, it often takes dozens of tries before a functional part comes out of the printer. And the process of troubleshooting a failed build — even at the most advanced DMLS shops in the world — still involves a lot of trial and error.


Part constraints

In general, parts that benefit from 3D printing tend to have the following traits:

  • Benefit from weight reduction
  • Benefit from customization
  • Complex geometries
  • High inventory costs and/or long lead times

My seatmast topper, in full and half-section views. Note internal cavities in the center neck area.

The part I’m building is a seatmast topper for high end road bicycles. Cyclists want lightweight, custom parts. Custom bicycles are increasingly popular with consumers, and they carry high price tags and long lead times. Broadly, it’s my suspicion that more and more bicycle components will be produced on-demand through 3D printing — if only for the simple fact that within high end cycling, sexy sells.

At about 60 grams, my part is fairly lightweight. It’s also relatively small, and fits easily within nearly every DMLS machine’s build platform. And because of its function (seatmast toppers are used to hold a bicycle saddle onto the frame) its structural requirements are fairly predictable. These factors, plus the fact that seatmast toppers are easy for almost any cyclist to install on their own bike, make it a good candidate for 3D printing.

But that doesn’t mean it’s easy to print. My part consists of two cylinders, oriented 90° apart and joined together by a funneled neck. The part’s wall thicknesses fall between 1mm and 1.75mm — roughly .039"-.068". And it’s critical that these walls not vary much in thickness; if they end up just .010" thinner (for comparison, a sheet of paper is about .004" thick), the part could be unusable.

Harder yet, the inner diameters of both of the cylinders must be accurate and consistent. Again, variations of just .005" can have a big effect here — and if the cylinders end up with oval cross-sections, the part won’t work at all. And the titanium 6/4 that my part will be made of (which is named for its 6% aluminum, 4% vanadium content) is notoriously prone to built-in stresses, meaning that we’ll have to be very careful setting up the build parameters and support structures to prevent the part from turning into a pretzel during the process.

As with almost all 3D printed metal parts, mine will require some degree of post processing; at an absolute minimum, the clamp bolt threading will need to be tapped. But because of the physical tolerances listed above — and the mechanical and aesthetic properties of DMLS parts, which tend to be rough and unpredictable — it’s likely that extensive finishing will be required on both the inner and outer surfaces of the part.

In short, my part’s manufacturing process chain was always going to include some subtractive steps. There are many feature types that 3D printing simply isn’t intended for, and I knew going in that this part would require more than one process as a result. But until we picked a build orientation — and built parts that passed fit & finish tests — we wouldn’t know for sure what our total process chain would look like.


Build orientation

My prototyping partner, DRT Medical— Morris, prints titanium parts on an EOS M280 — the workhorse metal 3D printing machine for American job shops. Based on my research, EOS’s market penetration outmatches each of their competitors by five to one. As of November 2014, EOS only lists eighteen service-ready M280s in the US, but their data is clearly incomplete; I wouldn’t be surprised if the real number was triple that. Moreover, the vast majority of DMLS machines are purchased by OEMs, who use them for internal capacity only, and my suspicion is that the proportion of EOS machines behind closed doors is similarly large.

The M280's build platform measures 250mm (x) by 250mm (y), and is has a maximum build height of 325mm (z), including the build plate. My part is about 70mm long (x), 37mm deep (y), and 90mm tall (z).

bk1033 drawing.jpeg

A common misconception about 3D printing is that the unit cost doesn’t vary much with quantity — that printing one part is just as efficient as printing a thousand. Granted, 3D printing doesn’t require tooling per se, but non-recurring engineering costs are absolutely to be expected. In addition to the time spent determining an optimal build configuration, there are significant changeover costs when a DMLS machine operator goes from printing in, say, titanium to stainless steel — which some low-volume service providers might do on a weekly basis. Moreover, metal 3D printing providers don’t normally print multiple orders in one build. In other words, if I buy a titanium part at the same time as another customers does, they’ll usually run those orders in two separate builds — even if both parts might fit on the build platform at the same time.

The exact math is hard to reverse-engineer, but there are generally four variables that determine the cost of a DMLS part:

  • Finished part mass. There are two subcomponents here: Raw material cost, plus the time it takes the laser to sinter the part. Raw powder costs between $300 and $600 per kilogram. My part weighs about 60 grams, which puts the material cost in the neighborhood of $30. But that 60 grams will take about eight hours to sinter, and the cost of sintering time adds up quickly. As a rough guide, expect to spend on the order of $100–200 per hour for part build time.
  • Support structure mass. DMLS parts require solid support structures to tie them to the build platform, and those structures are made of the same metal powder that the part is. If your part has a lot of overhanging geometry or requires additional support structures for other reasons, you’ll pay for those (and the time it takes to sinter them) as well.
  • Part height. Across all types of manufacturing, capital expenses (tooling, etc.) are paid off over a period of years. In DMLS, part height correlates directly with time spent recoating the platform with new powder, and that in turn equates to a higher tooling cost that the supplier needs to pay off during your build. As a result, designers are incentivized to orient their parts as close to the build platform as possible, to reduce build height and hence reduce recoating time.
  • Number of parts per build. Because the setup and powder recoat time can be shared across multiple parts, buying in batches (when possible) will generally be less expensive than buying one-offs.

Build configuration 1: Part on it side. Ten parts, ~40 hours. Image courtesy DRT Medical — Morris

In my case, those last two factors act directly against each other. If I orient the part on its side, I can fit about 10 parts per platform, with a ~40 hour build time — about 4 hours apiece. But if I orient them vertically (upside-down ends up being more favorable), I can print 24 parts in a ~85 hour build — about 3.5 hours per part.

Build configuration 2: Part upside-down. 24 parts, ~85 hours. Image courtesy DRT Medical — Morris.

At this point, Dustin and I spent some time thinking through the manufacturing process chains for each of these configurations. It’s very likely that we’ll end up needing to machine the inner diameters of both of the part’s cylinders, and we wanted that process to be straightforward and involve as little custom tooling as possible (post processing DMLS parts often requires extensive custom tooling). As far as we could tell, build configuration 2 was going to be slightly easier — mostly because the long ID could be machined while the part was still on the build platform. But the difference was very difficult to quantify, and in the end our build orientation was determined for a much simpler reason: powder availability.

The DMLS powder market is, like most things in this industry, changing rapidly. Powdered metal is expensive to produce, and the particle size, shape, and consistency are critical to finished part characteristics. And while prices are going down rapidly (double digit percentages year-over-year, I’m told), service providers are still stuck with having a large chunk of money tied up in raw powder powder at any given moment. Add in lead times, and the fact that titanium powder isn’t particularly fun to handle, and you can see why job shops would only want to keep as much powder on hand as they absolutely need.

In the end, we ended up building my part on its side simply because DRT was getting towards the end of a batch of powder, and the taller orientation was going to require more than they had on hand. Which is possibly, given the small quantities these parts will probably be produced in, the right orientation anyway — and was a less expensive build to boot.

At this point, our goals were explicit: Determine the minimum amount of post processing necessary to produce a working part.


Stress & build failure

It’s critical to remember that 3D printed parts move as you print them. The same is the case with other manufacturing methods as well (injection molded parts shrink as they cool, machined parts warp as they’re cut, etc.), but DMLS creates extreme thermal gradients, and the net effect is that stresses are built into the part layer by layer.

Build orientation affects stresses in *huge* and unpredictable ways. See this paper, by Amanda Wu, a researcher at LLNL, for more.

Build orientation affects stresses in *huge* and unpredictable ways. See this paper, by Amanda Wu, a researcher at LLNL, for more.

Predicting built-in stresses is an incredibly difficult task, and is the topic of a lot of basic research. At the moment, the best we can hope is to analyze and understand the stresses that are built into parts once they’re complete; predicting them before they happen is still a long way off.

Despite the fact that stress prediction is very much a dark art, the correlation between laser sintering and welding is not a trivial one; many of the same principles apply to both. But when approaching a new part, it’s almost always the case that the best way to deal with potential problems is through trial and error — and then adding and removing support structures as necessary.

This is a key point: powder bed fusion involves welding your part to the machine while you build it. The build will definitely fail if the part lifts off the build platform (when this happens, the recoater blade strikes the part. In general it doesn’t damage the machine, but I’m told it can be… exciting), so a lot of effort goes into designing clever — and hopefully not too massive — solid and lattice support structures to keep the part where it’s supposed to be.

Even if the build itself doesn’t fail, internal stresses can still render it unusable. This is why most parts are stress relieved (a heat treatment process) after they’re built and before they’re removed from the build plate: doing so allows the crystalline structure to relax, preventing failure later.

Going into the build process, I was warned many times that cylinders oriented parallel to the build plate are notoriously difficult to build. The stress profile around the circumference of the cylinder will tend to vary widely, and the result is that you generally wind up with a big oval. But other than orient the part at a 45° angle to the platform (and risk ovalizing both cylinders), our options on this part were limited. So, we started as simply as possible, and iterated as needed.


Support structures & Iteration

Once the build is complete and the part is wire EDM cut off the plate, support structures are removed manually.

Once the build is complete and the part is wire EDM cut off the plate, support structures are removed manually.

While I was in Cincinnati, I visited MicroTek Finishing — a major player in the metal 3D printing world. While there I spoke with Tim Bell, who related an anecdote about his time at Morris Technologies, the aerospace 3D printing giant that was acquired by GE in 2012. Tim was a product development leader at Morris, and he talked of a large bin that they had in their shop. It was called the Bin of Broken Dreams, and into it went an endless stream of failed parts.

My part has now been printed in six different build configurations. We (and by we I mean Dave Bartosik, whose creativity and enthusiasm for getting the build to work was inspiring) added solid supports in a number of places, chasing built-in stresses around the part with each iteration. The latest prototype, although nonfunctional, is nevertheless a big improvement on the earlier builds — and the process has taught us a lot about the idiosyncrasies of my design.

To begin, Dave let Materialise Magics (the industry standard for support structure generation software) do its thing with no manual intervention. Magics generates mesh support structures, which are scanned every other layer of powder (solid regions of the part are scanned every single layer). As a result, they’re very easy to chip off the part — but don’t have the same strength that solid supports do. As internal stresses proved to be an issue, Dave added solid supports to keep the part undistorted and tied to the build platform.

Build 1

In this build, the part is laid on its side and supported only by mesh supports. The build failed at only 15.6mm in the z-direction, when the recoater jammed on the saddle clamp end of the part, which had lifted from the build platform.

Build 2

Here, the seatpost clamp cylinder is firmly fastened to the build plate. But the stresses just concentrated on the other end of the part, pulling the bolt boss and some of the front edge off of the platform at a height of 22.7mm.

Build 3

Both ends of the part — the saddle clamp and the bolt boss — are firmly anchored to the build platform. But this created a complex bending moment, pulling the center of the part upwards; the build failed at 22mm.

Build 4

Here we’ve got solid supports on both the saddle clamp cylinder and the bolt boss, and added an additional solid rib to the middle of the part, tying it down there. This is the first build that completed; all of the others had failed midway through. We’re clearly getting closer, but the bottom of the part has distorted, pulling in and looking like a big “D”.

Build 5

To prevent the bottom of the part from distorting like in Build 4, we added a second solid rib. It helped, but only below the centerline of the cylinder; above that, the wall still pulled in.

Build 6

Build 6 finally produced a part that’s generally round and complete. This was achieved by extending the lower rib up the side of the part, giving external support to the entire bottom edge of the seatmast clamp cylinder. But although the top and bottom of the seatmast clamp are both basically round, the internal stresses still needed to go somewhere — and ended up bulging out the middle of the tube instead.

Throughout each of these builds, three things have remained consistent. First, the surface finish on the exterior of the part leaves much to be desired; it will definitely need to be finished in a separate step. Second, the surfaces that needed to be EDM cut from their solid supports (the saddle clamp and the bolt boss) are irregular, and will need to be smoothed into the rest of the part. Third, the internal diameters will almost definitely need to be post-processed by machining or EDM — even the saddle clamp, which overall had passable surface finish, was undersized by .020" — about four times the desired variance.

The net effect is that after six build iterations — each of which took almost two full days to set up, build, stress-relieve, and cut off of the build plate — we still don’t have a functional prototype to test.


Takeaways

What to take away from this? Well, prototyping is hard — but everyone knows that. My primary observations have more to do with the state of the industrial marketplace, and the maturity of metal 3D printing processes, than with the fact that we’ve now put six parts into our own bin of broken dreams.

File processing

As with consumer 3D printing, industrial 3D printers work exclusively from STL files. This produces a total break in the design-to-manufacture process. When I export an STL to send to a manufacturer, all of the underlying feature data is lost; all that’s left is a shape. This is drastically different from the conventional manufacturing world, where parts are regularly built directly from underlying design files.

Tolerances

For the vast majority of machined parts, any single dimension is expected to be accurate to within .005", regardless of size; in other words, a quarter-inch hole should be between .245" and .255", and a one-inch hole should be between .995" and 1.005". For a relatively small cost, designers can specify even tighter tolerances, and the means of achieving them are predictable and not overly complicated. But with additive, tolerances accumulate across the part at a rate .005" for every inch of distance. That’s fine if you’re building a one-inch part (whose dimensions will be between .995" and 1.005"), but larger parts can be problematic; a ten-inch part will be between 9.950" and 10.050" — a decidedly generous tolerance. Moreover, these tolerances don’t always stick; many of our early prototypes didn’t come close to meeting them. And when a part prints out of tolerance, the way to fix the problem is essentially to fiddle with the underlying design and then build it again.

Intellectual Property

Across the metal 3D printing industry, a stream of contract manufacturers told me the same thing. DMLS build processing is hard, they say. And the only way to maintain a competitive edge is to invest countless time and money into R&D — and then guard institutional knowledge vigilantly. On many occasions this is referred to as intellectual property, but the truth is that it’s closer to expertise; what’s being developed is craftsmanship, not patentable tools or methods. But whatever the name, the effect to designers is stifling. Regardless of manufacturing method, the design-to-manufacture process benefits from transparency; if a build fails, then I as a designer want to know the reason — and adjust my underlying design accordingly. Until the additive supply chain opens up to sharing its experience in the design-to-manufacture process, new DMLS products will be few and far between.

Undistributed Manufacturing

Today, 3D printing metal parts via a distributed supply chain is a myth, full stop. And while I’m as excited about that vision as the next guy, distributed manufacturing will continue to be a pipe dream for the foreseeable future. A distributed manufacturing ecosystem can only exist once there’s a robust network of suppliers capable of making parts repeatably. And while it’s my sincere feeling that the most hardworking, intelligent, and visionary people in manufacturing today are working in 3D printing, there simply isn’t currently a rich network of DMLS suppliers. For instance, the closest DMLS-equipped shop to New York City is a 200+ mile drive away. Meanwhile, MFG.com lists 68 machine shops within a 150-mile radius. If distributed 3D printing is to become a reality, the install base must increase by orders of magnitude — and the reliability and repeatability of the processes must improve dramatically as well.

In-Process Monitoring

In conventional manufacturing, parts are checked between operations to ensure that critical dimensions will be met. But the current generation of industrial 3D printers have little in the way of in-process monitoring, with the result that distortion isn’t detected until the build fails altogether. Although there are hints that this may be changing (B6 Sigma has announced some ambitious plans recently, and a lot of primary research is being done on the subject), the fact remains that until we’re measuring and analyzing the factors (thermal gradient, sound, vibration, etc.) that indicate build failure before it happens, trial-and-error will be the only way prototypes are developed.

The Process Chain

3D printing is very, very good for certain things. But it is not a one-stop process. For now and the foreseeable future, additive manufacturing will be a poor method of creating a number of important mechanical features, including many aspects of fastening and articulation. In addition, the surface quality of 3D printed parts will be unacceptable for anything requiring tailored aerodynamic features, and will be similarly poor for products whose fit and finish are of high value for aesthetic reasons. This is not to say that those aspects won’t improve; they will. But while I expect additive manufacturing to be an important part of the way parts are produced in the future, it’ll be a long time before it’s used to produce a wide range of products. And for those products which are well suited for 3D printing, their total manufacturing process chain will include subtractive tools (machining, honing, polishing, etc.) for the foreseeable future.


Next steps

My part has come a long way. Just having a physical prototype in hand makes a huge difference in understanding its benefits and drawbacks, and I continue to believe that with continued research and prototype development, I will find a way to make it commercially viable and attractive to high end cyclists.

But there’s much work to do. Moving forward, I see three primary directions to explore:

Keep the current build orientation, and continue to iterate on support structures as necessary.

At this point, it’s clear that we need to rethink the way we’ve been mitigating internal stresses. The external ribs are working somewhat, but even if we can add enough of them to make the build work, they leave ugly marks on the outside surface which require additional post-processing. Instead, I plan to experiment with reinforcing the inner diameter of the seatmast clamp cylinder. One thought is to create an internal lattice (like those that Frustum’s software creates), which would provide rigidity during the build and then be removed via machining afterwards.

Change the build orientation

Turning the part so that it’s upside-down on the build platform — with the seatmast clamp on the top — will offer significant advantages. The saddle clamp already has a thicker wall than the seatmast clamp, and is likely to resist distortion more easily. And with the seatmast clamp oriented in the z-axis, it’ll be in much less danger of distortion.

Try EBM

The electron beam melting process preheats the entire build platform to just under the melting point of titanium, and so generates much lower thermal gradients — and as a result less internal stress — than DMLS. EBM also generally requires fewer support structures, which is helpful for part cleanup. However, the surface quality and minimum feature size of EBM is significantly worse than DMLS, so EBM would probably require a longer overall process chain, with more material removal than DMLS would.

Regardless, I’ll be continuing this work over the coming months. These technologies are changing rapidly, and any ambitious product designer would be wise to pay close attention to their development. And only by experimenting with actual parts can anyone hope to keep up.

I believe that functional, engineered consumer products made by additive manufacturing are an inevitability. But as a product manager today the viability of metal 3D printing is totally opaque, and that will only change by careful study of the efficiencies (and inefficiencies) of the additive manufacturing toolchain.

Join me in working to make that a reality.


Thanks

First, thanks to Dustin Lindley (of UCRI) and Dave Bartosik (of DRT—Morris), without whom all the cool stuff described above would have never happened. Thanks also to Greg Morris (who originally connected me with Dustin, Dave, and Chuck Hansford at DRT), to Clay Jones and Jordan Husney for their creative inspiration and infectious enthusiasm throughout the process, and to Clay Jones and Mike DiGiulio for reading early drafts.

Lastly, thanks to Undercurrent, which is providing critical funding for this project — and which I am proud to call home.

This article originally appeared in three parts on 3D Printing Industry.

Share

"Do you think you're a workaholic?"

Added on by Spencer Wright.

Ada asked the question late last night, just as we were going to bed. It's been a long week, and I've worked until about midnight every single night. That's been the case for most of the past six months: In general, if I'm not working on The Public Radio it's because I've spent all evening clearing my inbox out, or writing my newsletter, or (as was the case much of this week) working late on Undercurrent stuff. And if I'm honest, the same could be said for most of my adult life. 

Regardless, though I suppose by way of a technicality, I've never considered myself a workaholic. I think of a workaholic as someone who is addicted to work - to whom the goal is working itself. 

I want freedom, though. I want to be recognized for my intuition, and my intelligence, and for the effort I put into the things I do. I want people to say "He doesn't fuck around. And he notices real stuff, and he turns his observations into really valuable output - whatever the form." And then I want to be given the benefit of the doubt - the freedom, both creative and financial - to do just that. 

It's possible - likely, even - that my efforts are misguided. At least within traditional working environments, and even at companies that espouse two pizza rules and generally empower their employees (I'll pause here to note that Paul Graham's How to Make Wealth, and especially the section titled "Working Harder," is an absolutely excellent discussion of this topic), the value of individual contributions is extremely difficult to measure, and it's correspondingly rare to have one's individual efforts result in the kind of graduation that I seem to want. And moreover, one might argue that the freedom I'm looking for is a Macguffin: Once I get this recognition, what will I do with it? Work? 

And yet, I continue. Even as I lay in bed, I was thinking of what I wanted to do over the weekend, with the explicit intention of carving out more breathing room for myself. And I awoke this morning feeling no different: There are things I want very much to work on today, and in my mind I can see how they add up to something more than the sum of their parts - to myself, my users, and to, I hope, the future of my creative path.

Share

Directions in automation adoption

Added on by Spencer Wright.

I've been spending a lot of time looking at industrial automation the past few days, and had an idle thought:

I've touched on this before, if only obliquely, when writing about MFG.com's role in manufacturing logistics. Much attention is being paid to companies who want to simplify (or circumvent) some part of the product development value chain. Many of these are companies I admire, and think are doing really valuable things. Take Within, whose 3D design software generates structures that are driven directly from functional constraints (but can't, as far as I can tell, deal well with thin-walled structures). Or Willow Garage's PR2, the really slick research robot (that takes charmingly long - 20 minutes per bath towel - to fold laundry).

Each of these is an incredibly impressive feat, and one that follows an ambitious (and I would argue honorable) line of thinking:

If we can encode all of the information needed to complete a routine yet complex task, then we can use machines to automate the process, freeing up our minds to do other (presumably more important) things.

But consider an alternate proposal:

If we can get machines to mimic a series of behaviors that humans can plan and execute with relative ease, then we can decrease the amount of rote mechanical work that humans need to do.

This is the tact taken seriously by Baxter, the admittedly not-too-serious (but cool nonetheless) humanoid task robot built by Rethink Robotics. Baxter learns by physically training his movements, presumably by the technician who he's "collaborating" with:

Even the traditional robotics companies, like Kuka, are moving in the direction of using robots simply to execute the complex tasks that humans calculate and perform with ease. Here a Kuka robot is trained how to clean a permanent mold by a BMW employee:

Both of these robots' use cases share a key feature: There's still a human doing the "hard" planning and calculation about how the task will be completed. In each case the robot doesn't understand the physical constraints or goals per se. Baxter has some awareness of his surroundings for sure, but all he knows is that his arms hit something; he doesn't have the vision or awareness of why that happened or how to correct for it.

Similarly, the Kuka bot doesn't understand that he's cleaning a mold, or have the facilities to learn how to do better work. He's just repeating a toolpath that he knows a human told him to do. Which, in this case, is good enough - and a hell of a lot faster than waiting for a computer vision expert to give him the intelligence required to do better.

I'm not sure what the implications of this are for the companies working to automate the design and supply chain. But the philosophical difference is striking, and I must say that the more hands-on model is very compelling - and I expect it to be so for the foreseeable future.


Parenthetically: All of the industrial 3D printing market is currently driven off of this same model: An intelligent, experienced technician makes manual edits to 3D CAD data in order to get a part to print within its design constraints. Anyone who suggests that build optimization is "right around the corner" is, in my opinion, *not* to be trusted. We're in a world of basic research still, and an automated design-print-post process chain is many years away.

Share

You're buying services

Added on by Spencer Wright.

A thought occurred to me this morning:

As you move up the value stream - away from on-the-shelf packaged goods and towards raw materials - the fundamental nature of what you're buying changes dramatically.

At the retail level, it's relatively easy to infer the correlation between price and brand language (which may or may not be true product features). 

The next step up - buying commodity manufactured parts - is in many ways the most transparent. Here the brand language has been removed, and price correlates with product features themselves. Parts that require more, more complex features are more expensive to purchase.

But as you move up higher still - to the point where custom designed parts are being converted from raw material - pricing moves away from features and towards services. Whether or not you're cognizant of it, the price that you pay has moved to a time-and-materials model. Even though you may ask for a part count: You're buying services.

Share

Pathing Kickstarter

Added on by Spencer Wright.

The path to The Public Radio’s Kickstarter campaign, and how we see the challenges ahead.

Background

About eighteen months ago, Zach came to me with an idea: an FM radio that only tunes to one station. We had recently completed MITx’s circuits & electronics course, and were looking for a project to apply ourselves to. This one was perfect: it was small, simple, and catchy. The Public Radio was born.

An early prototype.

An early prototype.

Over the following year, we chipped away at the project on nights and weekends. It’s hard to say how much time was spent, but 400 hours each is conservative. We tracked expenses casually, but have records totaling about $5000, most of which went towards electronic parts, printed circuit boards, and prototype mechanical components. All in all, we invested the equivalent of tens of thousands of dollars on the project, and got a *ton* of value — in experience, mostly — out as a result. Regardless of where the project went, we both strongly felt that the trade was worth it.

Preproduction

In February, we launched a beta version of The Public Radio on Grand St. It was a great way for us to get a few units into the wild, and forced us to come up with scrappy solutions to the problems we’d face ahead. A lot of them weren’t permanent, but they were good enough — and getting support from random strangers felt great.

But building the radios was painstaking. We did all of the assembly in my kitchen in Bed Stuy, spending long nights hunkered over soldering irons to ship on time. It was tough, especially as — even ignoring our labor — we were barely covering our own costs.

COGS

Calculating our costs of goods sold is a bit tricky; different parts scale on totally different curves. A few notes:

  • Most electronic components get cheaper as you buy more, but they don’t get really affordable until they buy them in quantities of 2500 or more. Our FM IC (the core of The Public Radio and one of our most expensive components) costs $12.76 if you buy one; $11.88 each if you buy a hundred; $3.51 each if you buy a thousand; or $1.85 each if you buy a full reel of 2500. Most off-the-shelf electronic components follow a similar pattern.
Our first shipment of potentiometers. 

Our first shipment of potentiometers. 

  • …But, not always. Our volume potentiometer is a non-stock part; we needed to order them in quantities of 1000 direct from Taiwan. They cost $.45 apiece, plus a $30 banking fee (international wire transfers are a PITA) and $155 in shipping. Rollup cost: $.63 each. This will go down only *slightly* with quantity: if we purchase in quantities of 10,000, we save $.01 per piece.
  • Our jars don’t scale particularly well. They’re sold in sets of four, which you can buy retail for $4.99. To buy wholesale you need a $100 minimum order, at which point the price per 4 units is $3.28, but the shipping costs (these things are bulky and fragile) put the rollup cost per unit at $1.78. If you get up to a $500 order, they apply a flat $125 shipping fee, plus $30 to ship it to our (residential) address; that all rolls up to about $1.07 apiece. If you get to $2500, though, the shipping is free, putting the unit price at $.82 — assuming you’re shipping to an address with a loading dock. The net effect: We want to be buying jars in minimum quantities of 3,049 units.
  • Some parts just don’t come in quantities of one. Our first few radios used antennas we found on eBay, which worked… okay. We did a bunch of research, and found that antennas just *aren’t* made in the US. In the end, we ordered ours custom from a company in Shenzhen called Sinowares, which required a minimum order quantity of 500, at which point they cost $1.20 apiece plus $100 in shipping. These don’t scale particularly well either; at an order of 10,000, they only drop to $1.15 apiece.
  • Producing our lid in quantity will require tooling, which brings the effective unit cost up for our initial order. Our first radios had lids that were laser cut (no tooling required), at a whopping cost of $7 apiece plus shipping — by far our most expensive line item. For production, I expect to spend somewhere between $500 and $2000 in tooling. If we get them made in the US, the unit cost (not including tooling) will be roughly $1.20 for quantities of 500 and $.95 for 2500. We don’t have a clear line on Chinese production, but I expect the pricing to be lower, though somewhat less scaleable.

The end result: In small quantities (<100) The Public Radio costs between $30 and $35, plus shipping and *not* including labor. Our price on Grand St. was $40 plus shipping, which we usually lost money on.

Inspecting the FM IC.

Inspecting the FM IC.

Labor is difficult to calculate precisely. Assembling surface mount components is time consuming; we spend about an hour per radio on that alone. Then there’s QC, mechanical assembly and tuning, all of which takes an additional 30–60 minutes. Add the fact that we were shipping orders one by one, and you’ve easily got two hours per radio in labor.

All in all, our Grand St launch did *not* make us money — but it did give us a great chance to cover some of our costs as we moved towards bigger volumes. For that, it was incredibly valuable; I’d do it again in a heartbeat.

The Rub

Building electronic products by hand is hard. And expensive. So, scale it a bit.

Our ultimate goal is, and has been, to sell The Public Radio at wholesale prices direct to radio stations — who would use them as a tote bag replacement during fund drives. Remember that even if we scale our purchasing and assembly, these things need to be tuned to the customer’s station before they’re shipped. If we can tune them in batches — say, a hundred or a thousand all to the same station — then we save ourselves a *lot* of work.

Kickstarter is, admittedly, not specifically tailored to establishing a wholesale business. There are a lot of logistical challenges that we’ll face selling to individuals, and it’s unclear whether we can deal with them in a way that’s sustainable long-term. But Kickstarter allows us to get access to a big network of people, and gives an opportunity to reach out to station managers and say “we’re doing this thing; let’s talk about it.”

Preparing

Figuring out the details of the campaign were *hard.* Aside from issues in producing a video (I can only blame this on the poor on-screen appearance of yours truly; both Zach and Colin (who was super gracious about helping us out) did a great job), the real difficulty was in setting the unit price (i.e.reward level) and funding goal.

We’re offering a handful of non-radio rewards in the campaign, but the bread and butter will be the “radio monogamists” level, which consists of an assembled and tuned Public Radio, including jar. Drawing from what we learned about buying habits on Grand St., we decided that $40 is a reasonable street price; we then averaged our shipping costs across the country and added $8 to cover those. As a result, the shipped price for our mainstay reward will be $48.

To be clear, the $40 baseline here is simply an estimate of what the market will bear. When we launched on Grand St, we started at $60, but after a week or so of no sales we dropped it to $40. That was the extent of our research, essentially — we couldn’t imagine it on a shelf for much more than $40, so $40 it is.

The funding goal was trickier. In the year+ that we’ve been working on this, we’ve spent $5–10k in cash — not to mention *months* of our weekends and after-work hours — developing it. It’s been a huge effort, and releasing it to the public will be even harder. But we’ll never get that time back, and anyway it has already paid for itself (in intangible rewards) many times over.

So, you just take that out of the equation — and expect to take many, many hours of future work out of the equation too.

We ended up setting a funding goal of $25,000, which corresponds to 500 units sold at $48, rounded up a thousand bucks for good luck. In the end, the deciding argument was this: while our cost structure at $25k probably wouldn’t make us money, the experience — and pulling it off — would be totally worth it.

Fulfillment paths

The exact quantities at which our production modes shift are still up in the air, but there are a few ways we *think* this can go.

We barely fund, selling about 500 radios.

Obviously this didn’t happen, but nonetheless: At quantities of 500, we should be able to get our COGS down to about $30 (but not much lower). As a result, our income above COGS is about $10 per radio, though much of that will end up going towards payment processing & Kickstarter’s fee. Not counting costs incurred for reengineering (which would probably be minor, as the marginal benefits wouldn’t add up to much), supplier vetting, and our own labor, we’d expect net income for the whole project to be about $2500. In short, we’d lose money on the deal — but gain invaluable experience as a result.

In this scenario, we’re probably using a local vendor for our PCB assembly, and doing a lot of the mechanical assembly ourselves. There would be a *lot* of long nights ahead, and many of them would be spent doing assembly and distribution ourselves.

We overfund, but not enough to buy reel quantities or amortize our tooling.

This is roughly where we are now — somewhere in the 1500 unit range — and it’s a *very* uncertain place to be. At 1500 units and a $28 COGS (we’d save a bit of money from the increased scale alone), our net income off of a $72,000 campaign will be in the range of $6500. If we reinvest that into engineering and reduce the COGS to $21 (still speculative at this point, but not without reason), we might be able to increase our net income to about $10,000. Do we take that risk? Either way, we’ll probably be incentivized to buy a number of our components in larger quantities; how do we deal with the excess inventory? Do we push The Public Radio to become a sustained business, even if we don’t currently have the demand to support it?

The Public Radio's final assembly step.

The Public Radio's final assembly step.

In this scenario, we’re probably outsourcing our PCB assembly to a larger shop and setting up a temporary space in NYC to do mechanical assembly, packaging, and distribution. Our roles become more managerial; we’ll get help to do a lot of the manual work. The career implications here loom large: this quantity will require a lot of energy, but might not provide full time employment for either of us.

We overfund by an order of magnitude or more.

Once we get to the 5,000–10,000 unit range, the game changes. At this point we’re outsourcing most of our operation, hiring a third party logistics company, and cutting out every fraction of a cent from our BOM. Production is probably done overseas, and the entire product is reengineered for scalability.

It’s conceivable, in this scenario, that we end up drawing salaries for our work. Regardless, we’re talking about *manufacturing* here — not just a project. I‘m not sure exactly what this would entail, but it’s safe to say that we probably wouldn’t be shipping radios out of my apartment.

How we’re looking at it now

There were a few days, early in our campaign, when we weren’t sure if we’d make $25k. As I write this, we’re at $70k with two weeks left, and we’ve had interest from both radio stations and retailers for large-quantity orders.

In short, we’re moving towards something resembling a sustainable business — which, to be honest, is a bit surprising. Many are the times that we’ve told ourselves that what we were working on was good in and of itself; to have it get bigger — and offer opportunities to think about a larger scale of commerce — is exciting and weird.

Regardless, the path forward is fascinating. We’ve stumbled upon a niche product that people seem to really want, and now we have the chance — and the priveledge — to fulfill that desire. Whatever the future holds, we’re ready for it — and look forward to sharing what we learn.

Share

A few rules for communication

Added on by Spencer Wright.

I've been thinking a lot (perhaps obviously) about my beef with slide decks, and came up with a list of tentative rules that I want to hold myself to. Many of these could be generalized for communication writ large, but for now they're tailored for decks.

  • No stock images, anywhere.
  • No transition slides.
  • Charts are for displaying data.
  • No slide projection of text.*
  • List format & headings should be meaningful (no single bullet points, etc).

These are in service of two things:

  • Signal > Noise
  • Nuanced > Watered down (where applicable; nuance is in the service of other benefits - not a feature in itself)

Basically:

If my audience doesn't have the time or attention to hear an appropriately nuanced argument, they don't really want to work with me.

There's probably more work to be done on these, but they're a start - and in many circles, they're pretty radical.


Translation: Don't write an essay and then chop it up into pieces to display on a page. Paginated prose is an idiosyncrasy of an outdated delivery medium (printed paper). If you're writing prose today, do like the web does, and use infinite scroll.

Share

Why it's troubling

Added on by Spencer Wright.

After posting (and tweeting) about The Presenter's Paradox yesterday, I spent a little time thinking about why I find it troubling. 

As a generalist, I accept that there are pieces of my skillset which will fall through the cracks. Not everything I do needs to add up to anything in particular, and I don't expect everyone I meet to appreciate each of my interests.

And yet I strongly believe that what others might think of as extracurricular activities are actually integral parts of what I offer. I feel that the breadth of my experience has a multiplying effect on the value of each component part. I have chosen not to specialize, and I consider my offering to be stronger as a result.

And so the Presenter's Paradox leaves me in an awkward position. If my value is estimated as an average of my levels of expertise, will I only ever be seen as an amateur? Or is it possible to present my breadth as an extraordinary skill in itself? What are the characteristics of the businesses best suited for generalists? Is giving in to self-direction (i.e. entrepreneurship, I suppose) the healthiest path?

I don't think these questions are intractable. But they are big. And they don't feel un-troubling to me.

Share

An application

Added on by Spencer Wright.

To XOXO. Because why not apply, and why not post the application here?

What do you do?

i'm some sort of a hardware guy. i grew up in construction, studied linguistics in college, and started my own business building custom bicycle frames. i eventually quit that in order to do 3d design and product management for a company building robot sliding doors.

now i live in nyc and work at a strategic agency, and do a bunch of scrappy projects on the side.

What are you working on right now?

  1. a single-channel fm radio that's housed in a mason jar. it's a cute consumer product with a bit of (hazy) decision theory behind it. 
  2. laser sintered titanium bike parts. the technology (DMLS) and supporting logistics aren't quite market ready for consumer products, but they're getting there.
  3. digital strategy for fortune ~100 companies. i mostly like the b2b stuff.
  4. the nyc outpost of the Bay Area Infrastructure Observatory (we'll lose the "Bay Area" part).
  5. other stuff.

What's something that you've made that you're proud of?

whooo... 

i spent two years after college doing a full gut renovation of a midcentury modern ski condo in northern california. it was really hard - i didn't know anyone there, didn't have a social OR professional network, and was in way over my head on both technical and management skills.

but the end result was really nice. most of the structure of the building was damaged by 50 years of renovations and a healthy dose of rot. i was almost crushed by a beam once, and had a high pressure water line explode a few feed from my face, and had to engineer a bunch of retrofits to problems that i didn't have easy solutions for. but i paid attention to the details that mattered and ignored the rest, and in the end it came together.

it's a far way from what i've ended up doing for the rest of my career. i mean, i spent a bunch of time literally chipping up concrete during those years, and now i mostly think about advanced manufacturing and business models. it's hard to talk about the one in the context of the other.

but i'm proud of it. and most of the people i meet day-to-day don't have anything like that kind of experience.

Share

B2B sites

Added on by Spencer Wright.

I've spent some time over the past few weeks thinking about my favorite B2B ecommerce sites. Here are my current faves (in no particular order), and why.

Box

Box's "Business" page is an easy-access portal to a complete set of product features & use cases. While I tend to recoil a bit at talk of "product features and use cases," the way they display them here is attractive and convenient.

Caterpillar

Considering the breadth of Cat's product line, their main site is an exercise in simplicity. My primary complaint is their browse feature, which uses multi-layered dropdown menus.

Cat.png

Olympus

Olympus NDT's video gallery gives one-stop access to hours of content - covering the lion's share of their product line. Considering that many of these devices run into (and past) the tens of thousands of dollars, being able to see them in action is a nice feature. 

Olympus video gallery.png

Amazon

(I know they're primarily b2c, but whatever - *tons* of businesses buy tools on Amazon)

Amazon's "Improve Your Recommendations" helps users tailor the products that the site recommends them. For small businesses in particular, this feature can be really helpful in separating personal from business purchases.

Share

Manufacturing logistics wishlist

Added on by Spencer Wright.

+1 for breakfast with a smart friend. Always good for taking a step back & seeing a bit of perspective.

I like mass market products a lot. But I want to really love the things that I make, and that's hard to do if you're trying to appeal to a mass audience. Compromises need to be made when you're designing for a diverse customer base; when the market is smaller, it allows the product developer to be a bit more choosy.

I'm excited that making short-run products is getting easier - but there's still a lot to be done. These are a couple of the things that have been bothering me.

Soup to Nuts design toolchain.

As a designer of traditionally manufactured parts, features are specified according to more or less knowable tool properties. When I place a drilled hole, the results will be predictable, regardless of my supplier's equipment or process.

The same is not the case with additive manufacturing, where build orientation and support structures matter a lot. As a designer of these parts, I want to be able to simulate varying configurations myself, so that I can specify the build procedure to my suppliers. Simplifying the CAD/CAM toolchain - ideally with solid/NURBS, T-Splines, topology optimization *and* build plate prep all in one application - will be crucial to lowering the barrier of entry to AM.

Surface finish specs.

When designing a part - especially those used in assemblies - surface finish is often critical. With additive manufacturing, surface finish may vary widely, depending on build orientation and support structures. In some cases it may be possible to reorient a part in order to improve finish.

But today, these determinations are preformed by machine operators whose knowledge of the process is experiential and not publicly available - making it difficult for designers to know precisely what they'll get. Machine manufacturers and job shops should work together to develop design guidelines and detailed surface finish specs, alleviating this uncertainty.

Full service plastics prototyping.

I love Shapeways. But they *need* to offer secondary services, i.e. tapping and tolerancing. 

Advanced Manufacturing 3PSCM.

Again, I love Shapeways. But they *need* to offer assembly, and custom packaging, and small parts that are traditionally manufactured (i.e. bolts). 

3D printing is a cool technology. But so is stamping, and you don't see sheet metal shops selling useful products directly to consumers. Without a supply chain management offering, I believe that Shapeways will be confined to just selling parts - not products.

Industrial supply catalog APIs.

I love McMaster-Carr. But they need an API that can talk to both my e-commerce and the API of my manufacturer. When my customers purchase an assembly from me, my supply chain manager (whether it's Shapeways or somebody else) would automatically place orders through McMaster-Carr and my manufacturing partner(s) - with all parts being shipped to the SCM and assembled just-in-time for shipment.

A word on MFG and Alibaba.

I'm all for services that provide me access to a wide range of manufacturers. But it is critical to the design process that that service be completely transparent. Like it or not, most designers are *not* manufacturing agnostic, and speaking directly to a manufacturer - and preferably to the machine operator who will actually be setting up & running your part - is key to producing successful designs.

Too much effort is being spent trying to disrupt procurement in ways that adds an opaque layer between me and my supplier, and the end result is that I learn little from the process. All I want is for you to put suppliers in front of me and then get out of the way.

Everyone in the supply chain should have a blog.

Why aren't these people talking about their processes? Why aren't they sharing the non-NDA work they've done? Why aren't they showing me the capabilities of the new machines they have? I would gladly pay a premium for a shop that's actively showing me the engineering feats they're accomplishing. Get bloggy - the openness is quite becoming.


I hope it is, at least :)

Share

McMaster-Carr and the Future of Parts

Added on by Spencer Wright.

Last year, I wrote a post describing my feature requirements for a modern parts management system. Re-reading it today, I realize that it doesn't really say what the user interaction would feel like - or how it would work at all. I hope to provide some of that here.

The key is this: Integrate small parts inventory management into the product design, prototyping, and maintenance, repair & operations processes. I'll treat these as three separate use cases, though they're all part of the same product lifecycle.

The reader will note that I believe McMaster-Carr to be the strongest positioned organization to take on these tasks. As a longtime fan of McMaster and a student of their intense customer focus, beautiful interface design, and impressive supply chain management, I hope that they seriously consider these recommendations - as I'm sure that their competitors will be soon.

Note: I diagrammed an early version of this idea in a flowchart here.

My current "system," during prototyping on The Public Radio.

My current "system," during prototyping on The Public Radio.

During Design

As a hardware product designer, I want my suppliers' parts catalogs integrated into my design environment, so that I can seamlessly browse for new parts and view part data directly from my modeling software.

Autodesk Inventor is my go-to design software, and McMaster-Carr is my go-to parts supplier. I'm constantly browsing McM for a part, then adding it to an open order, then downloading the STEP file and importing that into my model. I consider this a luxury: McM's decision to include STEPs for the vast majority of their mechanical parts makes my job a ton easier. But the process is convoluted, and a lot of part data is lost. On parts like socket cap screws, for instance, McM tracks the following data:

  • Thread size
  • Length
  • Thread length
  • Material
  • Package quantity
  • Package price

But their STEP files contain none of that; all that's included is the part number and the material, which is often stripped of a lot of useful data (parts described as "Type 316 Stainless Steel" on McMaster's site often show up as either "Stainless" - or worse, "Generic" - in the STEP file).

For McMaster-Carr to become more fully integrated into my design and procurement process, they should include comprehensive part data in all of their STEP files. 

Moreover, there's a larger opportunity for McMaster to integrate their catalog directly into my design environment. If their catalog were available as a plugin for Inventor/Solidworks, designers could browse, design, and purchase all from one seamless interface - which I believe they will demand in the near future. Look at Plethora and Sunstone Circuits (and in web development, Squarespace) - across the hardware world, the movement is towards integrating design & supply chain management. McMaster-Carr is perfectly positioned to become a powerful player in the field. 

During Prototyping

As a prototyping mechanic, I want real-time internet enabled inventory management, so that I can understand what parts I have on hand & prepare for shortages before they happen.

Small parts management sucks. With their lightning-quick delivery and vast catalog, McMaster is the cornerstone of most prototyping shops' parts management system. But that solution is awkward at best, and often requires simply ordering more parts, even if we have some (somewhere) on hand. 

Small scale inventory management has historically been extremely difficult, but today it's increasingly easy. For instance, Quirky has shown us that it's not that hard to keep track of the number of eggs you have in your fridge, and Tesla's iOS app shows the charge state of your car's battery. It's only a matter of time before the same is the case with things throughout our physical lives, and McMaster-Carr is uniquely positioned to take small parts management on.

I envision a small parts cabinet full of sensors (some combination of force, optical, or proximity), which would periodically update an online database as to the quantity of parts inside each bin. But you needn't even start there. An easy MVP would be an iOS app that allowed the user to snap a photo of a small parts cabinet and tag each bin with a part number & quantity. The photos would be collected and stored online, and would be linked to the customer's McM order history. 

Then, when a mechanic takes a handful of bolts out of a drawer, all he needs to do is update the inventory count from his app. By tapping around a set of linked photos in the app, he's directed to the bin that he's physically looking at - and he can confirm visually that the parts are what they appear to be. By tapping on an "info" tab, he brings up the inventory data (including links to a 3D part file, technical data, order dates, and a list of mating parts/assemblies that the part has been used in - culled from the Inventor plugin described above) and assign a piece count to a job & edit quantity on hand in moments.

McMaster-Carr should build this system - starting with an iOS app that offers basic inventory management. Doing so would give them a view into their customers' usage data, and would help users streamline their restocking process. The days of bins labeled with bits of paper are numbered, and users will soon demand personalized (and internet-enabled) inventory management systems. McMaster is in a unique position in the marketplace, and has the opportunity - if they work now - to strengthen their foothold in small parts management.

For MRO

As a maintenance, repair & operations engineer, I want a single process that incorporates machine data, relevant spare parts, and procurement, so that I can get my facility back online more quickly.

A large part of McMaster-Carr's business is in supporting maintenance, repair & operations (MRO) professionals. These customers have unique needs; their ability to get the right part, right now, can have huge impacts on their company's ability to recover from unplanned downtime due to a broken machine.

In many cases, MRO engineers will find themselves with a broken part and will need to replace it immediately. Doing so will require careful measurement to determine the part's specifications, a process that can be difficult and imprecise - especially if the broken part has been mangled and/or lost.

McMaster should work to establish a system of folksonomy - user contributed data - that would allow MRO customers to tag parts with information about how and where they can be used. For instance, a particular serpentine belt might be commonly used as a replacement spindle drive belt on an old lathe. Instead of finding this data on the web - and then cross referencing part numbers back to the McMaster-Carr catalog - a tag could be submitted to the relevant part directly in the McM database. Subsequent users could then find the information they need right in the McM website/app.

Such a system would be complicated, for sure. It would require a significant effort on McM's part to hire and train community managers, who would monitor and vet user submitted data on a daily basis. But doing so would allow McMaster to leverage the huge - and growing - network of hardware professionals and enthusiasts. This community is sorely lacking a single go-to reference, and McMaster is in many ways the strongest candidate (with its enormous existing database of part, material & process data) to do so.


In order to pull off these tasks, I believe McMaster-Carr will need to become more transparent about their processes and inventory data. This will be a difficult process - I myself struggle with transparency - but I believe the payoff will be well worth it. A new generation of hardware professionals & hackers have come of age in a new information paradigm, and they are increasingly responsible for purchasing decisions in small and large companies alike. These people have grown up reading Amazon's shareholder letters and following the official Google tech blog. They expect to be part of a company's product development process, and will contribute their own time, energy, and expertise to projects that historically would have been developed in private. McMaster-Carr - with its huge network of enthusiastic users - should leverage that collective energy, and work with its customers to bring parts management into the 21st century.

Share

A smart thing that McMaster-Carr does really well

Added on by Spencer Wright.

Commoditization of everything.

Tool selection is often a difficult process. Manufacturers are keyed on branding, and often use brand terminology to describe what may (or may not) be useful product features. As a customer, a lot of my efforts are spent trying to interpret this information, and cut through the terminology to get to a head-to-head comparison.

Most retailers repeat brand product descriptions verbatim, but McMaster-Carr does customers the service of stripping brand copy and providing only the relevant product features. They even go a step further, formatting those features consistently across product lines.

See the Amazon results for "nailer":

Amazon's results show four products. Customers can see the brand name, a large color photo, pricing, consumer (star) ratings, shipping availability, and one product feature/description.

McMaster, on the other hand, shows eight products (plus two accessories). Each product has nine features, a price, and a detailed description - including a wide range of associated products (mostly nails, in this case).

Amazon seems to think that what I really care about is the color of the tool and when it's available. McMaster gives me real product data, and their global shipping policies (which are a worth a thousand words unto themselves) give me all the information I need to make a timely decision. While Amazon focuses on brand language - both the manufacturers' (who needs the 9-digit alphanumeric part numbers?) and Amazon's ("Prime"; "#1 Best Seller"; "More Buying Choices") - McMaster focuses on what the tool actually does.

As a consumer, I want to comparison shop by technical product features, so that I can quickly find the right tool for the job.

Brands are beside the point. McMaster commoditizes products, reducing them to the features & methods they use to solve my problems.

Share

What It Would Be

Added on by Spencer Wright.

I've spent much of the past few weeks thinking about how to proceed on my DMLS seatmast topper project. Since I posted my findings on DMLS pricing in mid January, it has became the most viewed thing I've written here. It's also become (aside from my home and "feed" pages) the most popular landing page on my site, due to both high search term ranking and the fact that it's been shared around the 3D printing community extensively. 

There are a few distinct goals moving forward, which represent partially overlapping ideas of what I'm working on.

  1. Develop a body of knowledge and understanding which encompasses the advanced manufacturing industry and the supply chain logistics required to sustain businesses selling engineered 3D printed consumer products. 
  2. Develop deep experience operating the toolchain required to design said parts for manufacturing. Includes parametric solid/NURBS modeling, organic T-spline modeling, topology optimization modeling, and DFM/CAM software.
  3. Design said parts, and have them manufactured & tested. Use the resulting data to develop an understanding of the mechanical properties and DFM guidelines for parts made via DMLS and other advanced processes.
  4. Develop & launch distribution & sales operations (likely e-tail), and sell physical product there. 
  5. Do some/all of the above with bicycle parts as a specific focus.

Many of the points here are not mutually exclusive; point 5 certainly entails many/all of the previous items. But my path forward depends crucially on whether I approach this as primarily a research project - or as a business.

One possible build orientation, courtesy C&A Tool

On one hand, I'd like to move forward in a rapid, directed manner. Doing so will require resources, however, and may inevitably constitute a full-time job. In order to fund such an effort, I'd need to show a near-term market fit - which will require me to approach this specifically as a business.

On the other hand, I'm aware that there are benefits to approaching this primarily as research. I ultimately want to learn; building a business is just one of many ways of doing so. Moreover, there are any number of businesses which address parts like mine, and selling bicycle products doesn't apply to all of them. It's possible that advanced supply chain logistics is a better fit for my knowledge and skillset. Focusing on the bike market might not be the best way to approach such a goal.

Regardless, it's likely that I refine and then purchase a seatmast topper in the coming weeks. This will require a small investment on my part (a few thousand dollars), plus about a week's work. I'll learn a few things about the process, and going through a build will give me an opportunity to cement relationships with suppliers and processing & testing partners.

Assuming the test part is functional, the next step would probably be to feel around the market a bit. This topper will be on the expensive side, and though I'm confident it'll sell, branding it will be delicate. Finding an audience, and defining the product in a way that they can relate to, will be an interesting exercise. 

With a bit of luck, I'll have a working assembly + a landing page with preorders by Memorial Day. Stay tuned.

Share

Smart Factories & Design Intent

Added on by Spencer Wright.

Robert Schouwenburg, writing on Medium about a utopian idea of manufacturing automation.

To be clear humans are still needed. Certain steps are better handled by a human (refill / maintenance of machines or specific process steps like assembly or packing of parts – all depending on the factory setup and supported production steps), but the human is just a resource in the factory. A resource which can be planned and directed by a computer. It is not about fully automating the factory but about the creating a smart factory.

So how does this work? A product production request comes in. Based on the product production requirements a production plan is generated. The production plan contains each step necessary to produce each part and – if applicable – how the product is put together. The production of the product is scheduled based on capacity and necessary process steps. Not only the machine are planned but also human operators where needed. In the end the factory runs itself in the most optimal way based on the incoming production requests.

Today, we miss a significant piece in this puzzle. The current standards for design files (Autodesk's .ipt, Solidworks' .sdlprt, the ISO .step format, and of course the now-ubiquitous .stl) are agnostic regarding manufacturing processes. They simply convey geometry, and don't communicate anything about how that geometry is to be created.

I suppose that an ideal manufacturing environment would be clever enough to analyze part geometries and produce a manufacturing plan that was highly optimized for efficiency, but that reality is still far away. It's also worth noting that such a world would never produce another Eames Lounge Chair Wood - an artifact which was designed specifically as a use case for a new material and manufacturing process. When computers control the manufacturing method, the only control a human has is to tell it what shape to make.

I should be clear that I don't fight that future's development; nor do I have enough foresight to find it either delightful or troubling. But it's worthwhile to consider the implications of a world in which the nature of design is so radically reimagined - and it's good to consider what it'll take to get there from where we are now.