Manufacturing guy-at-large.

Desk update

Added on by Spencer Wright.

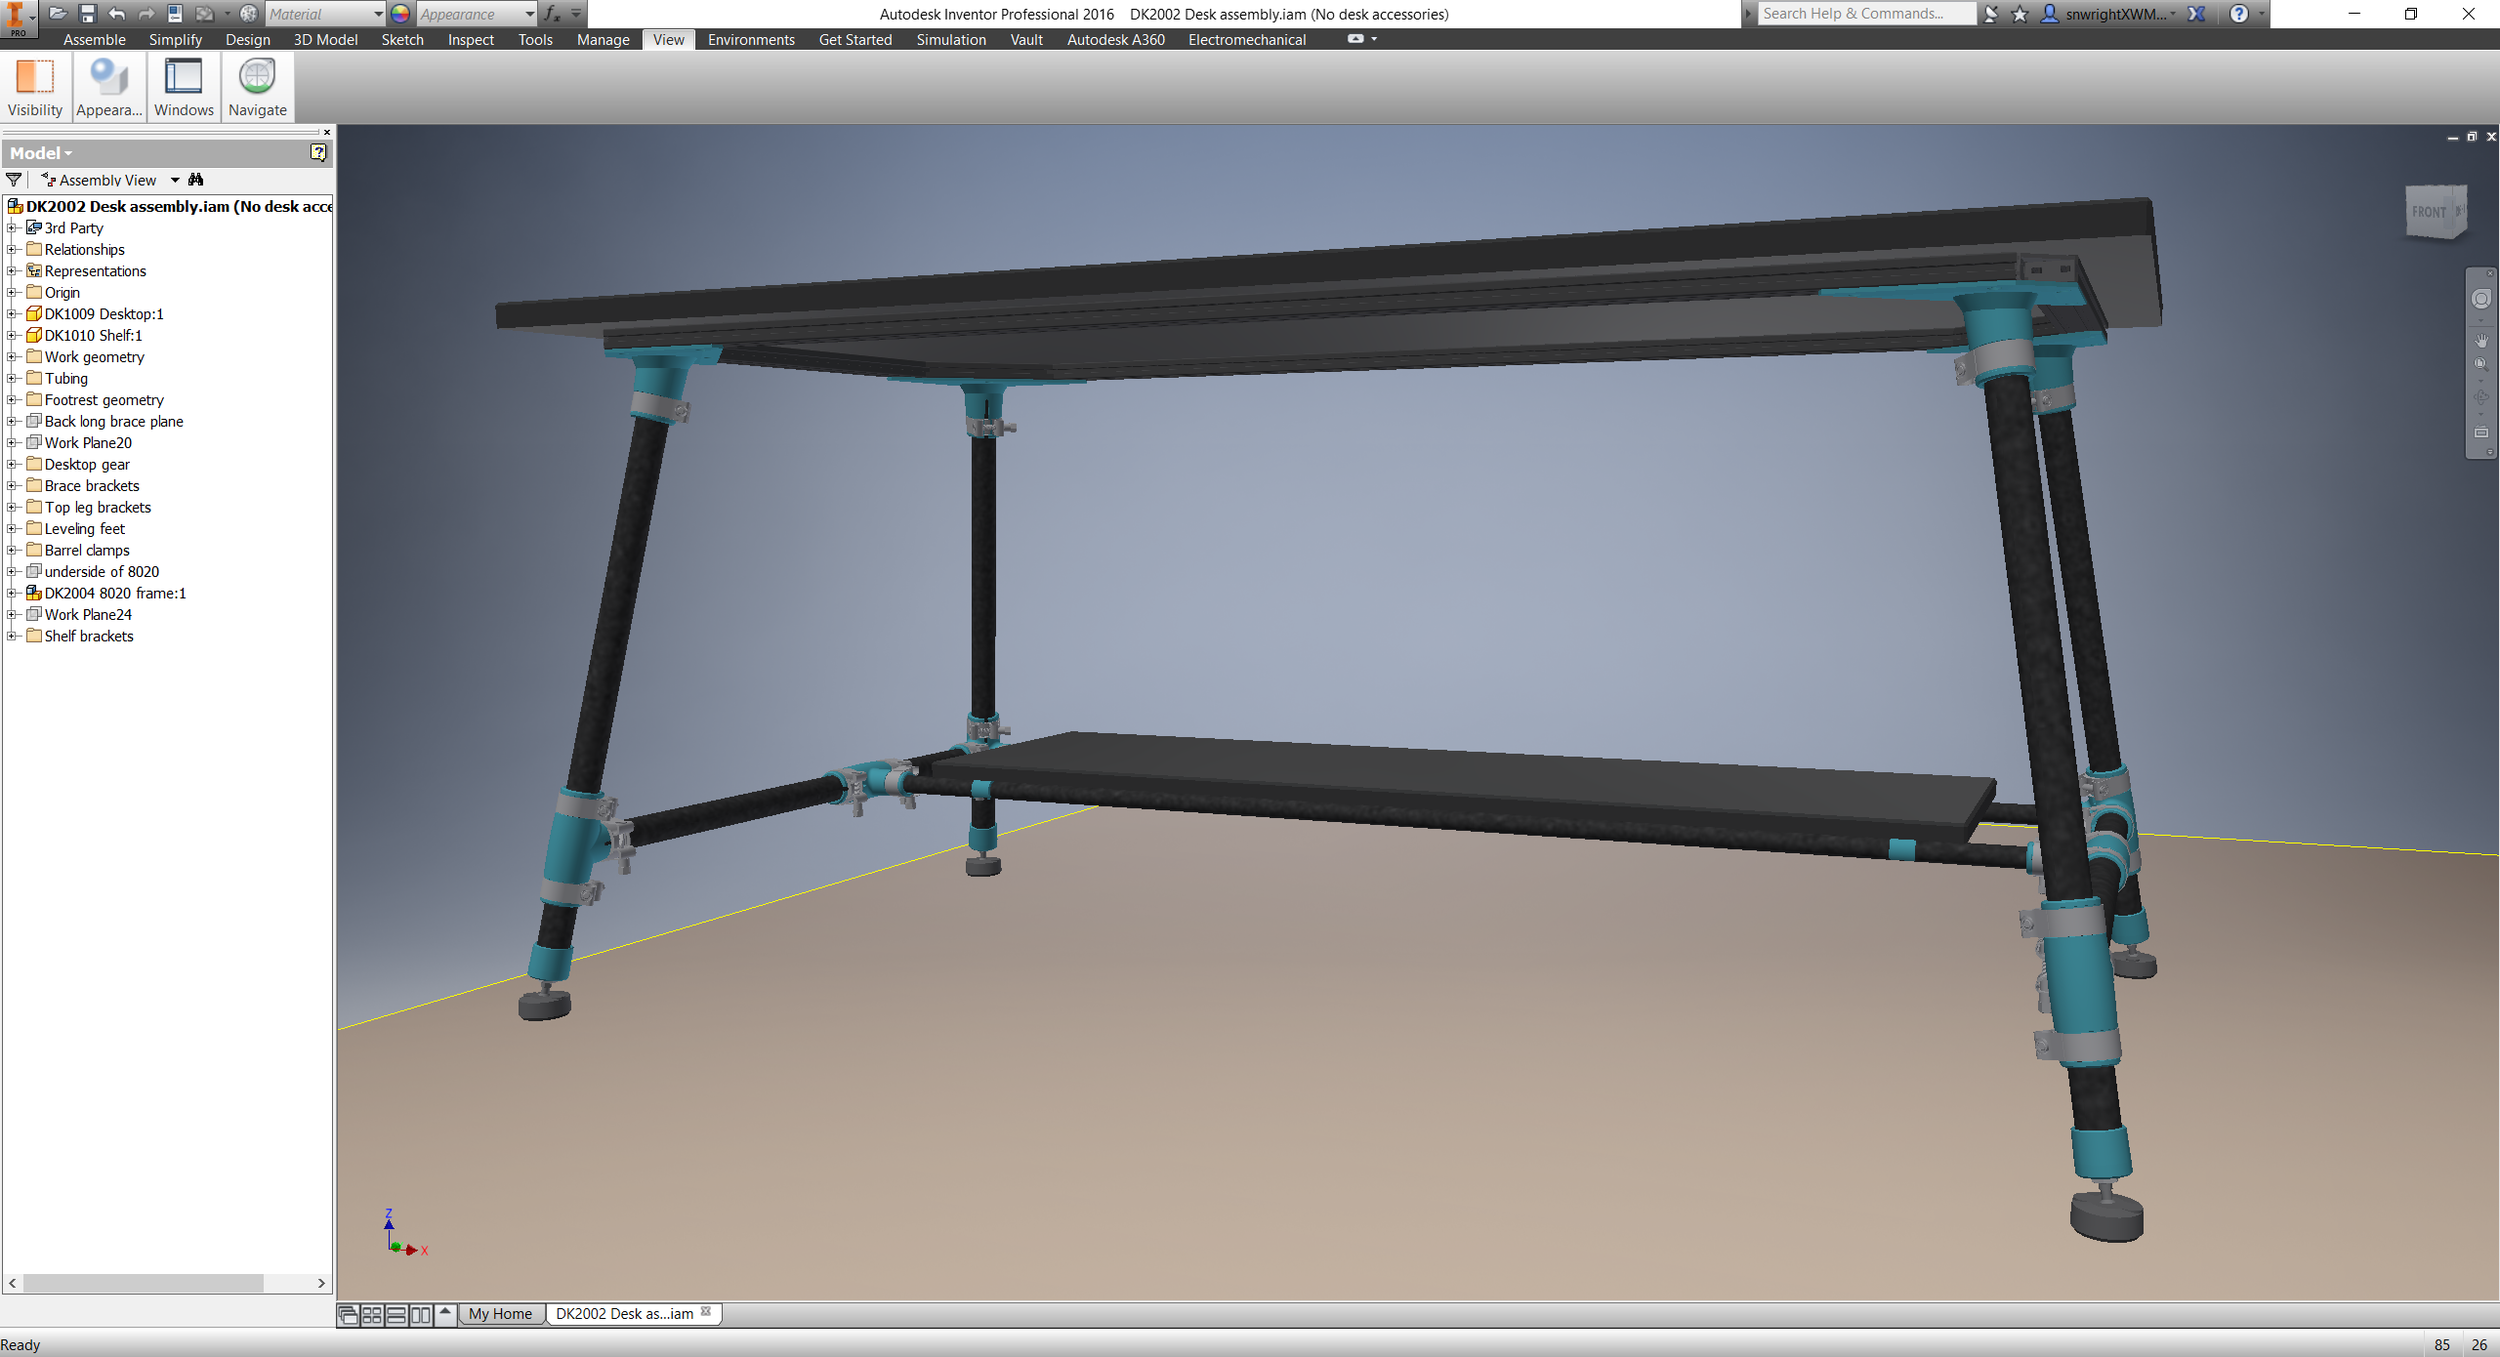
I was able to spend a little more time on my desk this past weekend, and got it nearly done:

A quick changelog:

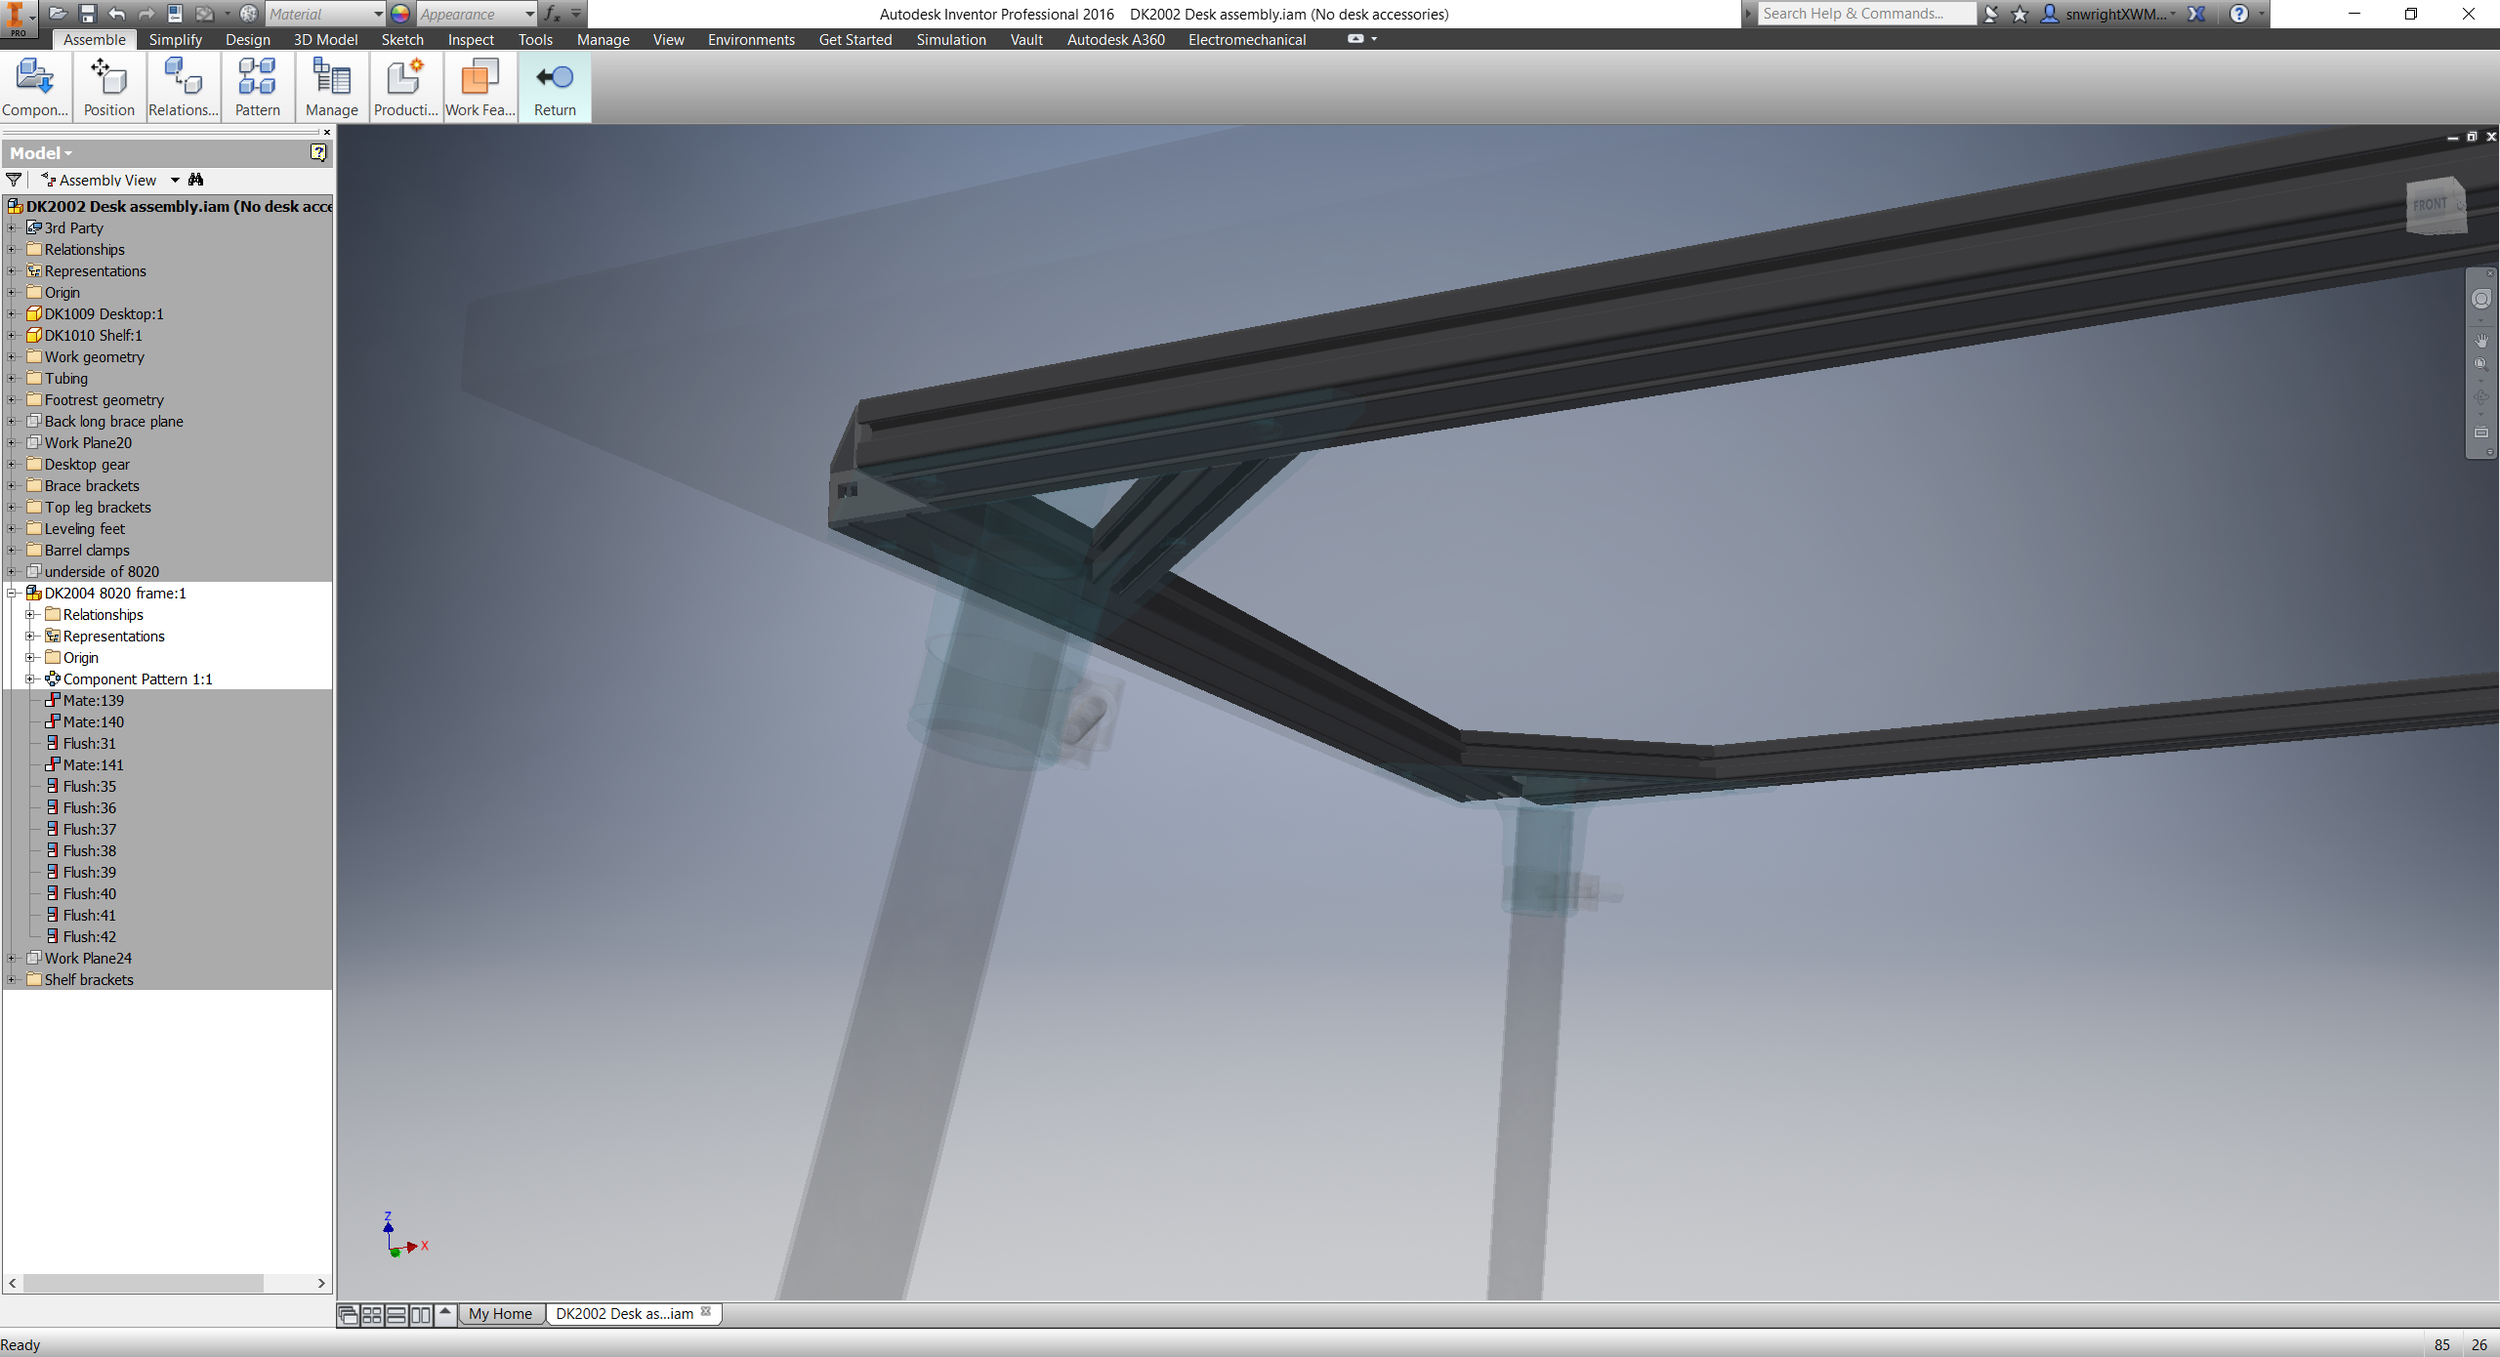
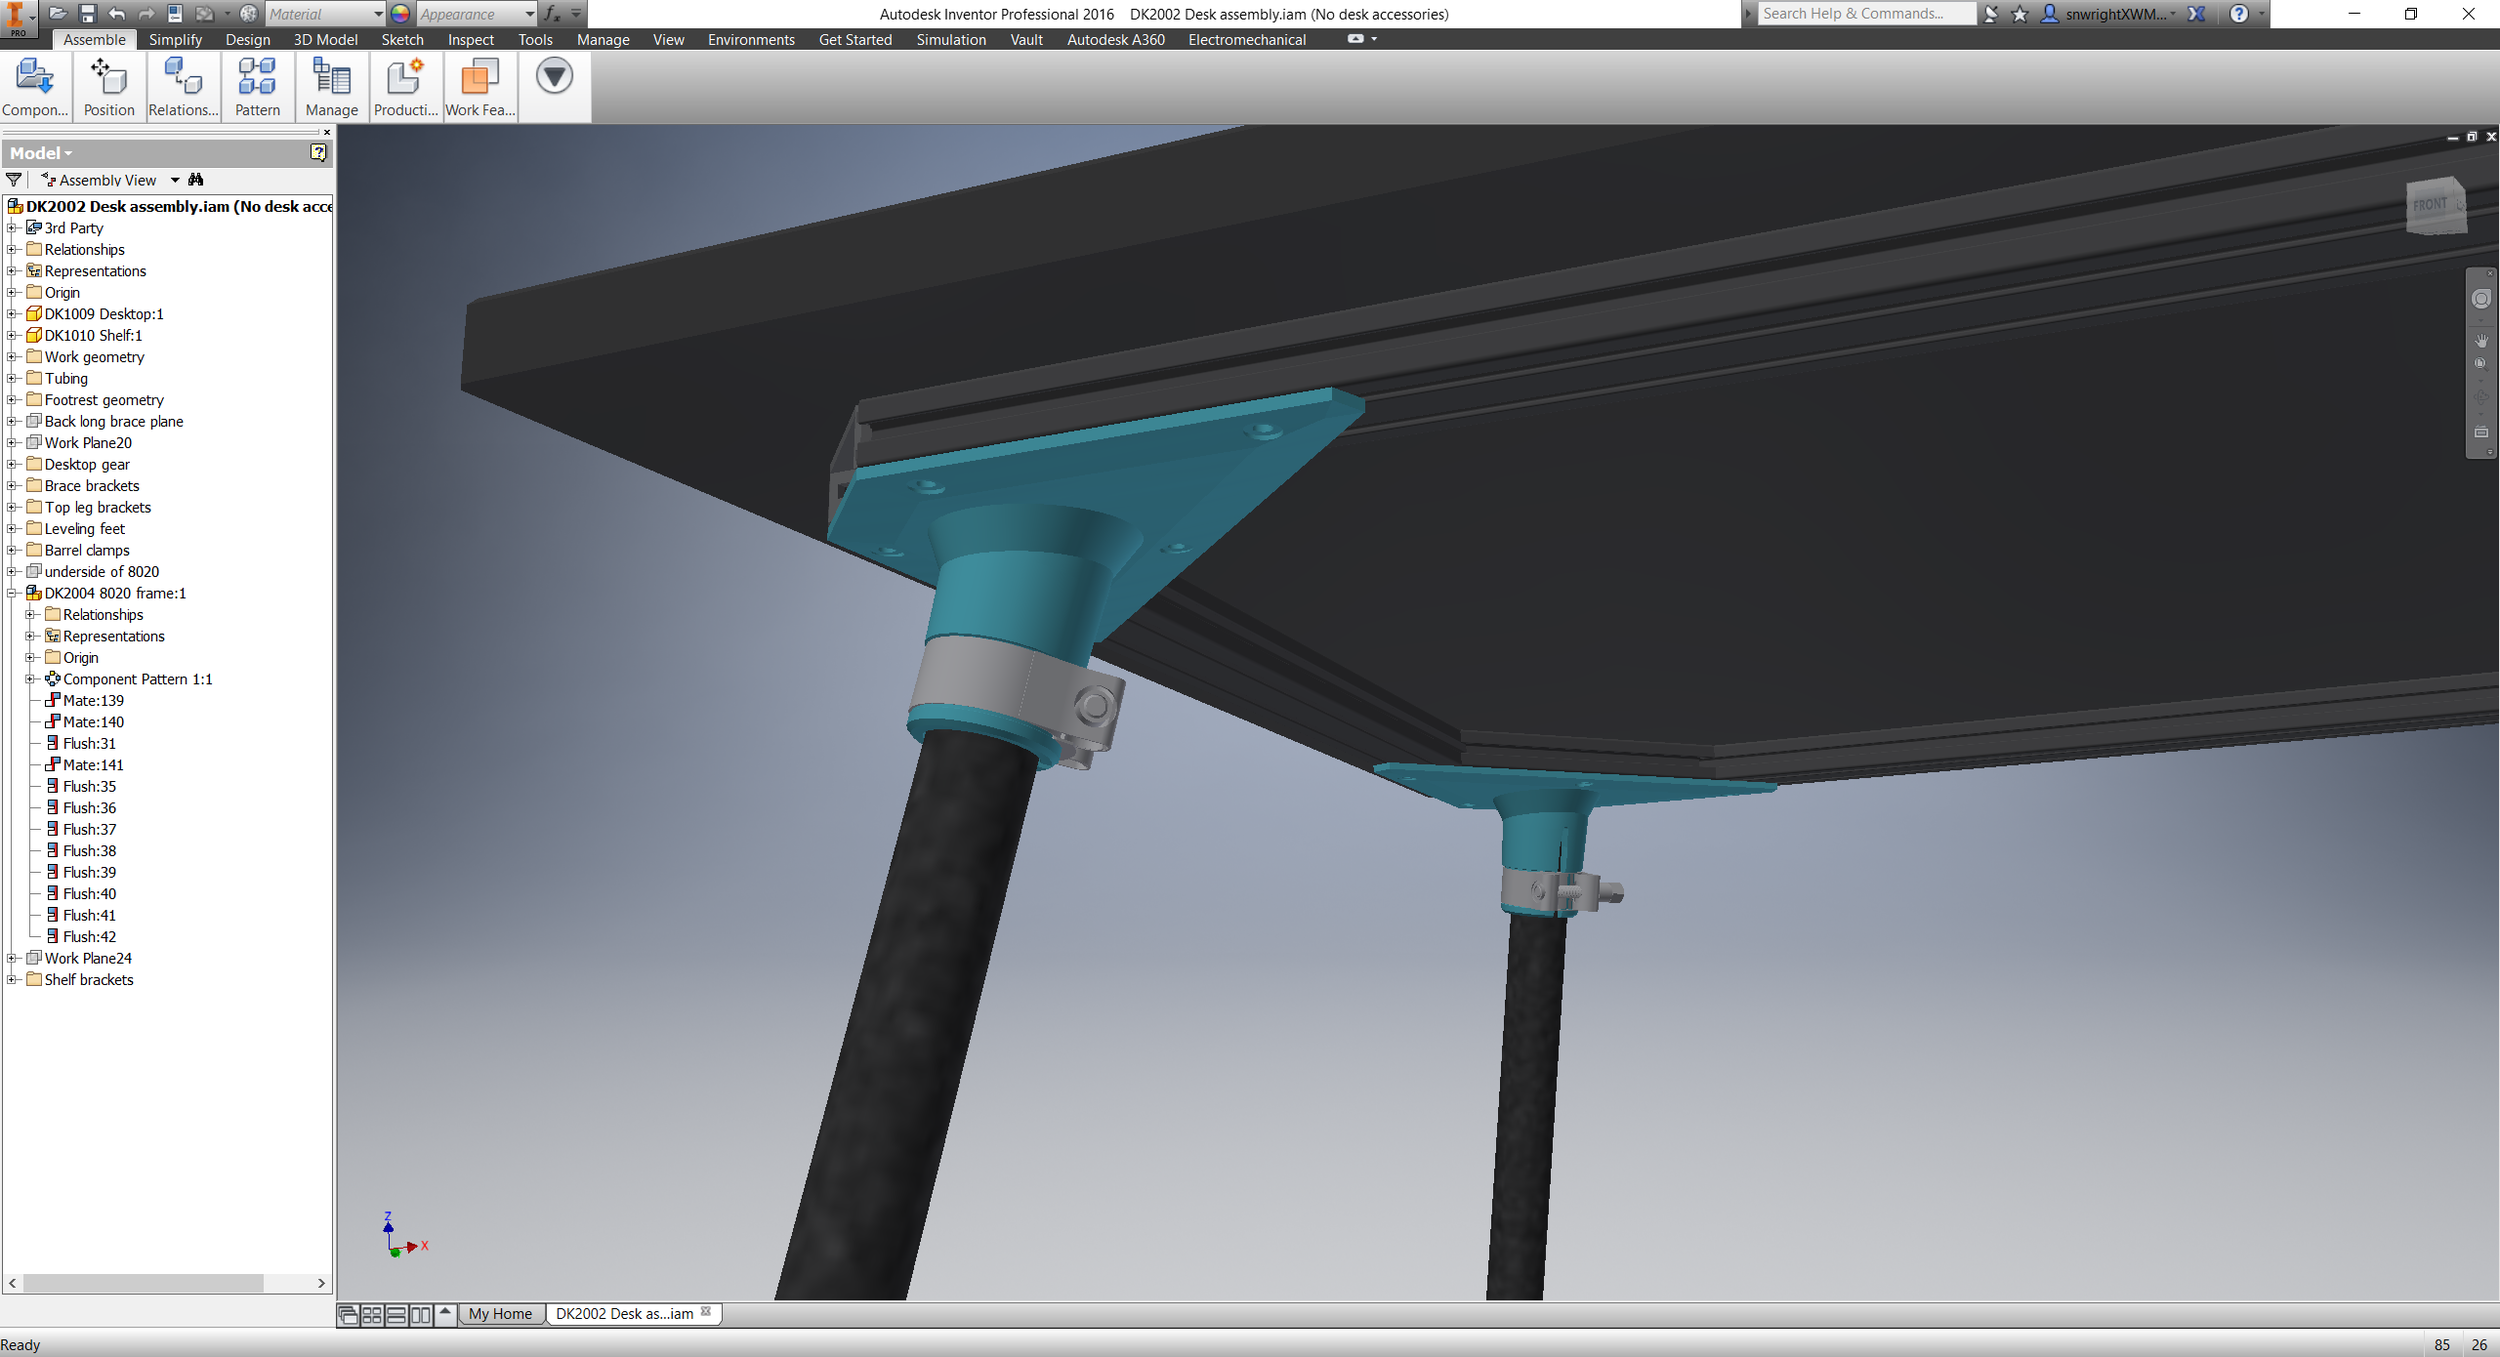
  • Added a frame to the desktop. I'm planning on using 1" phenolic resin (or *maybe* epoxy resin, if I can afford it) for the surface, and it needs to span almost 5'. At that length it seemed like a good idea to support the span, and I'm using an 8020 frame to do so. It's not the cheapest option, but means that attaching the surface will be easy. It also has the advantage of allowing me to attach other accessories (a power strip, my monitor stand, an architect's lamp or two) really securely as well.
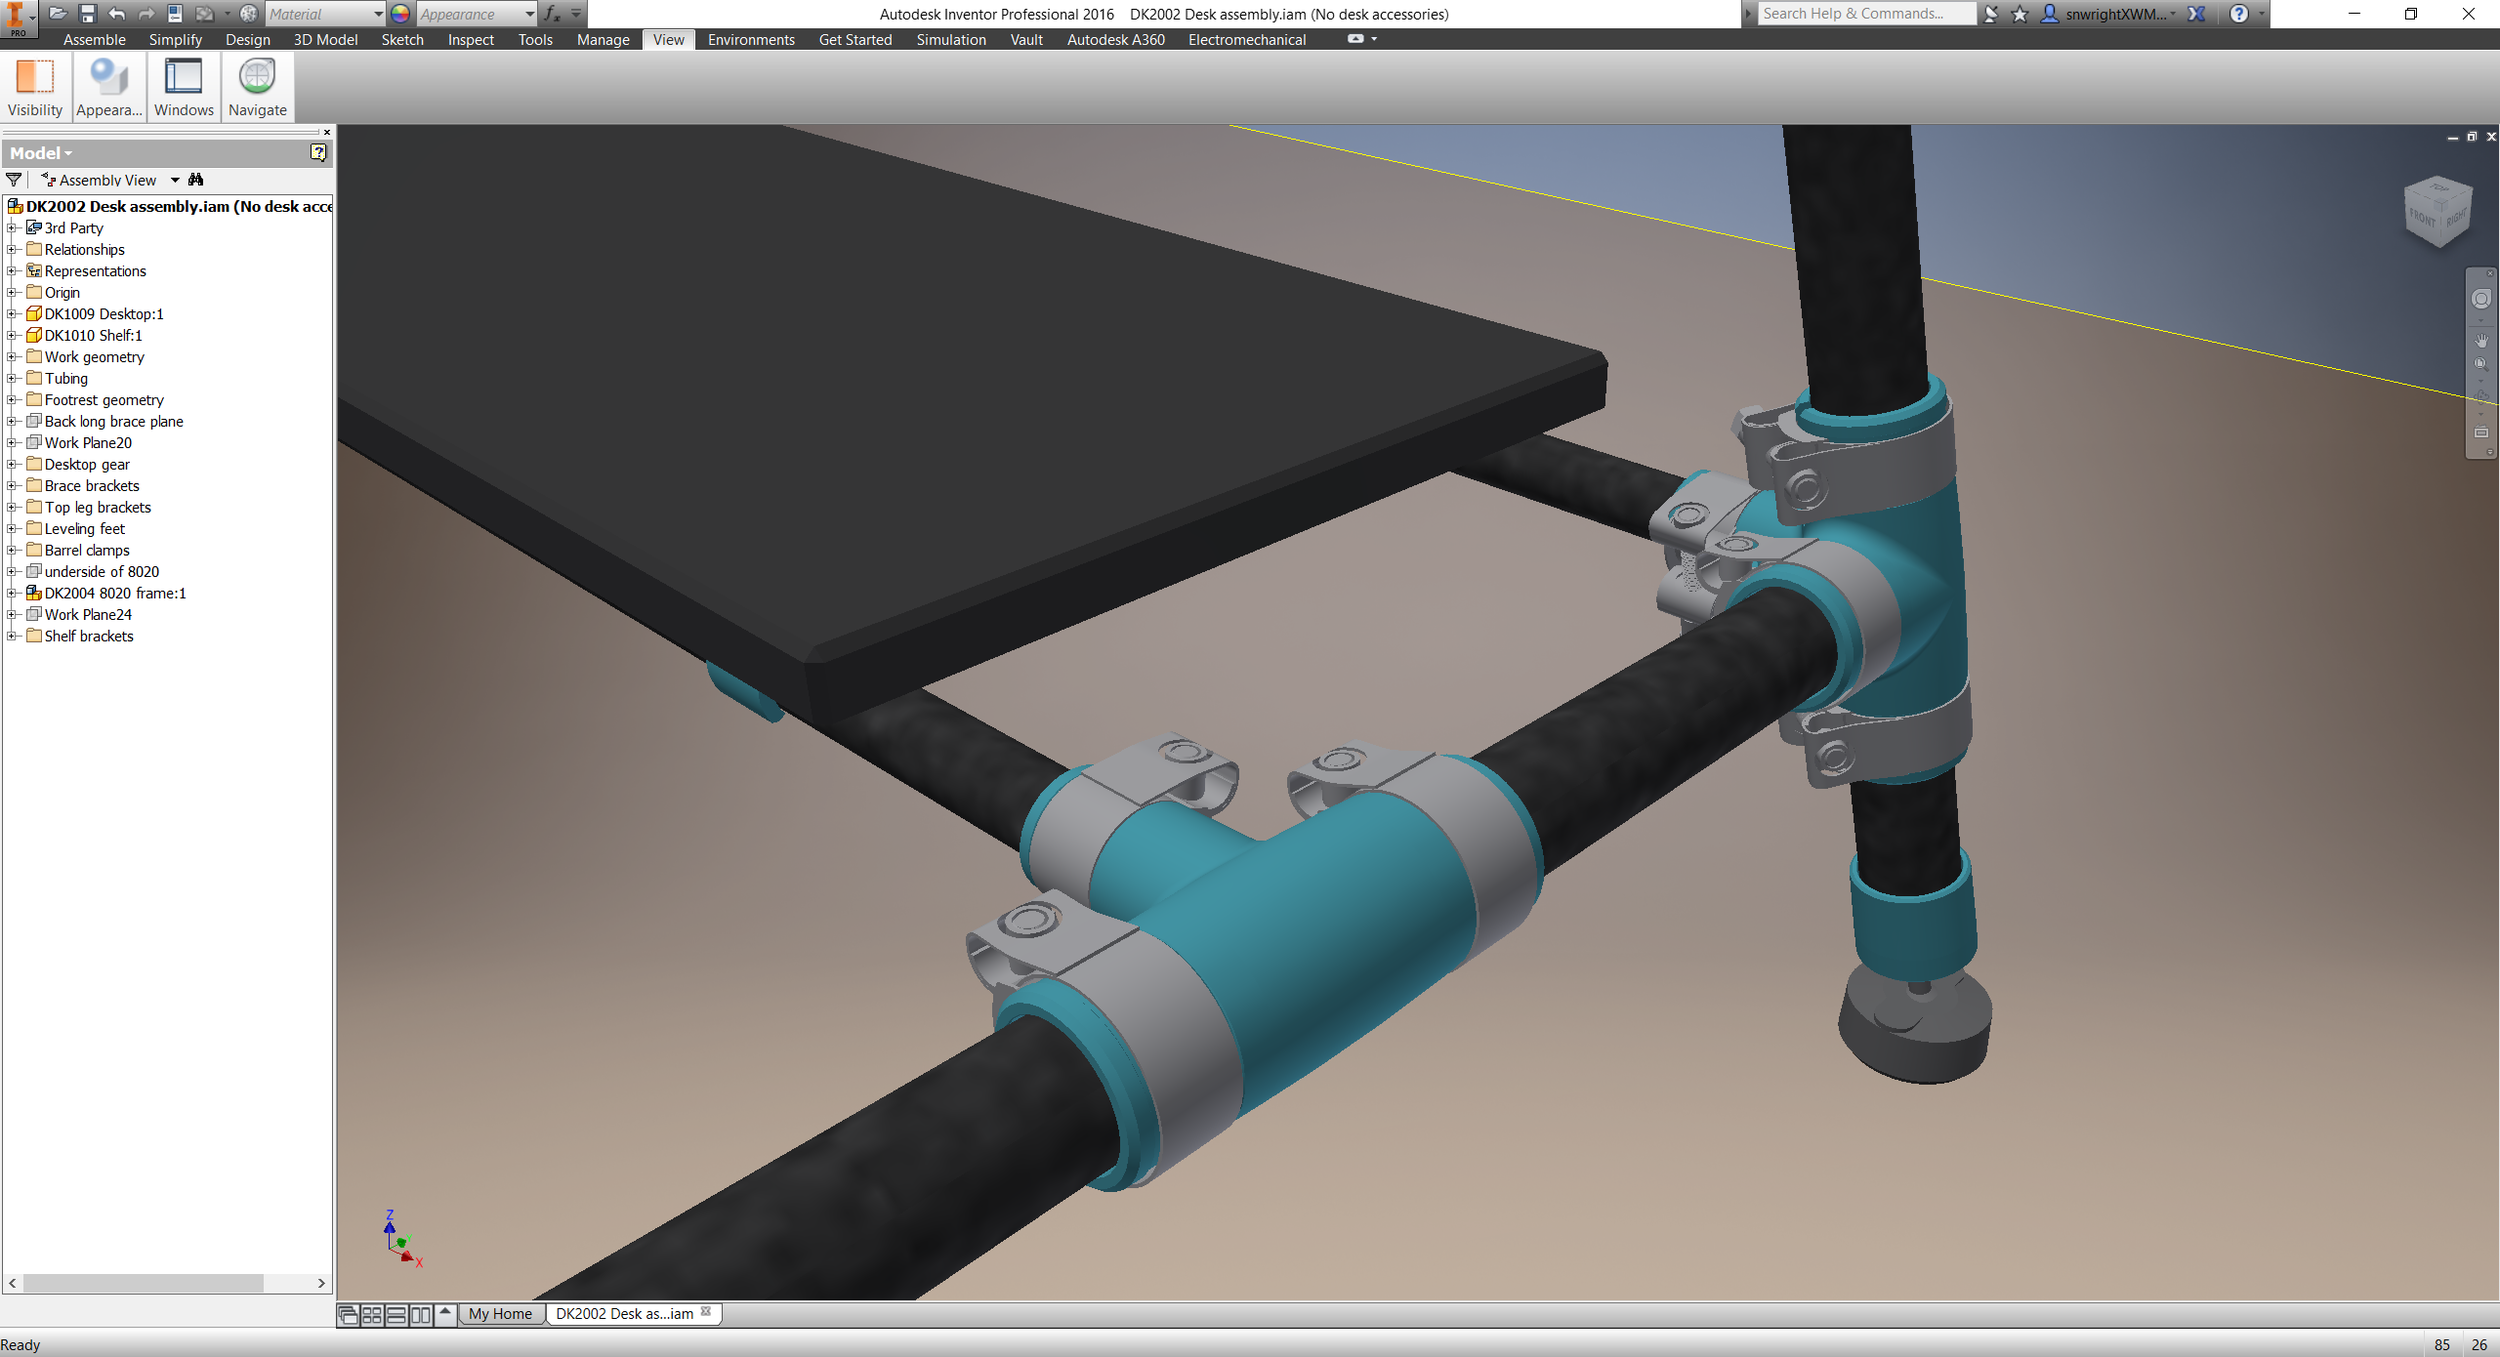
  • Added adjustable feet. These are nylon with a rubber pad, and they thread into nut inserts that'll be installed in the leg caps. 
  • Added shelf clips to hold the lower shelf onto its supports. I think that the shelf will just rest there - the clips should snap more or less securely onto the supports, and I don't think I need to attach them any more firmly than that.
  • Other small changes to the leg brackets. I had an early prototype printed by Form Labs in their "Tough" resin, and was pretty impressed with the results; the part came out true to size and clamps onto my carbon fiber tubing really well. I'm having a few more parts printed now, and will rig up a bigger test assembly to confirm - but with the combination of my leg geometry and the Form Tough's high tensile strength and elongation at break, I'm confident that it'll work well.

Time allowing, I'll order the rest of the stock and cut-to-order parts in the next week or so. Pretty excited :)

DMLS lattice sample prints

Added on by Spencer Wright.

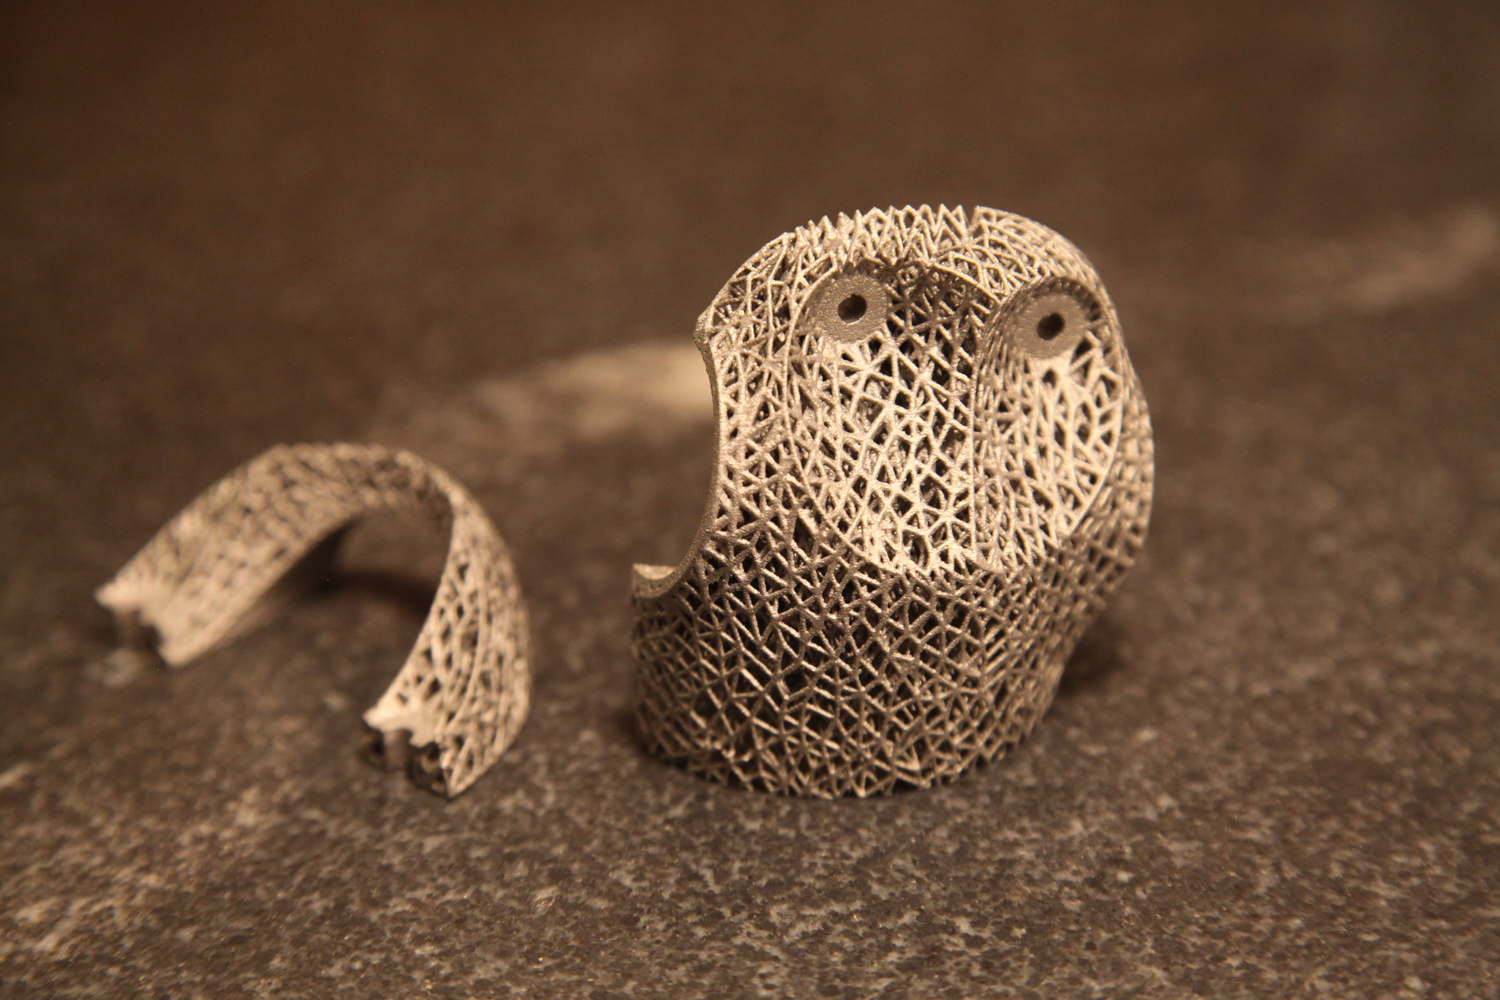
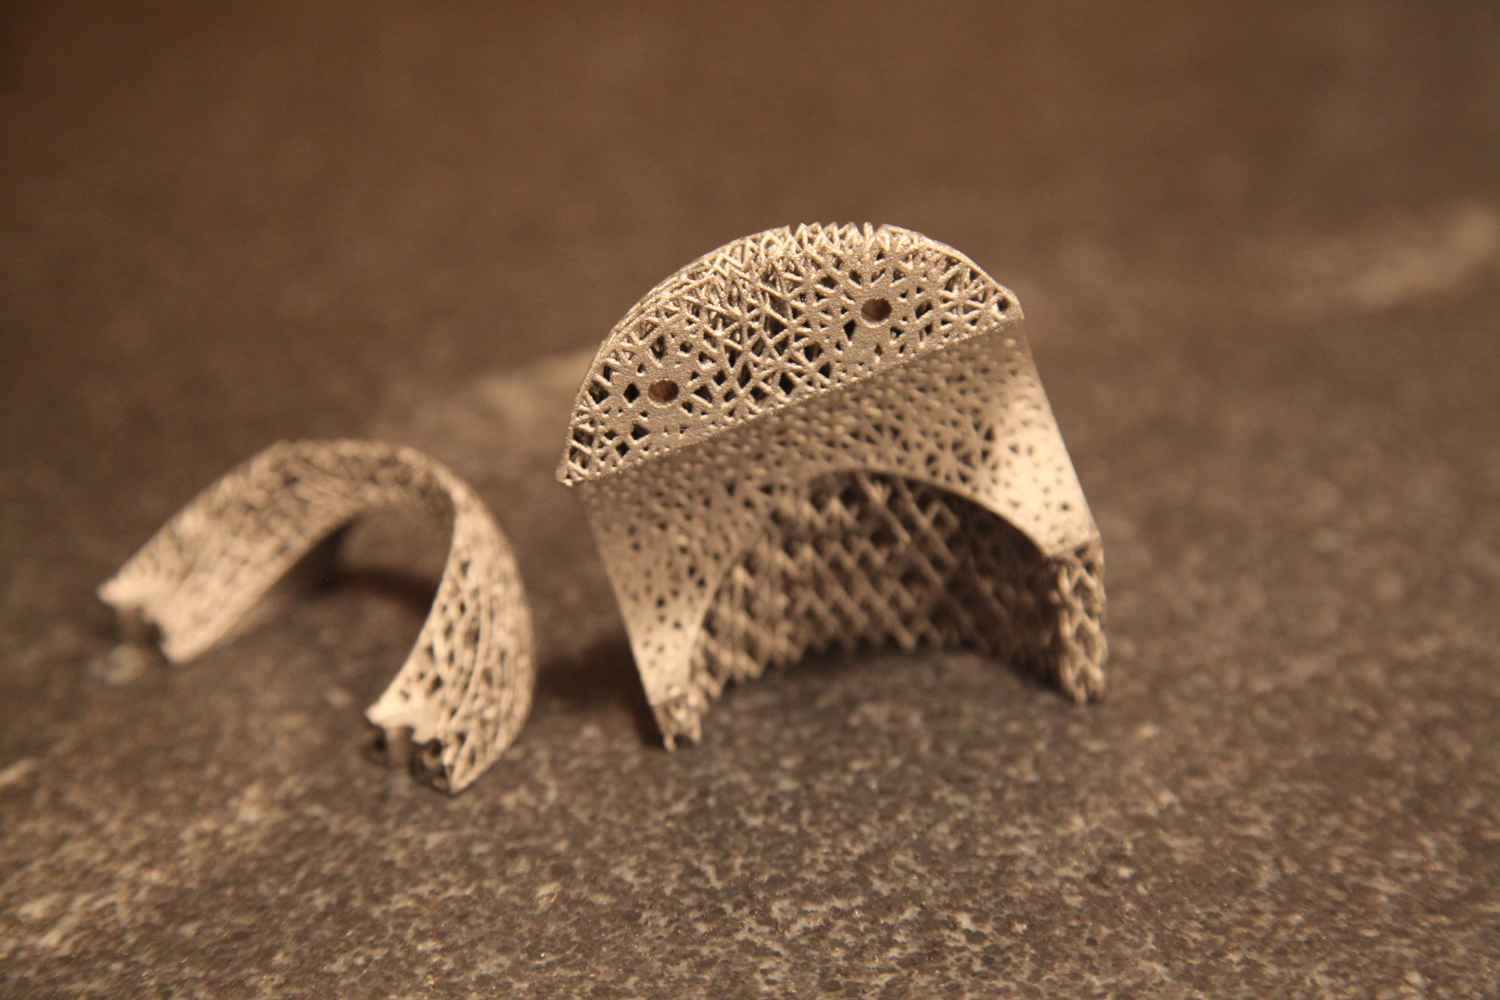
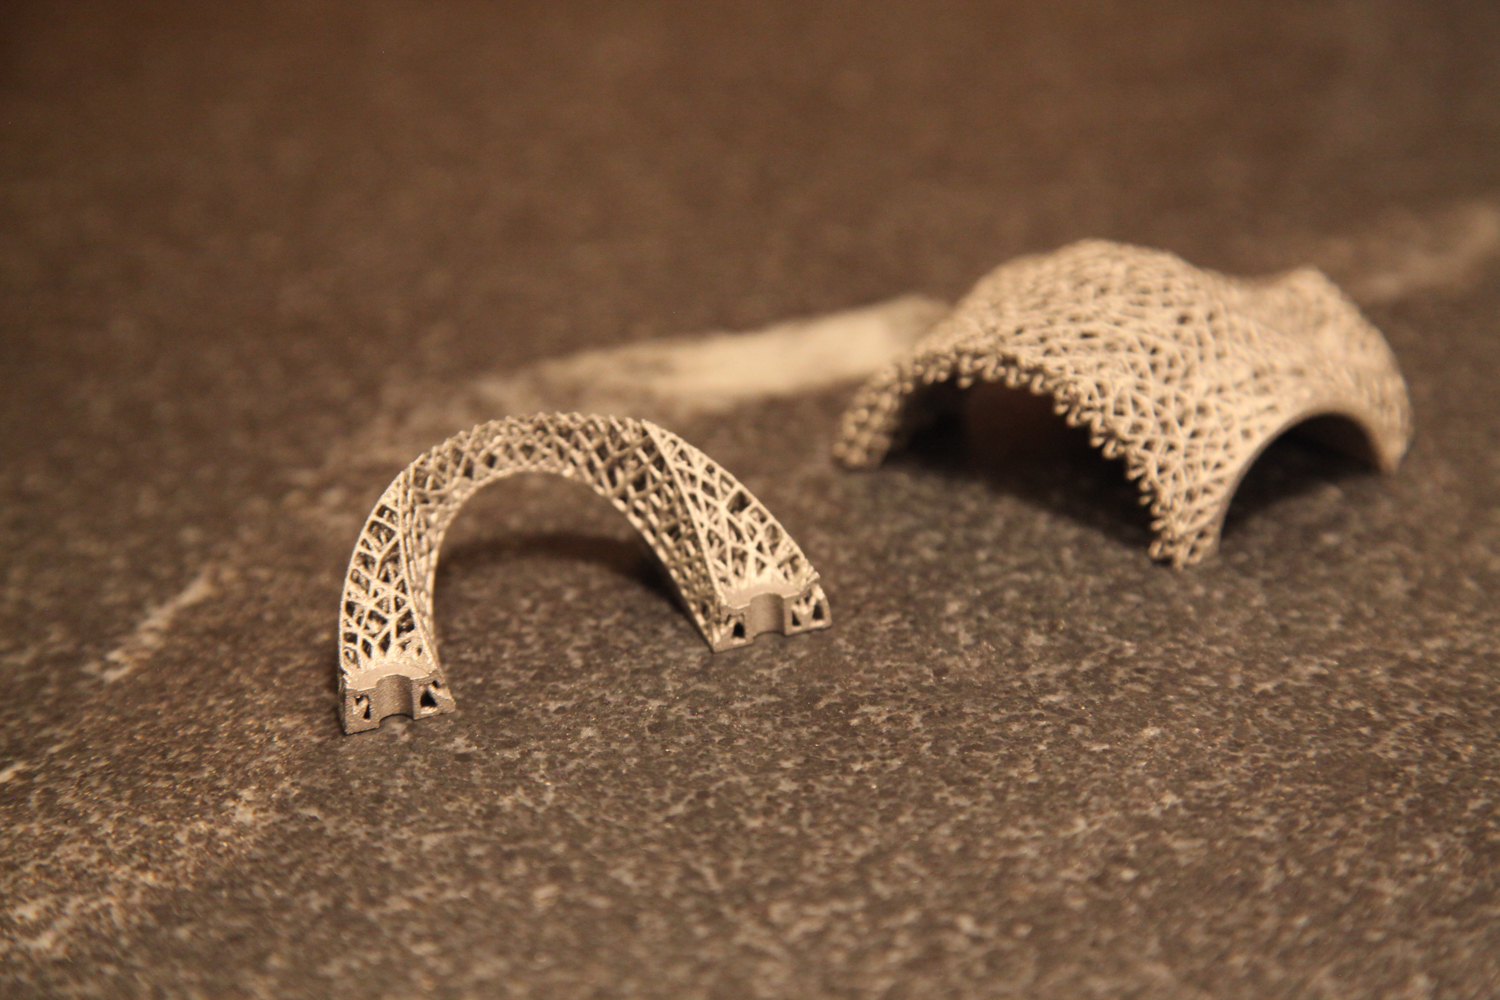
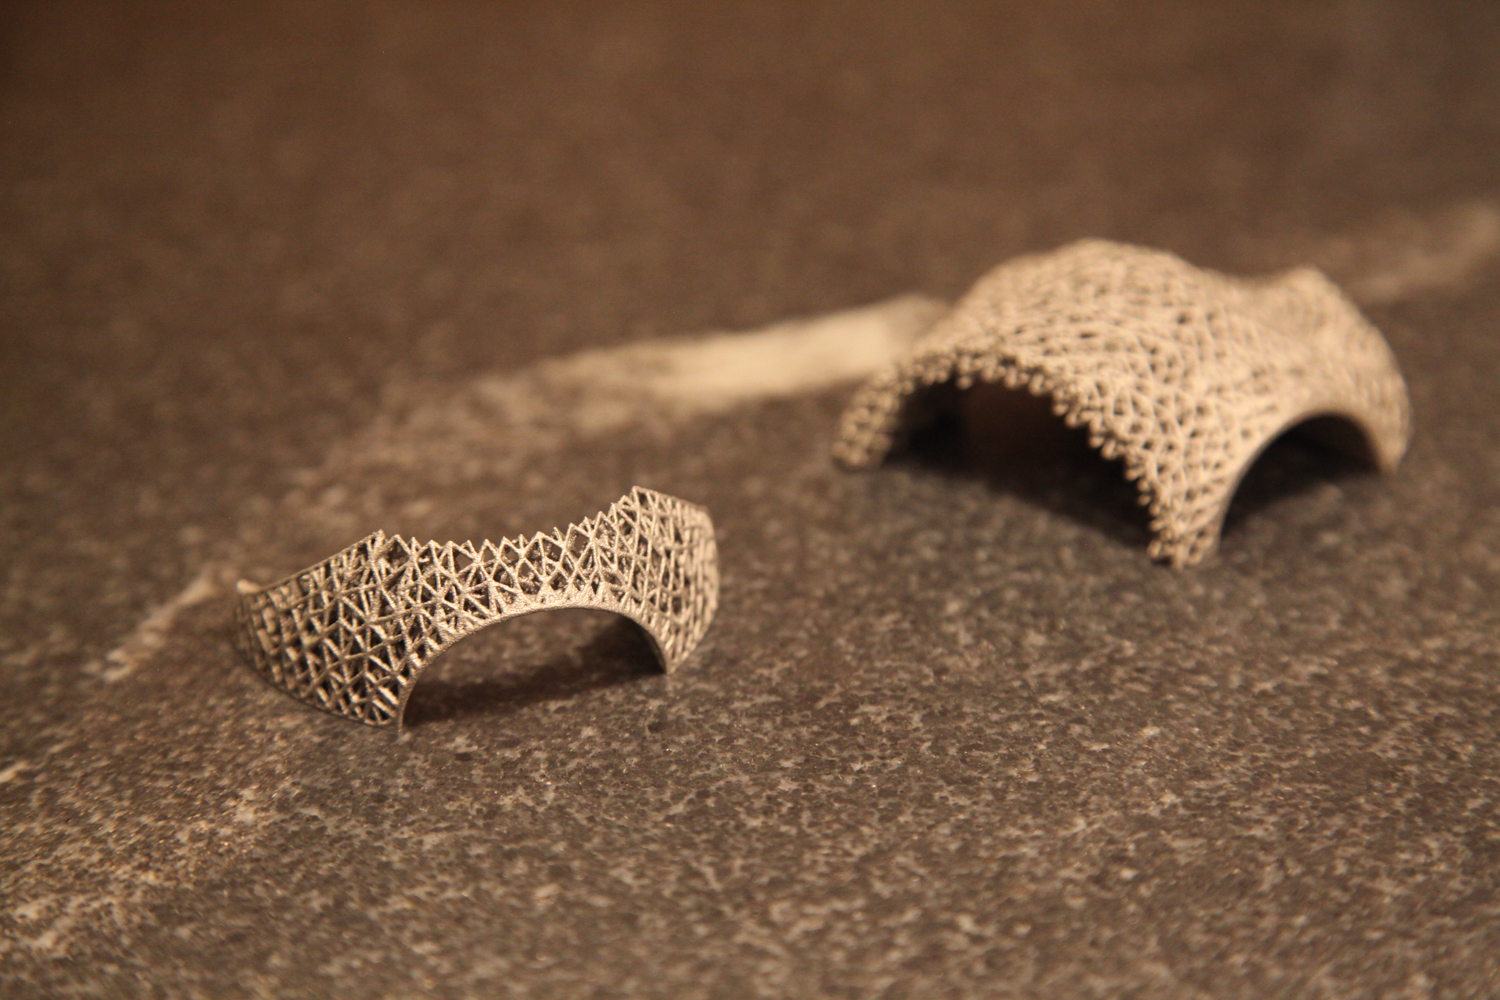
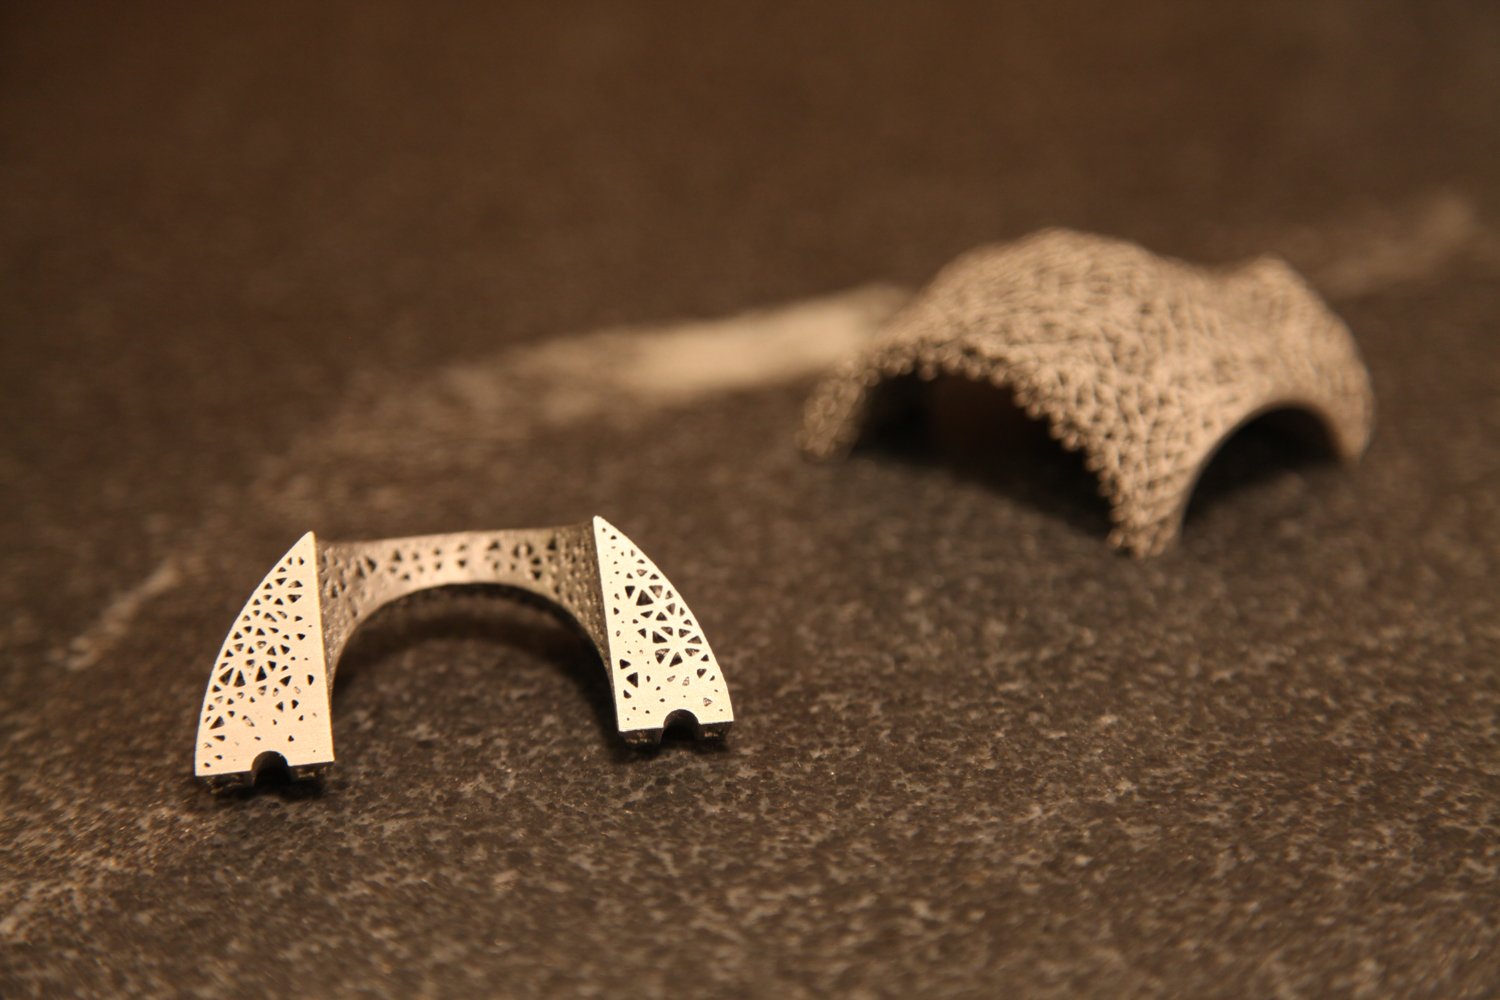
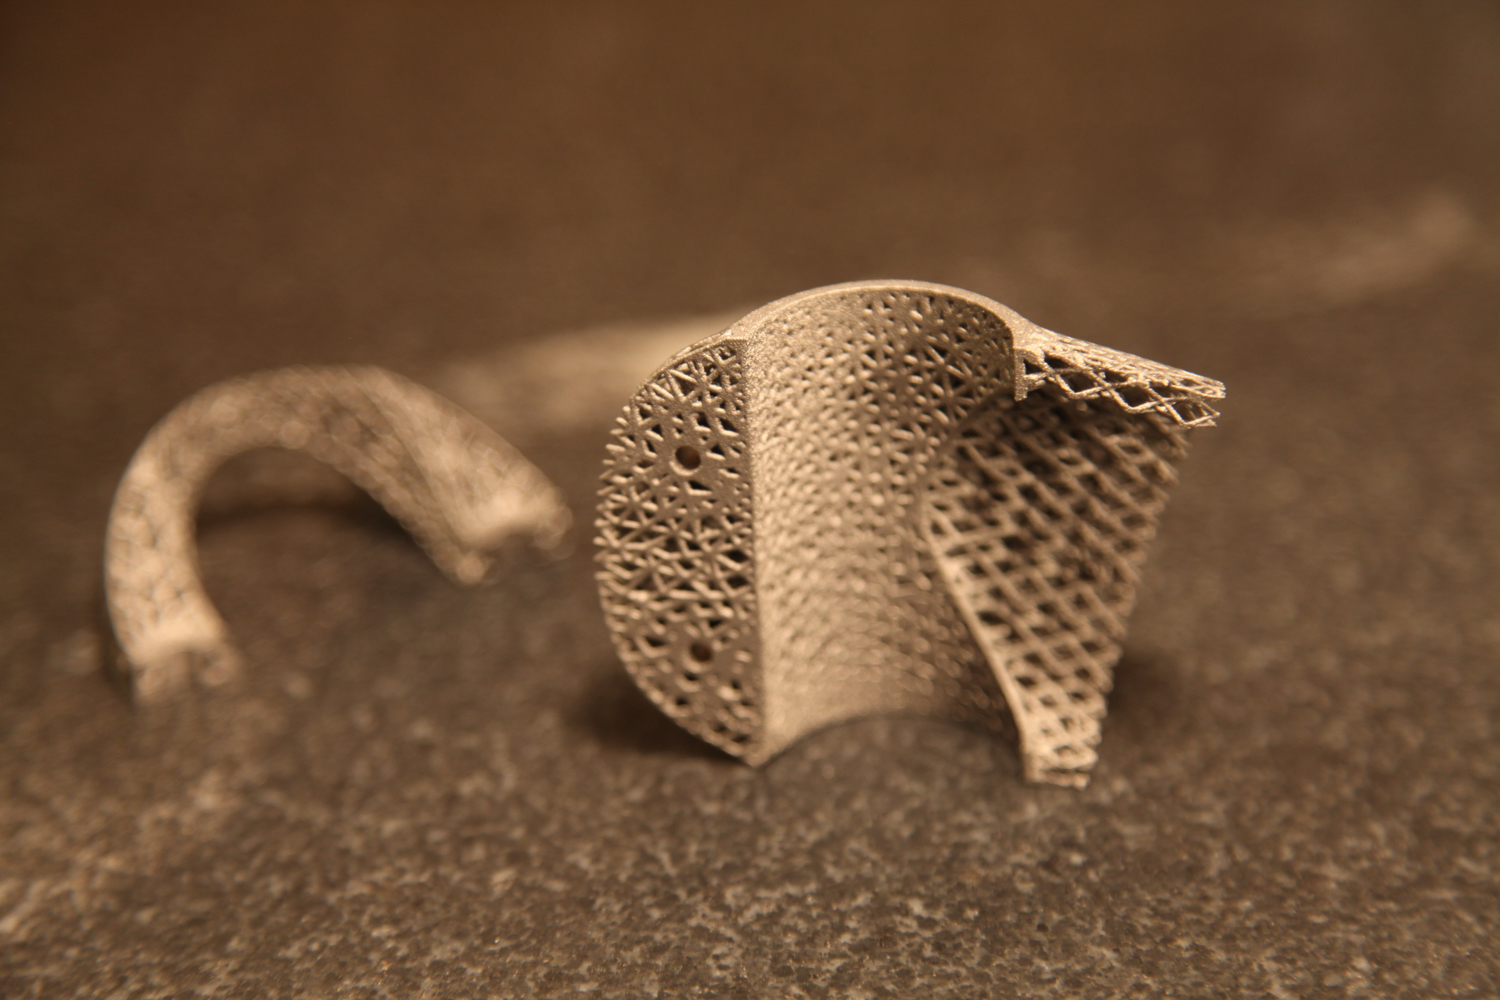
I'm *very* excited about these parts from C&A:

These parts were printed in titanium 6/4 by C&A Tool in Churubusco, Indiana; they were designed in nTopology Element. 

This is a pure lattice structure - the entire geometry is designed as beams and nodes, with no explicitly defined solid regions. The beam lengths are on the order of 2-3 mm; their thicknesses range between .45 mm and 1.1 mm. In some areas (for instance, the bolt holes) this results in a fully solid part, but the transition from lattice to solid is continuous rather than discrete. The result is a structure that's solid where it needs to be and sparse elsewhere, with no stress risers where solid and lattice meet.

The parts are, of course, sample regions of the bike stem that I've been working on for some time now. The intent of the samples was to prove the printability of the structure and identify any potential difficulties. The results were overwhelmingly positive: With the exception of a few small flaws, the parts printed very well, and I believe the problematic areas can be addressed in the design pretty easily.

Given the good quality of the sample prints, I'm planning on printing a full version of the part soon. I'm also experimenting with a few other design variations (intended for a variety of different metal AM machines), and am running them through a beam sizing optimization process with Abaqus and Tosca in order to reduce mass and decrease strain energy. More on these soon :)


Thanks to Rich Stephenson for his ongoing help on this project - and for continuing to educate me on the metal AM industry.

Build process simulation

Added on by Spencer Wright.

Early last year, Andrés Bellés Meseguer reached out to me with a proposition. He had read my piece in Metal AM magazine, and wanted to use my printed parts from DRT Medical Morris to verify a build process simulation workflow that he created using Abaqus. I agreed, and with Dave Bartosik's help I got him the build files necessary to simulate the print.

Andrés' full results were published in a paper titled Prediction of Distortion of a Titanium Bike Part Built by DMLS, which he presented at a NAFEMS conference in November. The simulation used a fine hexahedral mesh at the part itself, and a coarser mesh for the surrounding powder bed and the build platform. At each timestep, heat (representing energy applied by the laser) is applied to nodes throughout the model; it then dissipates throughout the structure. Below, see a thermal map of the part about 70 minutes into the build:

Image courtesy Andrés Bellés Meseguer and Prime Aerostructures

You can also use this simulation to model distortion in the part - seen here at the end of the build:

Image courtesy Andrés Bellés Meseguer and Prime Aerostructures

The distorted areas in the simulation correspond well to the as printed part, but Andrés notes that the magnitude values don't match perfectly; it's likely that some of the discrepancy can be narrowed by adjusting thermal coefficients.

This field - simulating additive processes to predict and compensate for built in stress and distortion - is one that I've been excited about since I began working with AM. Thanks to Andrés for sharing his work - I'm looking forward to more progress on this soon.

Desk update

Added on by Spencer Wright.

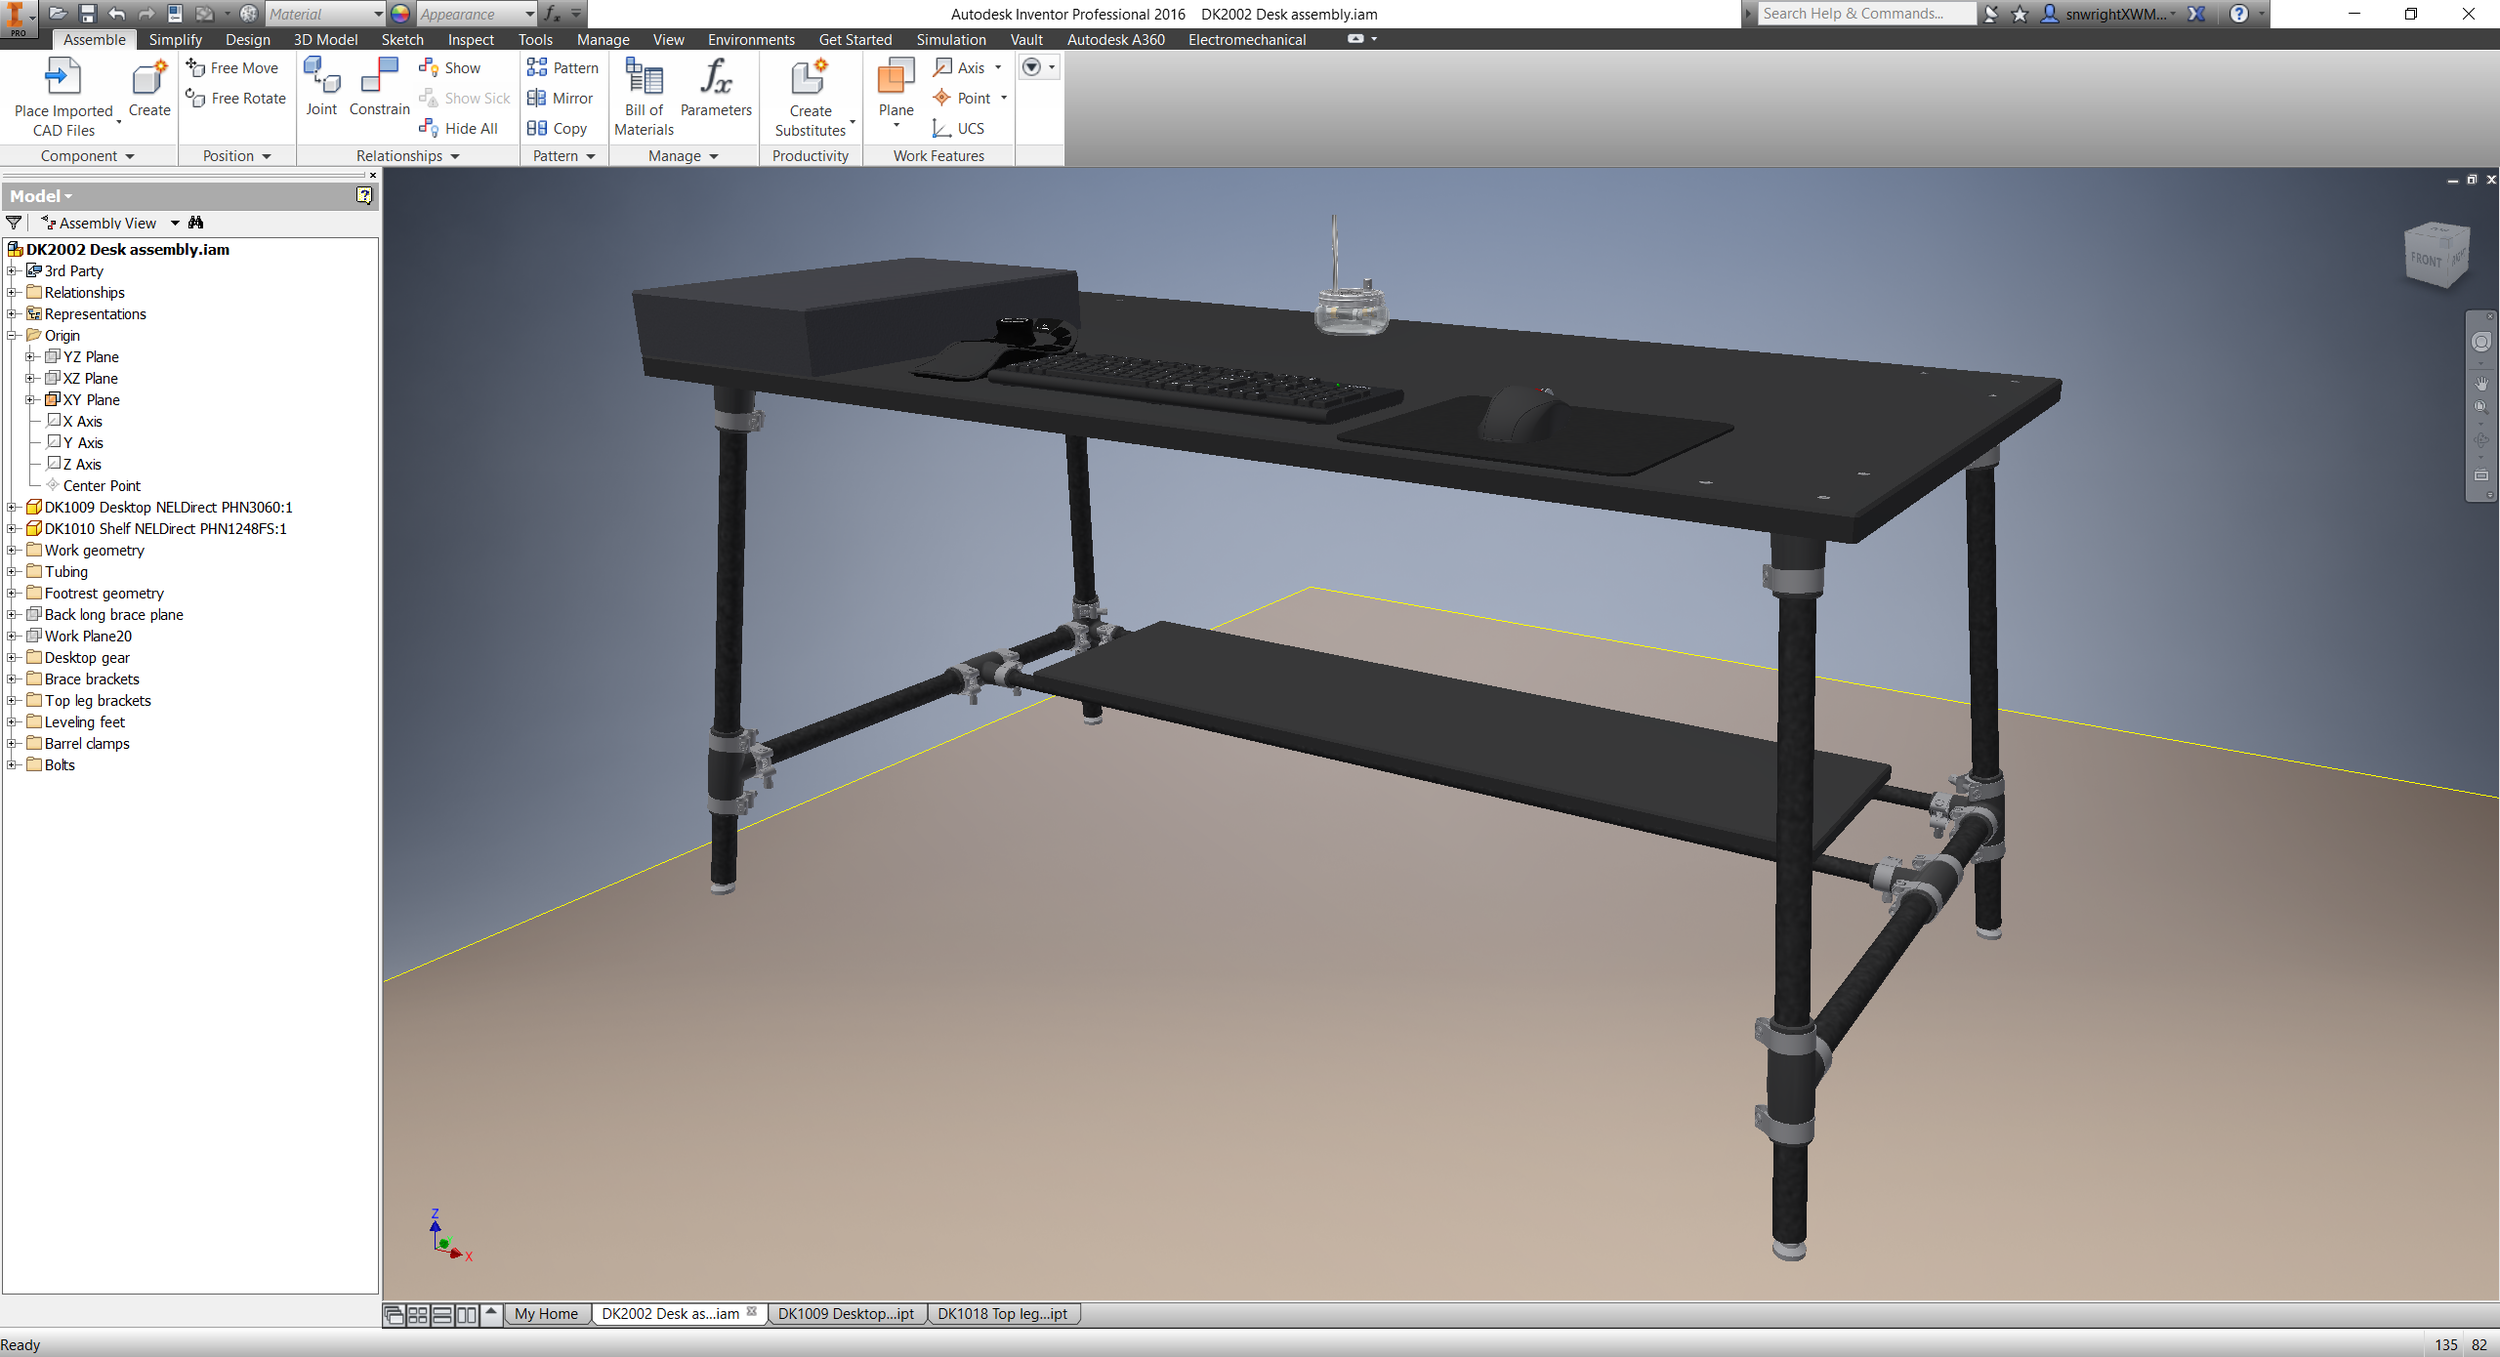
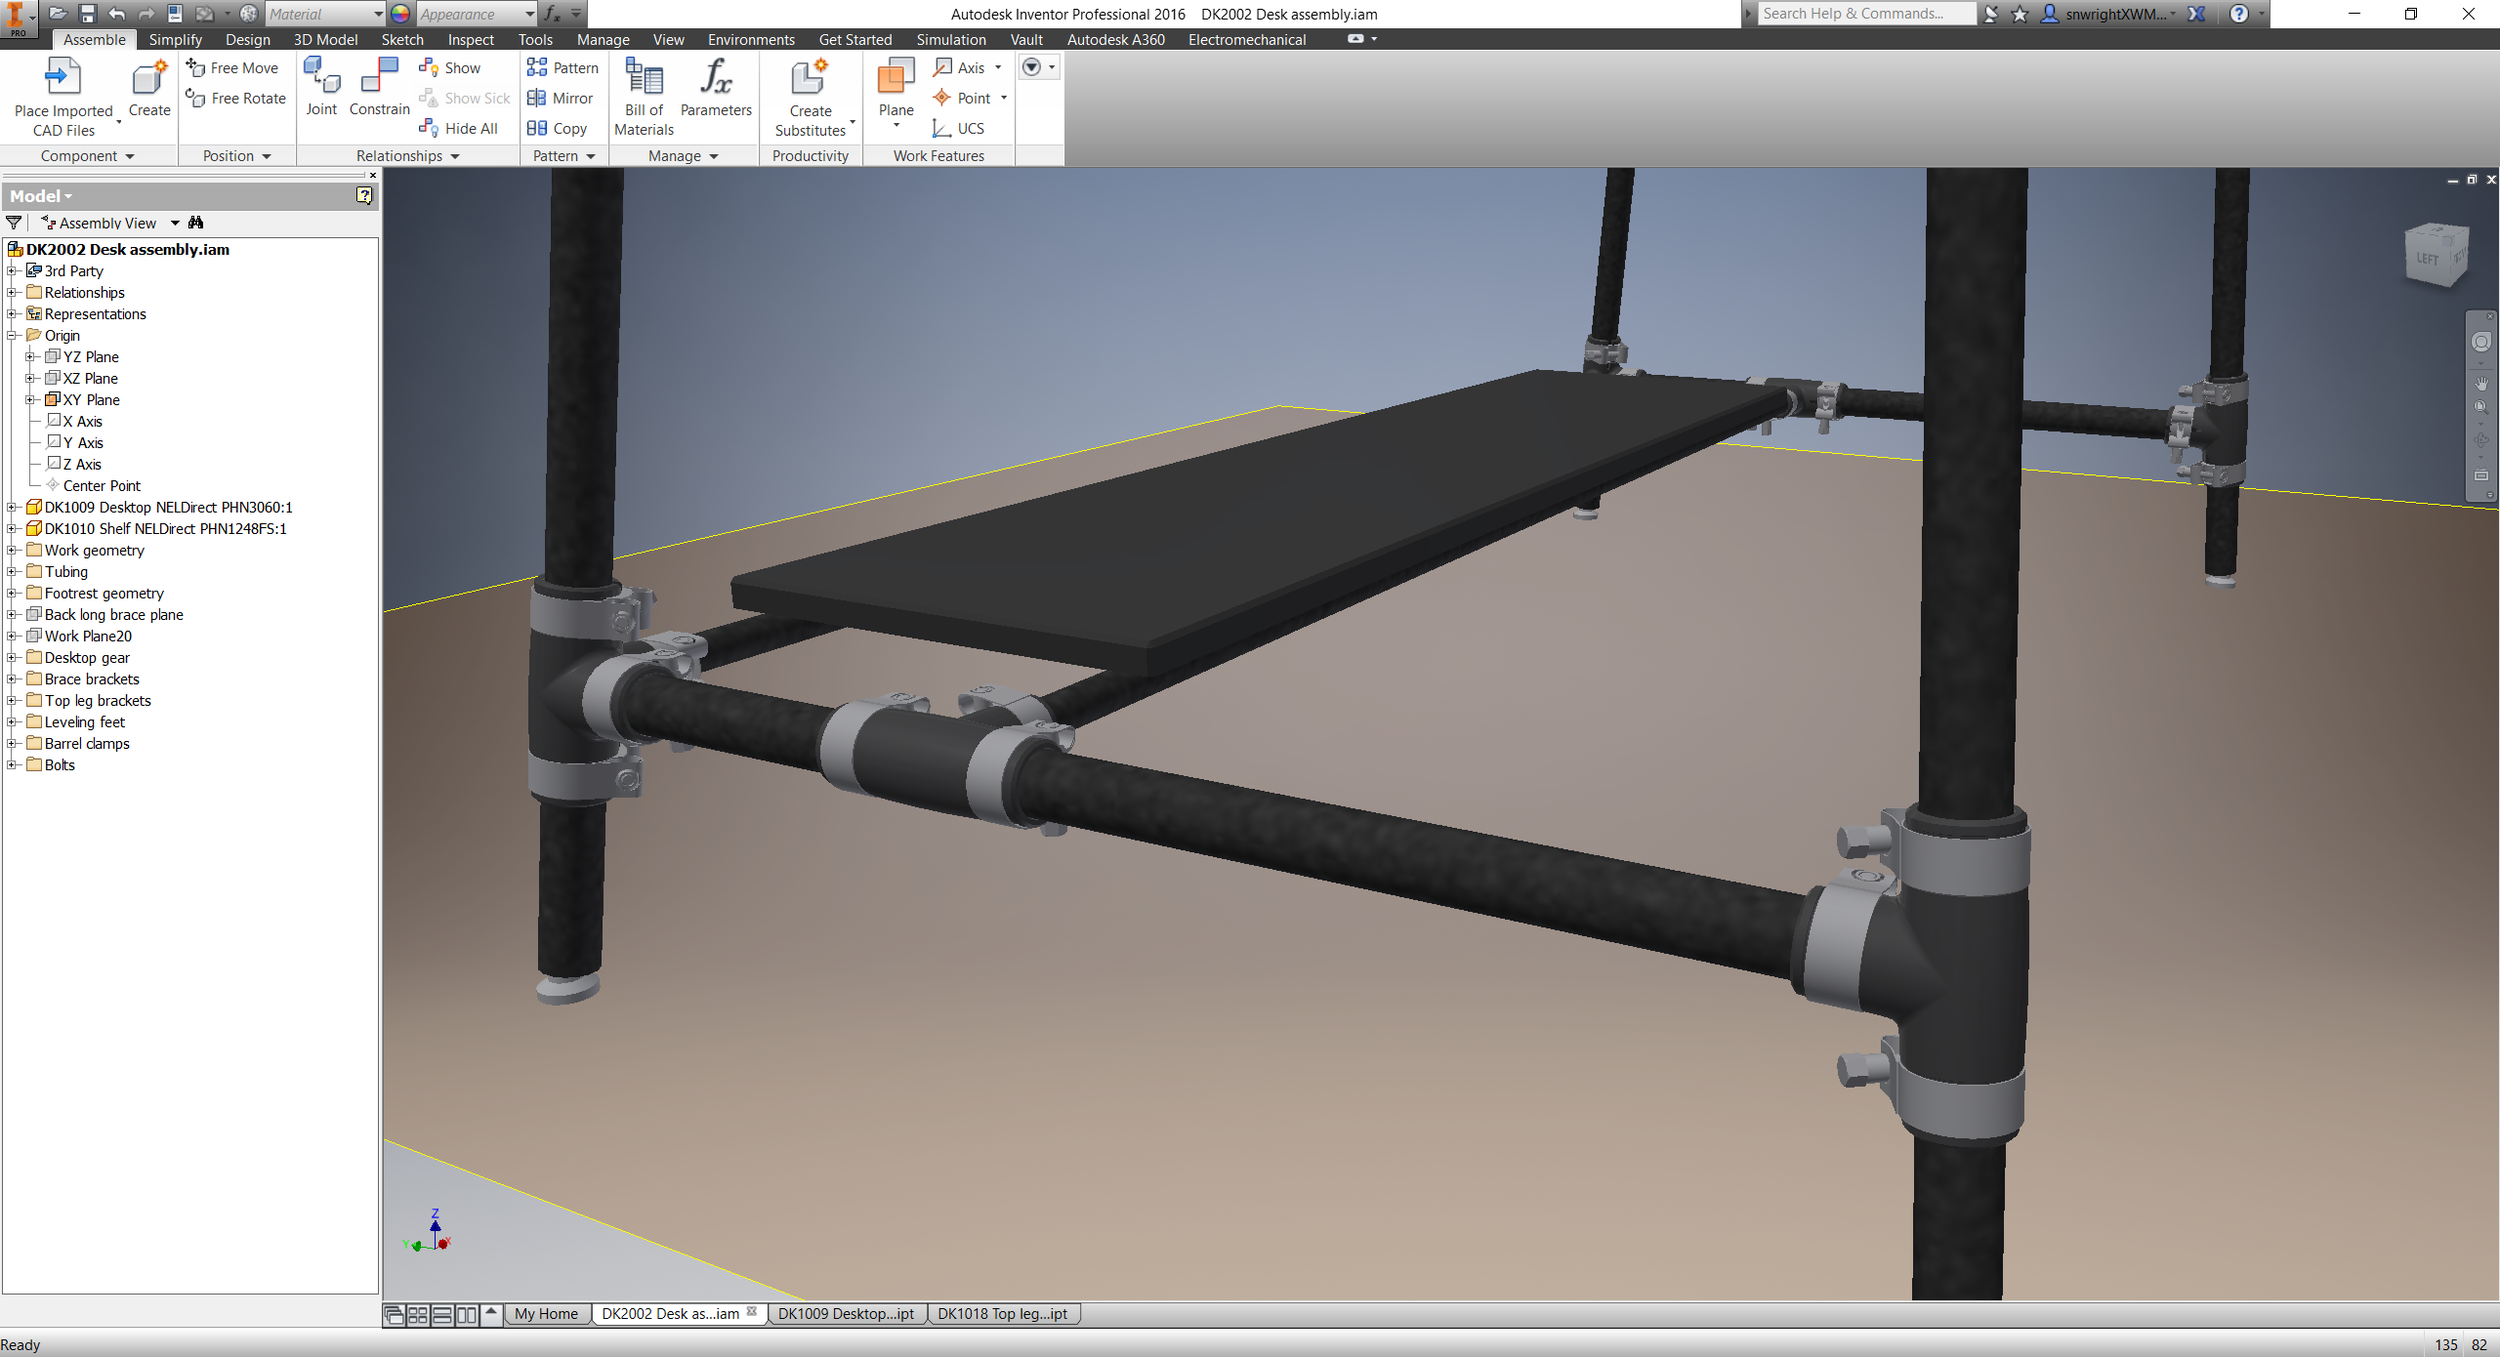
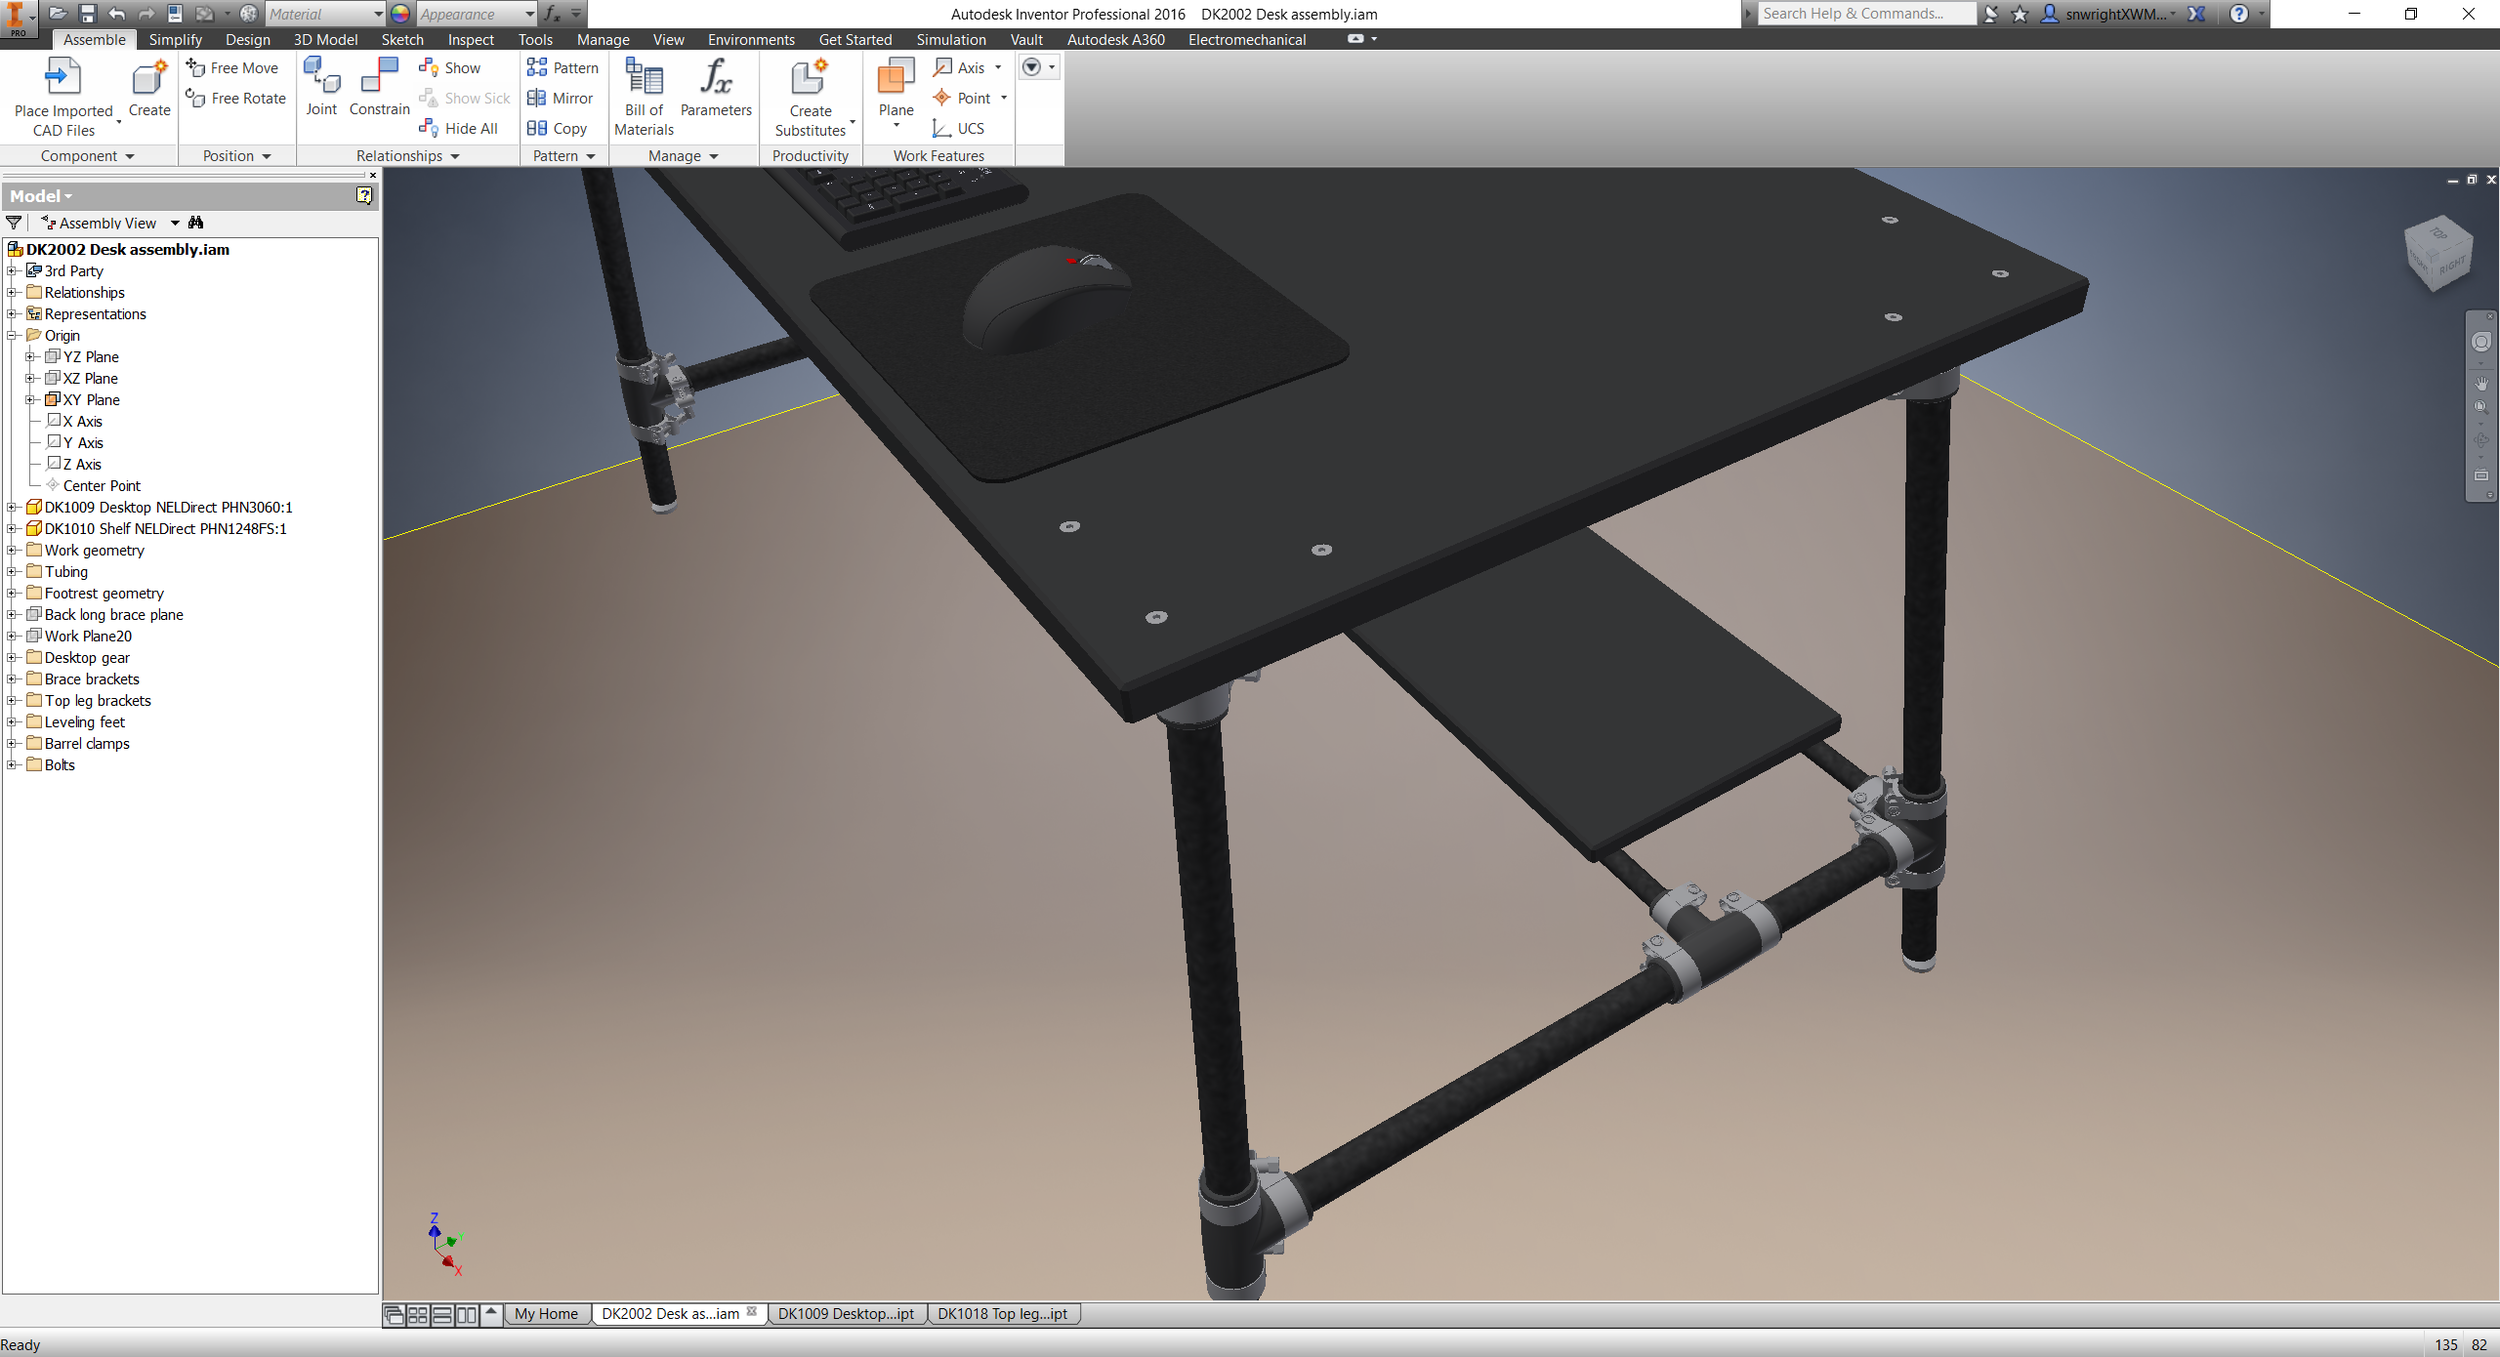
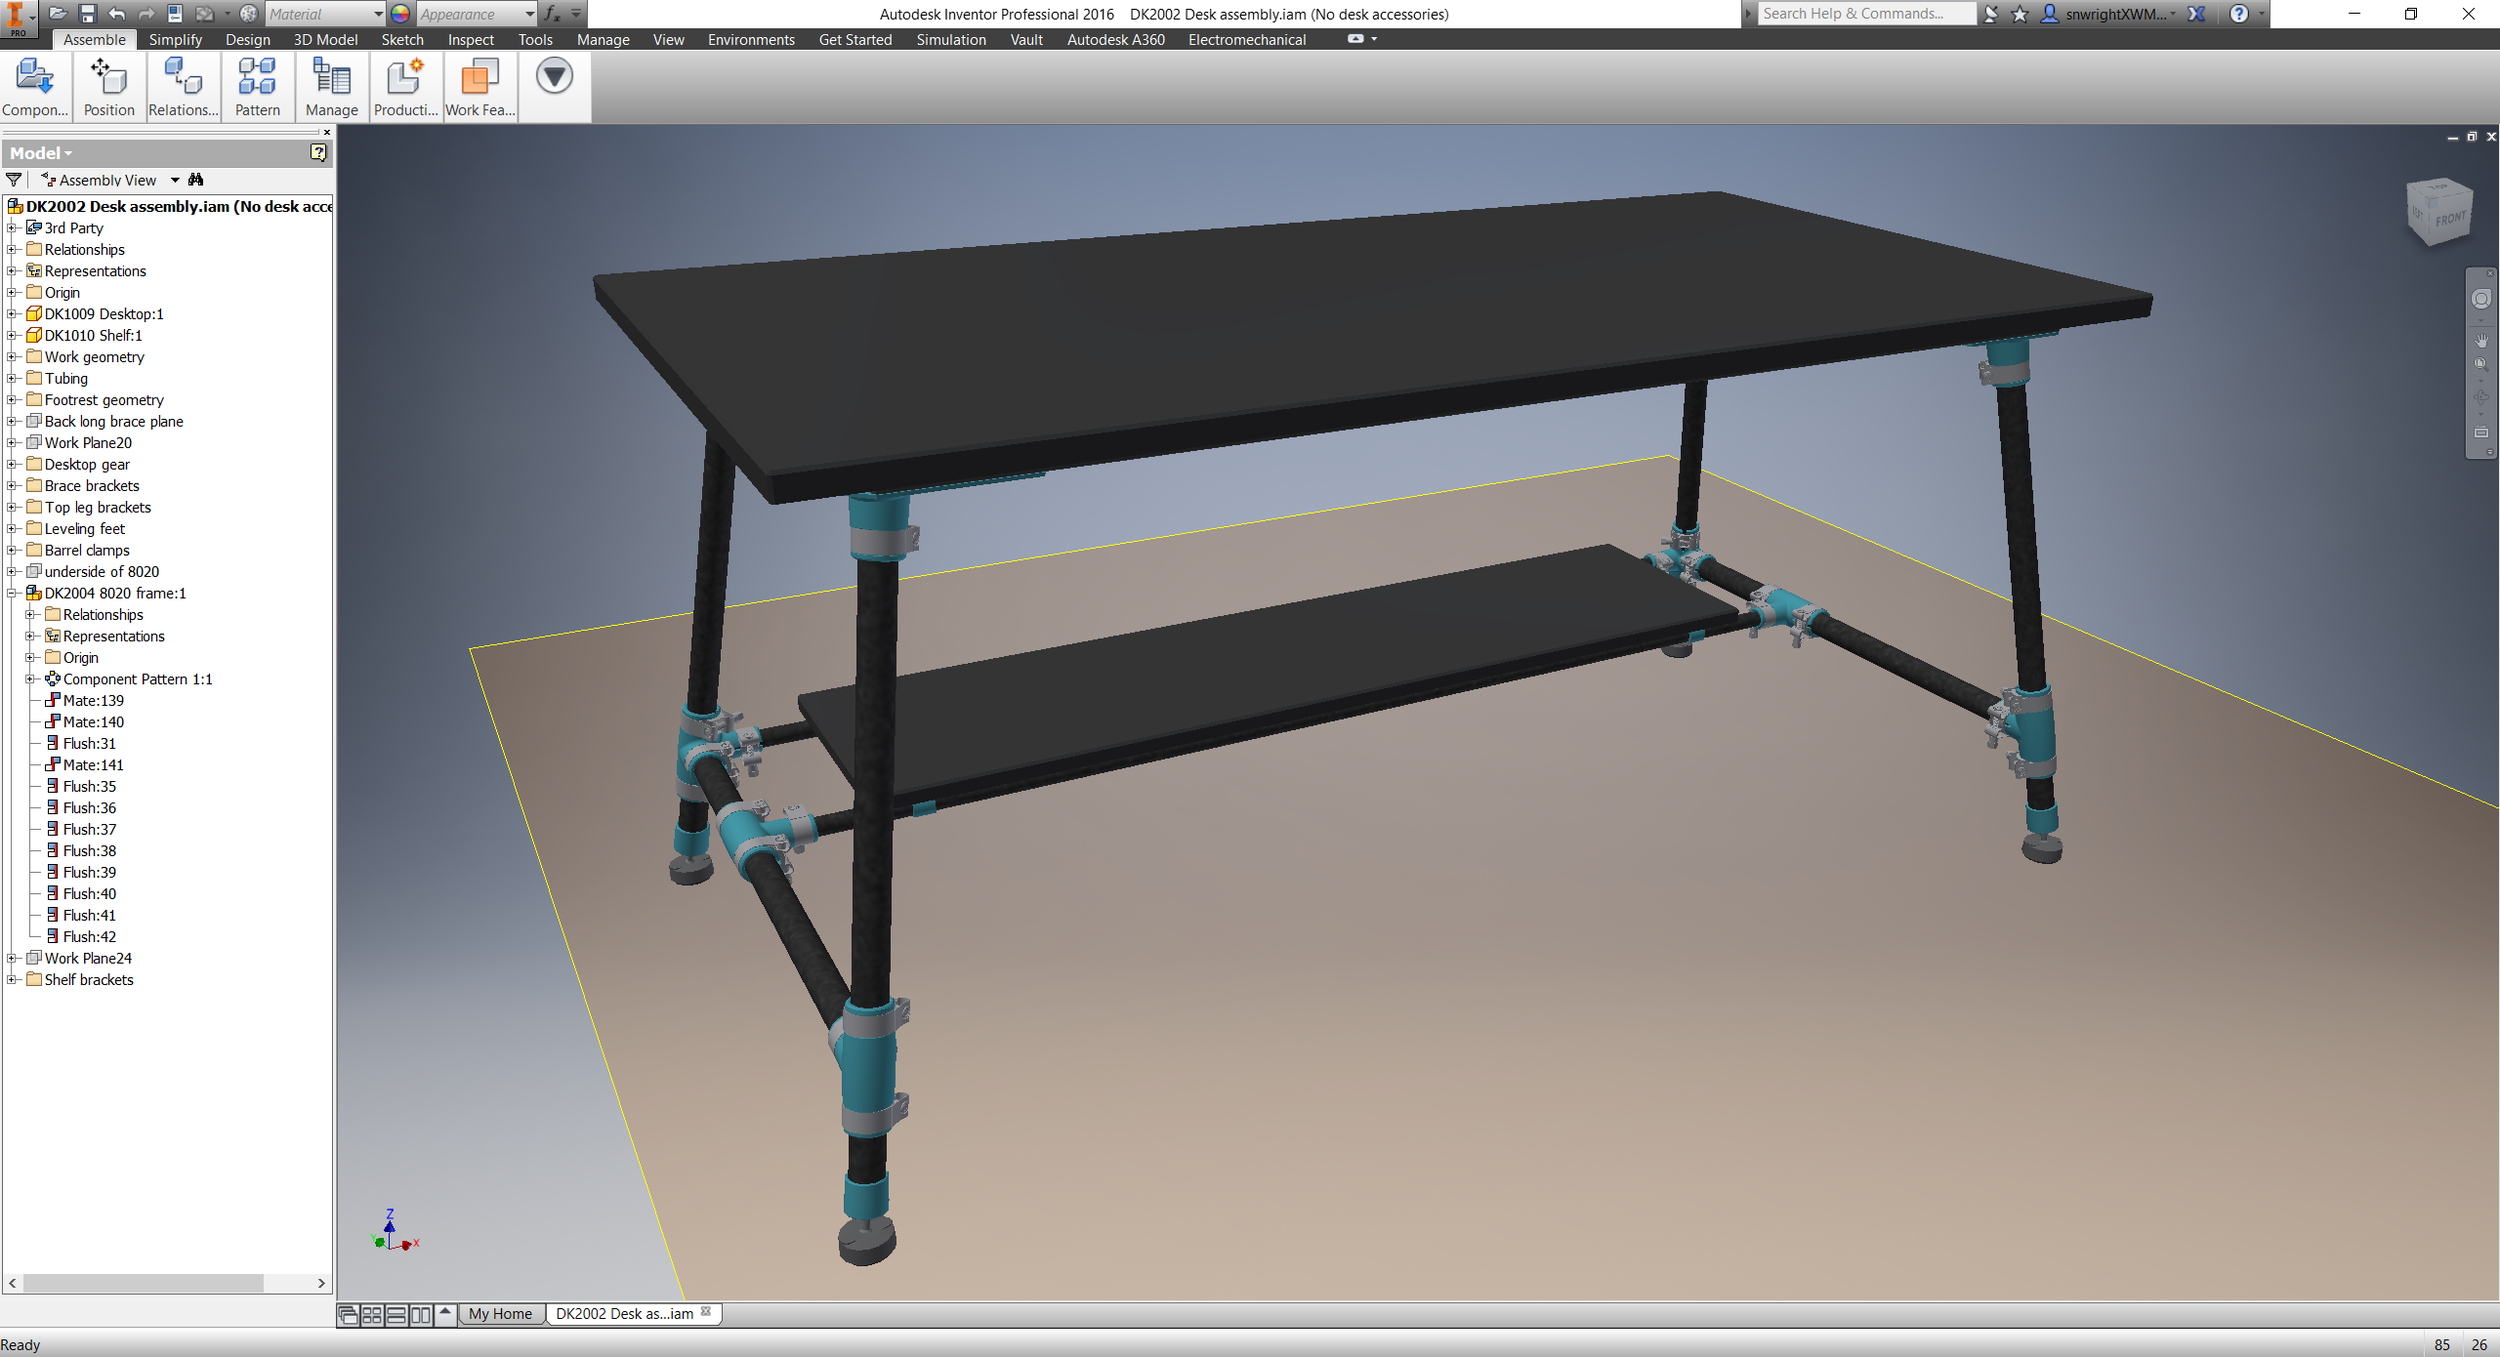
Some changes to my desk design:

In no particular order:

  • I rebuilt about 90% of the model so that it's driven off of an Excel spreadsheet. It took a little while, but makes updating tubing diameters *so* much faster.
  • The tabletop and shelf are designed to be phenolic resin; the shelf doubles as a footrest. I'm a bit worried that the long span on the tabletop will result in bounce, but that'll be relatively easy to fix if it happens.
  • The frame tubes are filament wound carbon fiber throughout.
  • The lugs/brackets are all slotted; they'll be printed. The band clamps are a little bulky for my taste, but the practicality of making the frame modular is just too appealing to me. Plus, I'm pretty sure they'll distribute the clamp force evenly and be plenty strong to hold the frame together.
  • My current plan is to drill and countersink the tabletop and then use flat head screws with washers & nuts to fasten the leg brackets. 
  • The legs are angled, and I'm planning to use swivel mount feet with rubber pads on them. I'll install nuts in the bottom of the legs (method TBD) to hold the feet in place.
  • Having dummy models to serve as Utah teapots is *really* nice. I'm still missing my Wilton vise, Gerstner tool chest, and monitor/laptop stand, but none of those is worth the time it'll take to model them.

I'm pretty happy with this so far - hoping to have it together soon :)

EBM and chemical surface finishing

Added on by Spencer Wright.

As I've written here before, the field of high performance surface finishes is fascinating - and complex. Surface finish plays a big role in the mechanical and aerodynamic properties of a part, and (in the case of consumer products) it can have a huge effect on marketability too. And so, as I've gone through the process of developing my titanium 3D printed bicycle seatpost, I've been conscious to evaluate many different surface finishing options to find a manufacturing process chain that's both effective and economical.

And so, this past spring, I reached out to Dr. Agustin Diaz to see how REM Surface Engineering could help my parts.

For a bit of context, allow me to quote myself (from EBM surface finishes and MMP):

The part's nomenclature

The part in question is the head of a seatpost assembly for high end road bikes. The part itself is small - about 70mm tall and with a 35mm square footprint. As built, it's just 32g of titanium 6/4. Add in a piece of carbon fiber tubing (88g for a 300mm length) and some rail clamp hardware (50g), and the entire seatpost assembly should be in the 175g range - on par with the lightest seatposts on the market today.

As a product manager who's ultimately optimizing for commercial viability, I had three questions going into this process:

  1. How do the costs of the different manufacturing process chains compare? 
  2. How do the resulting parts compare functionally, i.e. in destructive testing?
  3. Functionality being equal, how do the aesthetics (and hence desirability) of the parts compare?

Towards these ends, Dr. Diaz and REM finished three parts for me:

The parts were printed in titanium 6/4 on an Arcam A2X by Addaero Manufacturing. They were then HIP'd (hot isostatic pressing is a whole other area of interest - more on it soon, I hope) before being treated by REM's isotropic superfinishing process.

The results are very interesting, and contrast in many ways with MicroTek's MMP process. REM ISF is a chemical accelerated vibratory finishing process. In it, parts are placed in vibratory finishers with a nonabrasive media and a chemical activating agent. The chemical agents are selected by the part's composition: Different metal alloys will react to different chemicals. The media, on the other hand, is selected depending on the part's geometry: Parts with small features will require smaller media, etc.

As with any vibratory finishing process, then, REM tunes the frequency and amplitude of the machine to adjust the aggressiveness of material removal. The media chambers in these machines are shaped like toruses, and parts take a rotating helical path around them as they vibrate. Adjusting the frequency and amplitude of the vibration affects that helical path, and REM tunes the rolling angle to produce the result that's needed. "It's an art and a science," Dr. Dia zaddtold me.

REM finished three parts for me, in two slightly different design variations. The first part went through their Extreme ISF process - a quick treatment that removes excess powder and some higher-order roughness. The second two parts went through Extreme ISF *and* an additional ISF treatment, removing .020" (about .5 mm) and producing a much smoother surface. In order to compensate for the material removal, one of the Extreme ISF + ISF parts was printed with .020" of  extra stock on all of its surfaces (if you look closely, you can see the additional stock as a stair-stepping effect on the inside of the skirt edge). The results are below - click on the photos to enlarge.

Incidentally, I found REM's process nomenclature a bit confusing at first. As described above, all of these processes include some chemical agent and some media. The difference in the different processes has to do with the balance of those two factors: Extreme ISF uses aggressive chemistry but relatively little media interaction, whereas ISF is a longer process with less aggressive chemistry and more media interaction. REM also offers a Rapid ISF process, which is to ISF much as a lathe is to a milling machine. In it, the parts are fixtured and then moved through the chemical/media mixture. It's a much faster process, but one which requires more tooling and setup and hence is reserved for high volume parts.

The surface character of the REM parts differs significantly from the parts that I had MMP'd. ISF interacts with the full surface of the part, with the result being that both peaks and valleys are rounded out. Note that the color scale in the images below are not constant; click on the images to see the color scale key.

The roughness values for the two methods are also quite different. The key metrics are below; full roughness profiles & filter data are here for Untreated, Extreme ISF, and Extreme ISF + ISF parts (thanks to REM).

Ra - Roughness average

All values in µm. Evaluation length = .5"

Rq - Roughness, root mean square

All values in µm. Evaluation length = .5"

Rsk - Roughness skewness

All values in µm. Evaluation length = .5"

Rt - Roughness total

All values in µm. Evaluation length = .5"

As with most things, the numbers above both a) capture interesting differences between these five finishing methods, and b) are abstractions which ultimately fail to capture the entirety of the physical parts. Such is the nature of data; in and of itself, it's not particularly insightful.

As I've described previously (and above), my interests are functional, aesthetic, and economical. The latter two of these sit more or less in balance, but the former is bound by the composition & arrangement of matter. To that point, Agustin referred me to a paper by Kwai Chan called "Characterization and analysis of surface notches on Ti-alloy plates fabricated by additive manufacturing techniques," which shows a correlation between notch depth and a shortened fatigue life in EBM parts. To quote:

The presence of surface notches is likely to promote crack initiation and reduce the fatigue performance of LBM and EBM materials. Since the depths of the surface notches correspond to the maximum valley depths on the surface, fatigue life of the various Ti–6Al-4V materials is expected to decrease with increasing maximum Rvm values...
To improve fatigue performance, the surface notches on the EBM and LBM materials must be removed by machining.

Of course, those last two words - "by machining" kind of begs the core question that I'm asking here. To wit, see the Rvm numbers from REM:

Rvm - Maximum valley depth

All values in μm. Evaluation length = .5".

The goal, here, is to improve fatigue life - and avoid the fate that my last parts met during testing. My hope - and one that's balanced by my lingering concerns about my glue joint design - is that the much reduced Rvm numbers here will help significantly.

More soon.

Intellectual influence

Added on by Spencer Wright.

From a 2011 review of Daniel Kahneman's Thinking, Fast and Slow - which, as I've written before, is very good:

But intellectual influence is tricky to define. Is it a matter of citations? Awards? Prestigious professorships? Book sales? A seat at Charlie Rose's table? West suggests something else, something more compelling: "Kahneman's career shows that intellectual influence is the ability to dissolve disciplinary boundaries."

That's a pretty compelling definition to me.

My favorite tools of 2016

Added on by Spencer Wright.

I like tools a *lot*; my favorite gifts (both given and received) have been tools. So I thought: Wouldn't it be fun to put together a guide for folks like myself who want/need gifts for loved ones & themselves?

Aside from five items here (each marked with an asterisk), I own and have used all of the stuff below extensively. My filter: It's gotta be a tool; it's gotta be a pleasure to use and/or be exceptionally useful; and it's gotta be something that you might not think about or stumble across otherwise.

And so, without further ado: My favorite tools of 2016!

Planning & Strategy.

  • A serious particulate respirator. You know those paper dust masks? They're BS, and you'll never look back once you use a real respirator.
  • Eye protection! I have a pair of these. I've had foreign objects (metal, sand) removed my my corneas on more than one occasion - it *sucks.*
  • Workflowy. The free version is everything you'd ever want out of a list app - iOS or web access, supports hashtags and sharing, etc. It's a *great* tool for task & information management.

Making & Manufacturing.

Maintenance, Repair & Operations.

Distribution & Logistics.

Inspection & Testing.

Tangents.

And.

A Lego model of the Panama Canal (which you can only buy in Panama).


Good at it

Added on by Spencer Wright.

This week I experienced a few moments - fleeting, but palpable - of being good at it. 

It was a nice feeling: A combination of knowledge, experience, and at least a bit of maturity. It was the feeling of having all of your tools laid out in just the right place. The feeling of finding a rhythm. The feeling of knowing exactly how much energy you've got, and pacing your sprint so that you *just* exhaust all of it.

Of course, I continue to make mistakes. Things rarely move as quickly as I hope, and rarely am I satisfied with the results. But when I look back, I can see my own work working - and I'm pretty sure it's not accidental.

I know the feeling isn't permanent; even writing this now, it seems a far way off. But I've been building for a while now, and even a fleeting reprieve is pretty great :)

New desk

Added on by Spencer Wright.

About a year ago, when I refurbished an old Wilton vise for my home office, I noted that I intended to build myself a new desk as well. Like many projects, I ended up moving a bit more slowly on that than I expected - which in this case was convenient, as it allowed me to settle into a new house and think about what my work will look like over the next few years. And so last weekend I opened up Inventor and started putzing with my desk design again:

Like so many of the things I've designed in the past few years, the idea here is to use modern materials & assembly methods, and make something that is highly functional and also aesthetically pleasing. The tabletop will be lab-grade phenolic resin - a material that is strong, seamless, and durable to impact, scratching, and liquids. The legs will be monofilament wound carbon fiber tubing, which I'll probably apply a clear sealer to. And the whole structure will be held together with - you guessed it - 3D printed node connectors.

The exact dimensions and assembly methods are still TBD; I'm also considering a few details for attaching/mounting things (my vise, my monitor stand, lighting, the power strip that I like). I'm also still considering integrating the desk with the 7-drawer tool cabinet that I have, although at this point it's more likely that they just sit side-by-side.

Timeline on this moving forward is... medium? But hoping to show some progress soon :)

Intentions & Modes of Communication

Added on by Spencer Wright.

This is a bit of a blast from the past: A draft blog post that I wrote, but never published, back in July of 2014. I was working at Undercurrent at the time, and thinking a lot about the way that we communicated to our clients (mainly through slide presentations), and about the degree of intellectual seriousness and honesty of that presentation. 

What I wrote below is a bit out of context, so I'll put it bluntly here: I think that slide decks are fine and good as supplemental info during presentations, but do not generally encourage the kind of thought that real strategy and/or evaluation require. 


From an excellent 2001 report by Smithsonian Institution's Office of Policy and Analysis titled "Art Museums and the Public":

Over the last 25 years, many museums have engaged in studying the impact of their exhibitions on their visitors...The research has been largely evaluative, comparing outcomes with intentions, and has been directed towards improving the mechanisms of presentation so that desired outcomes are more likely...
One of the most striking results of this generation-worth of museum audience studies is that the explicit aims of exhibition planners are rarely achieved to any significant degree. In study after study at the Smithsonian, in all types of settings, researchers found that the central goals of the exhibition team (which are usually learning goals) were rarely met for more than half of the visitors, except in those cases where most visitors entered the museum already possessing the knowledge that the museum wanted to communicate. Rather than questioning their aims, most museums, at the Smithsonian and elsewhere, reacted to such results by attempting to improve their exhibition designs and information delivery systems, and by downplaying the importance of such outcome measures.

Here I see a striking disconnect between the stated goals of museums and those of public museum goers. Curators feel a mandate to *educate* their audience, and tailor their exhibition plans towards that end. But visitors remain uneducated, and when curators are presented with that fact, they react defensively.

Later in the report:

Art museums serious about enhancing their public role may also need to reconsider their internal structures to better express their priorities. How are decisions about public programs to be made? Must exhibition subjects be determined solely by the interests of the museum's research staff? Who will be responsible for maintaining the dialogue with present and prospective visitors? Will the dialogue function be called marketing? Program research? Audience research? What role will those specialists play in directing the museum's program plans? What role can be shared with the public directly?

Ultimately, it might even be necessary to review the subject matter distinctions that currently separate museums. If the aim of a museum is to serve a public that is often less interested in the authorship and style of an art object than in the culture that gave rise to it, or the meaning that is currently found in it, there may be little practical reason to maintain the subject matter boundaries that museums have inherited from the departmental structure of academic institutions...

If a museum wants to seriously address its public role, it needs to find a way to engage in an extensive, prolonged, multi-faceted dialogue with that public. There needs to be a way for the museum to listen, especially to those who do not believe that the museum has anything to offer them. And there needs to be a way for the museum to respond to what it hears.

And lastly, in a section titled Rethinking "quality":

The operations of some Smithsonian art museums are deeply affected by a concept of quality that discourages innovation, experimentation, and flexibility. If museums are going to find ways to connect with new audiences, they will have to experiment. Many of those experiments will fail and many will have to look very different from what is currently being done. Unless the museums are willing to take such chances, they will not change.

In my opinion, a fundamental rethinking of purpose is appropriate here: away from pseudo-objective quality and towards popularity. At minimum, museums should be honest with the fact that their curatorial decisions are largely based on an elitist form of popularity. I will leave it to them whether they want to broaden the range of aesthetic and cultural perspectives that they aim to serve, but I find the focus on quality intellectually dishonest and ultimately counterproductive.

---

On a personal note, I am struck with how this report contrasts with my output at Undercurrent. Here there is a remarkably legible and compelling analysis. It is both academic and personal. It describes the extant goals and performance metrics of both the organization at hand and its broader marketplace, and asks serious questions about how the reader should interpret them. It then suggests both specific action steps *and* general frameworks to consider - all while allowing for some ambiguity in what an optimal outcome will look like. And it does so without sounding jargony or academic, something that I am often bothered by in the world that Undercurrent inhabits.

To be fair, some of the work I've done at Undercurrent has shared these features. I've also not been tasked with such a high-level analysis of an organization's objectives (most of the product strategy we do tends to be more visual). But for the most part, we produce decks, and I can't compellingly argue that they are as thoughtful or intellectually honest as this Smithsonian document.

Now, I should note that there are benefits to being short-winded, and throwing a couple of pretty pictures in with your pitch isn't necessarily a bad thing. But I wonder: In a business that communicates with busy and varyingly interested stakeholders, what is the place of producing text-only reports? Are there specific traits of organizations that are well suited to integrating and acting on such output? And what are the constraints which should be applied to it, such that it can have as great an impact as possible?

Notes on Arcam and SLM

Added on by Spencer Wright.

Yesterday, GE announced that they had put in bids to acquire both Arcam and SLM for a combined total of $1.4B. This move poses some interesting questions about the next few years in industrial AM, and will no doubt have a big impact on both the companies involved and their customers and competitors. I don't have any privileged insight into any of these companies' decision making process, but I have a longstanding interest in the industry and what they're working on. Here are a few observations & questions that occurred to me about the deals and their impact.

Background

In 2012, GE Aviation made three large acquisitions in industrial AM. The first was the combined purchase of Morris Technologies and Rapid Quality Manufacturing, two sister companies based in Cincinnati who had already been a big supplier to GE Aviation (terms of the deal were not disclosed). Later that year, they bought Avio Aero, and Italian parts supplier, for $4.3B. These two purchases showed an interesting balance in technologies. While Morris and Avio had very similar business models (both were job shops that produced parts for GE Aviation and other business units; Avio also produces parts by traditional manufacturing methods), they focused on different additive technologies: Morris on laser, and Avio on EBM.

I've written about the difference between laser and EBM in the past, but a few points here:

  • The fuel nozzle that GE is so famous for printing is made by laser in Auburn, Alabama on EOS machines. I believe that their (lesser known) T25 temperature sensor is made on the same machines.
  • The laser (Note: I'm using "laser" here to refer to processes that are variously called DMLM, SLM, DMLS, lasercusing, and the generic "laser metal powder bed fusion." Note also that SLM can be used to refer both to the printing process AND to the machine manufacturer that GE just acquired.) machine market has a number of providers: Aside from EOS and SLM (the two machine manufacturers that GE is most known for using) there's Renishaw, Concept Laser, Additive Industries, 3D Systems, and a variety of Chinese entrants.
  • While GE Aviation has tended towards EOS machines (see the video above), GE Power & Water uses machines made by SLM in their Greenville, SC plant (Note: Here I'm drawing from an AMUG 2015 and other industry sources; sorry for the lack of a hyperlink reference).
  • Arcam sits apart from these: it's currently the only company making machines for EBM (electron beam melting, or "electron beam metal powder bed fusion" if you're picky).
  • Avio Aero has done some really interesting things with EBM since the GE acquisition. Perhaps most notably, last year they printed low pressure turbine blades out of titanium aluminide, an intermetallic alloy. TiAl has excellent mechanical properties at high temperatures (an important feature of any part that's in the hot stage of a jet engine), and is traditionally cast by companies like Precision Castparts Corp (PCC). Printing in TiAl brings advantages but is extremely difficult due to the material's tendency to fracture. Printing TiAl could be a big deal as GE ramps up production of TiAl blades for the GEnx engine, and it was very interesting to note that after the successful prints, Avio bought an additional ten Arcam systems - the largest purchase that Arcam had ever accepted.

So: GE already had a strong portfolio in additive. What are the implications of the Arcam and SLM acquisitions, and how will this impact the industry?

A full stack, in-house

The most interesting part of the acquisition to me is the fact that GE will now be able to in-house the entire industrial AM supply chain (minus software; more on that below). Previously, they were focused primarily on basic research and applications development (Morris, Avio, CATA, and the Niskayuna Global Research Center) and serial part production (Auburn, Greenville, and Avio). Now, they'll own not one but two machine manufacturers - allowing them to push upstream and make a more direct impact on the development of the additive industry.

But perhaps more importantly, GE gains both powder production (through AP&C, the Canadian powder supplier that Arcam acquired for CAD 35MM in 2014) and final parts manufacturing (through DiSanto, the medical implants manufacturer that Arcam acquired for $18.5M later the same year). When Morris was acquired, they shut down their sales organization and focused on printing parts for internal GE customers. DiSanto is a very different business, though, and I wonder whether it might make sense as part of GE's healthcare unit - with its traditional focus on medical imaging and healthcare IT.

AP&C is a bit of a different beast. They manufacture the raw materials for not only powder bed fusion but also MIM, HIP, and other powder metallurgy applications. Their website advertises commercially pure titanium and ti64, but Arcam also markets cobalt-chrome - which both the fuel nozzle and the T25 sensor housing are made of. I'll be very curious to see whether AP&C continues selling powders to the public, or if they focus on internal use.

Improving - and selling - manufacturing machines

Separate and apart from the implications to GE's internal operations, I'm particularly interested in the way that GE's involvement at these new levels of the tech stack will affect how the industry matures. Try though they may, it's difficult for a company whose bottom line depends on selling machines (as opposed to, say, selling machines AND printing parts, or selling machines AND developing manufacturing software) to truly impact the end-to-end engineering process much. And while GE has been at the forefront of additive research (and, no doubt, collaborates very closely with both their hardware and software providers), I'm hopeful that having them at the helm will push both EBM and laser powder bed fusion forward in a cohesive way. 

Some might suggest that keeping expertise in house would be the strategic choice here, but I disagree. Powder bed fusion today suffers from both a lack of talent (easiest to change by expanding the number of use cases for the process, many of which GE ultimately is not going to compete on) and a lack of process predictability and reliability. GE has more knowledge about improving AM part yield than just about anyone else in the world, but that doesn't mean that there aren't other approaches that they're not trying. Inasmuch as sharing whatever process improvements they come up with will encourage others to try their own approaches, I hope that GE does just that. And they have in the past: through their involvement with standards and industry organizations like America Makes, 3MF, and ASTM F42; through their participation in sessions at AMUG and RAPID, and through their open innovation work (some of which I worked on while at Undercurrent) with GrabCAD and NineSigma.

My hope would be that GE continues to market and improve both SLM and Arcam machines. The latter is particularly dear to me, as EBM equipment isn't currently made by anyone else (and because I've had many parts printed on Arcam machines). SLM is a bit different, as the market for laser powder bed fusion is already so rich. But by that same rationale, the potential impact that any updates to SLM's machines would have could be huge, as they would force other players to respond in kind.

Software

I take GE at their word: They want to be a contemporary engineering company, and they believe that contemporary engineering companies need formidable software capabilities. And if they're going to truly make their mark with a software solution, it would be wise to do so in a realm where they know the problems well.

Even before these acquisitions, GE knew the pain points in additive as well as anyone else. Adding a few machine manufacturers, plus a raw materials supplier and a finished parts manufacturer, will only help that along. So my question is this: Why wouldn't GE make a play in additive manufacturing software? This is, after all, the whole subtext behind the Brilliant Factories initiative: GE knows how hard it is to make things, and they can help you make them better.

As you'll know from my previous writing, I'm excited for advances in build processing (see netfabb and Magics), build simulation (see 3DSim and Pan Computing, and research by Wayne King at LLNL), and in-process monitoring & control (see Sigma Labs, plus the product spec sheets for a *lot* of the current class of laser printers). Each of these is extremely hard in itself, and recreating the entire stack would be extraordinarily complex; I don't expect any one company to solve (or even attempt) them all. But whether they build their own solutions or work with external providers to build them, GE will be a huge stakeholder in the next generation of additive manufacturing software. And if they're serious about being a formidable software company, then why wouldn't they take a shot at building it themselves?

Regardless of how these acquisitions shake out, the next year should be interesting. I'm looking forward to it :)
The first 14mm

Added on by Spencer Wright.

This week I got some good news: Researchers at The MTC had begun printing one of my latticed bike stems.

The first 14mm of my latticed bike stem, printed in titanium on an Arcam A2x. The part is upside down (relative to the build orientation) in this photo.

This part was printed in titanium 6/4 on an Arcam A2X. Unfortunately the build failed at 14mm high; on the upside, it appears that the failure was *not* caused by my part. It's a bit early to make any judgments about its feasibility, but I'm pleased to see that these beam diameters (which are between .8mm and 1.8mm) seem to print without support structures. As you can see below, many of them (almost all, in fact) had very low angles relative to the XY plane.

The build orientation of my latticed bike stem.

I'm hoping to have more progress on this soon. Thanks to my friends at The MTC for their help with printing - and with debugging the design!

A rural community at the heart of it

Added on by Spencer Wright.

As you may know, I'm fascinated with Chinese history and culture. I also like thinking about the way things are made and how that affects people. This article, then, was excellent: A thorough essay on Chengzhongcun, the urban villages that, now subsumed by cities like Shenzhen, play a distinct and unique role in Chinese urban culture. 

So, apropos of just that much, here are some passages that I thought were really great - partly because they feel so much like my (limited, for sure) experiences in urban China, but also because the vision of urbanity they describe are so much like the daily life that I want for myself.

The Chengzhongcun is a vibrant place which is alive twenty-four hours a day and there is a constant hum of activity. The ‘handshake buildings’ over look one another and it is easy to see directly into your neighbor’s living room. These facts should not be considered a negative, but they are the consequences of living at such a high density. It can be argued that such a model of living would not be acceptable in a Western society but in the Chinese context and culture this model is perfectly acceptable and actually thrives.

The boundaries between private and public within the Chengzhongcun as so blurred that even your own home becomes part of the public realm being overlooked. It can be said that this layered living actually reinforces a sense of inclusion and a sense of belonging almost, a sense of belonging to a place and a community. Unlike living in a faceless gated high-rise were you are sealed in your own apartment, living in the Chengzhongcun binds you to a place, you are constantly aware of the environment you are living in and constantly feel part of a wider social group. This is perhaps how a social trace of a village community has remained despite all physical traces of the village disappearing.

The constant flow of daily life spills out onto the alleyways and brings with it a vibrancy which can only come from people living on top of other people. The constant social interaction and the constant feeling of an urban society that is ever present within your life. The fact that everything you need from supermarkets to workplaces to entertainment is literally round the corner. These are elements that a mega-city designed in zones of activities and connected by vast transport links can’t replicate and these are the exact characteristics that give the Chengzhongcun their atmosphere and sense of place...

Only in China can the most extreme form of urbanisation be said to have a rural community at the heart of it...In fact an urbanism with community and social interaction, one which has grown out of a rural beginning can sit just as comfortably within the context of that most 21st century form of a mega-city like Shenzhen...
I believe if you truly want to understand contemporary China then you should try and understand the Chengzhongcun. The traces of history mixed with pragmatic development, the hap-hazard approach and determination to achieve progress, the self-regulation and social cohesion, the density and intense atmosphere of social interaction are all elements that are present at all levels of Chinese society. Here in the Chengzhongcun they are exaggerated and amplified given an insight into the Chinese mindset. For me the Chengzhongcun are in their way a summary of China at this moment in time. To have architecture achieve this is quite special, it was organically produced from the people themselves and the value lies with the villagers and migrants who live in these places, the people who produce the vibrant lifestyle and preserve the ancestral heritage and create their shared communal living. It is that quintessential Collectivity through Individuality that is so appealing and produces these fascinating communities and fascinating communal urban space that is uniquely Chinese.

All I know is this: they're doing *something* right.

Seatpost testing post-mortem

Added on by Spencer Wright.

This week I got my seatposts back from testing at EFBE. As you'll recall, these failed ISO 4210-09:2014, 4.5.2. 

The part's nomenclature

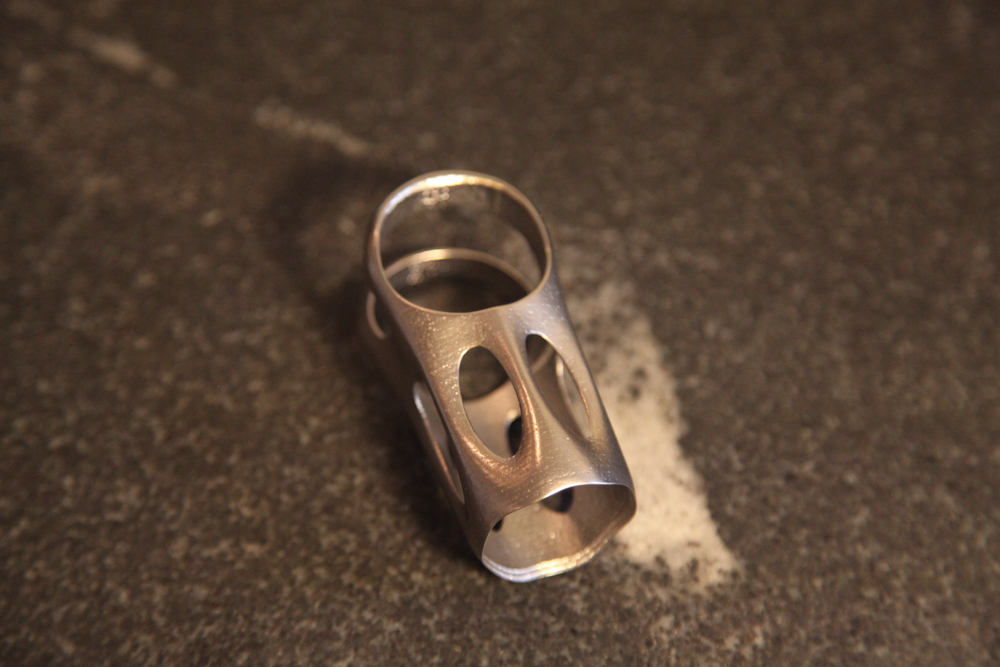
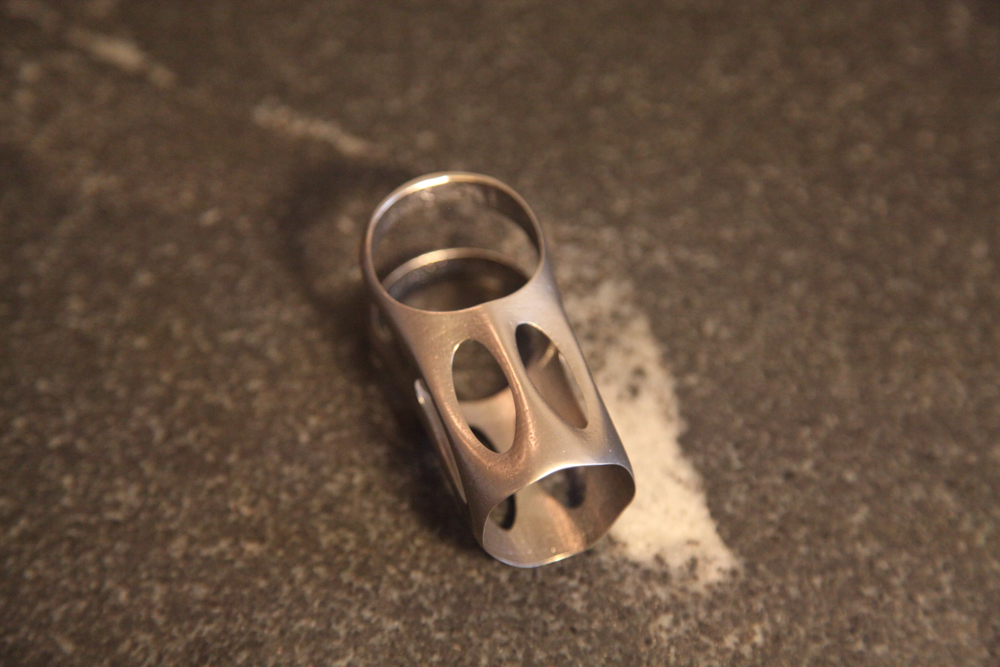
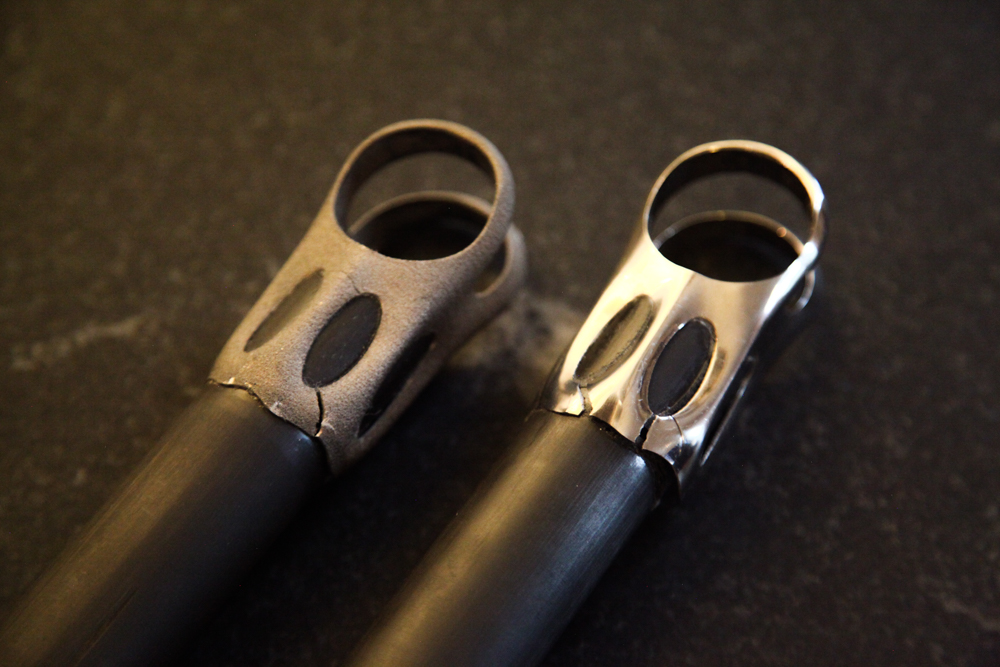
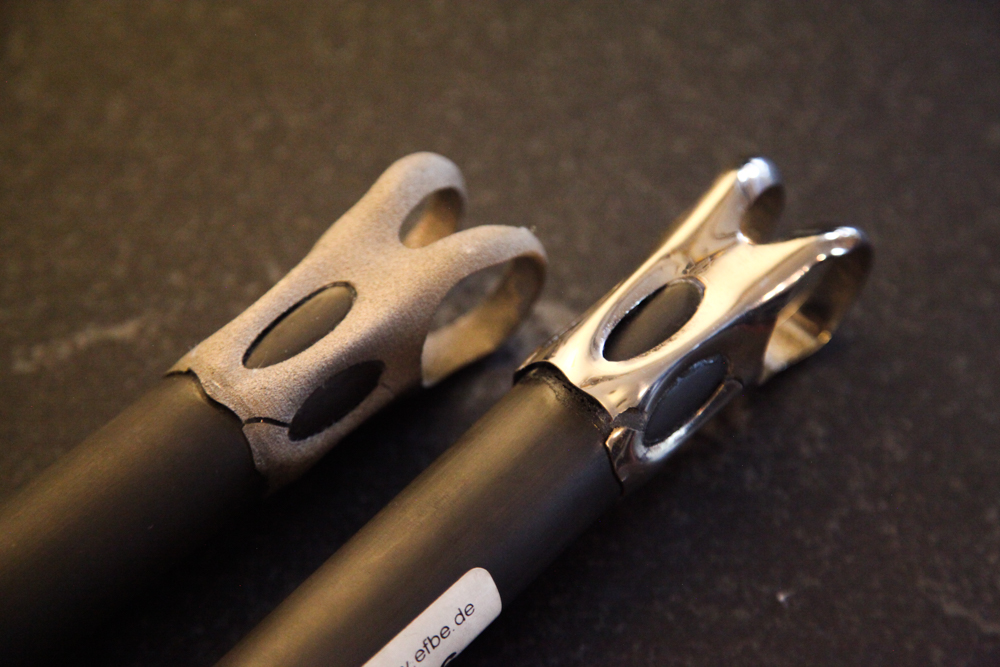
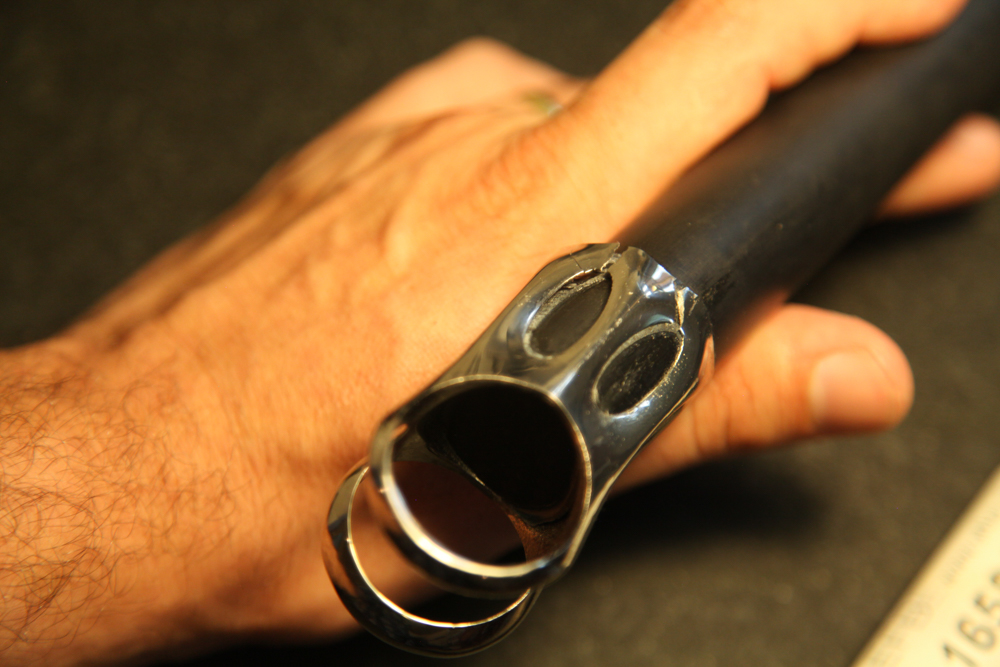
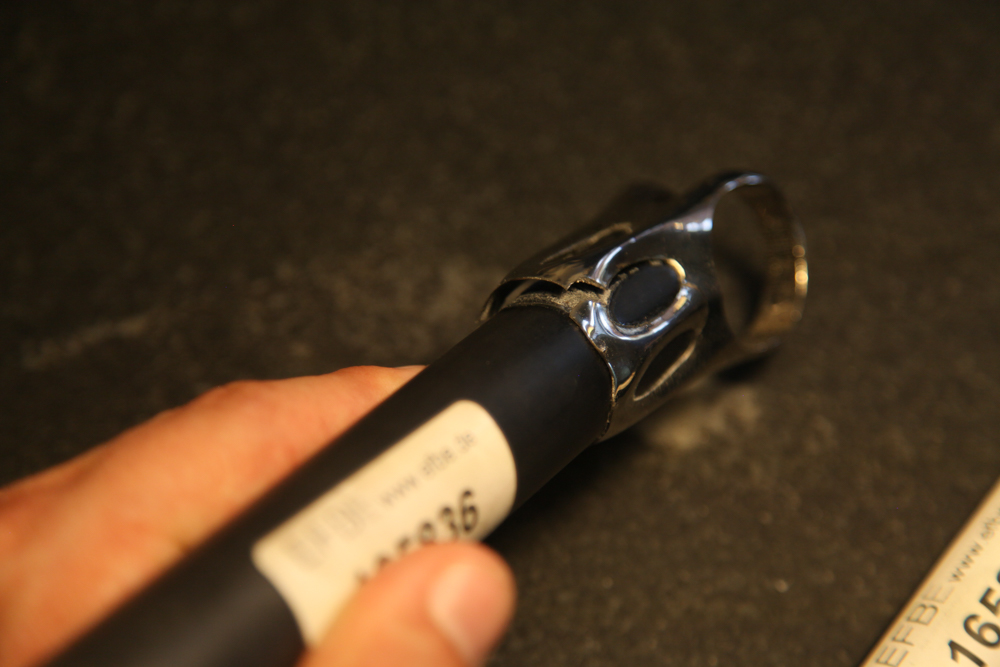
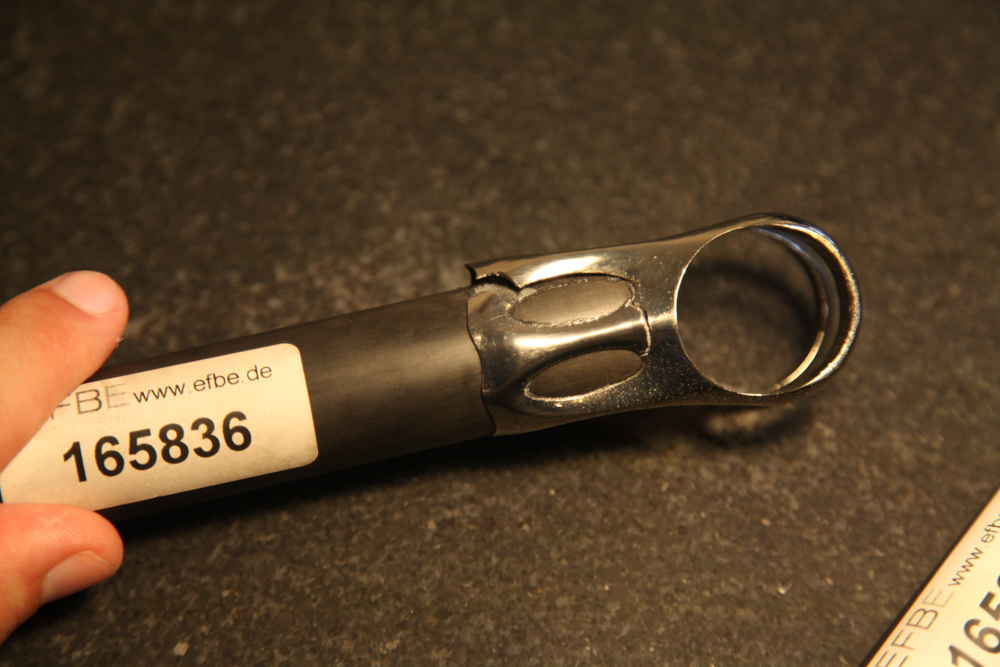
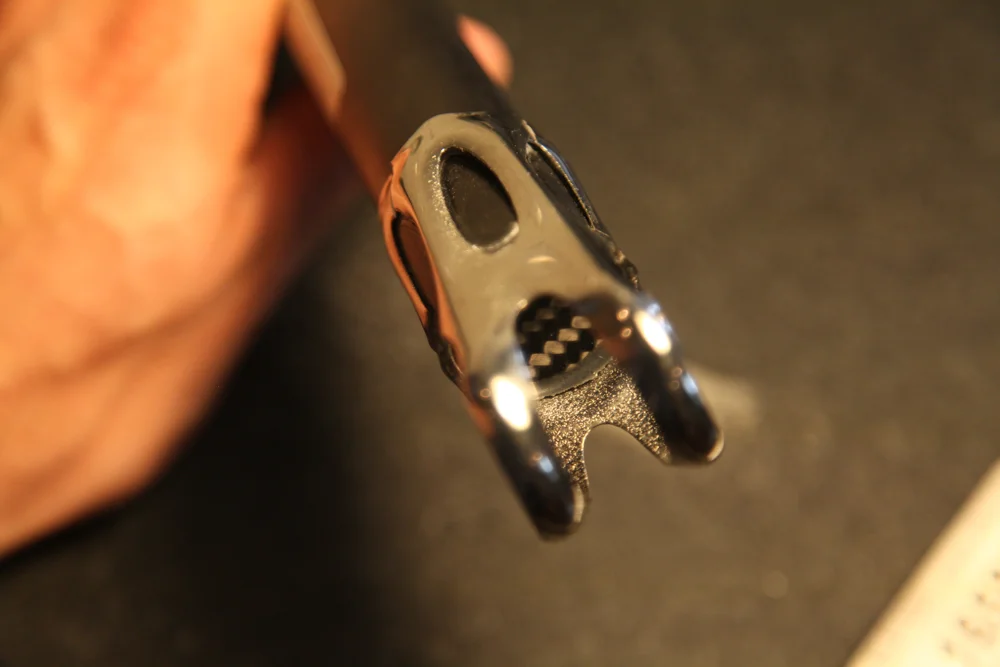
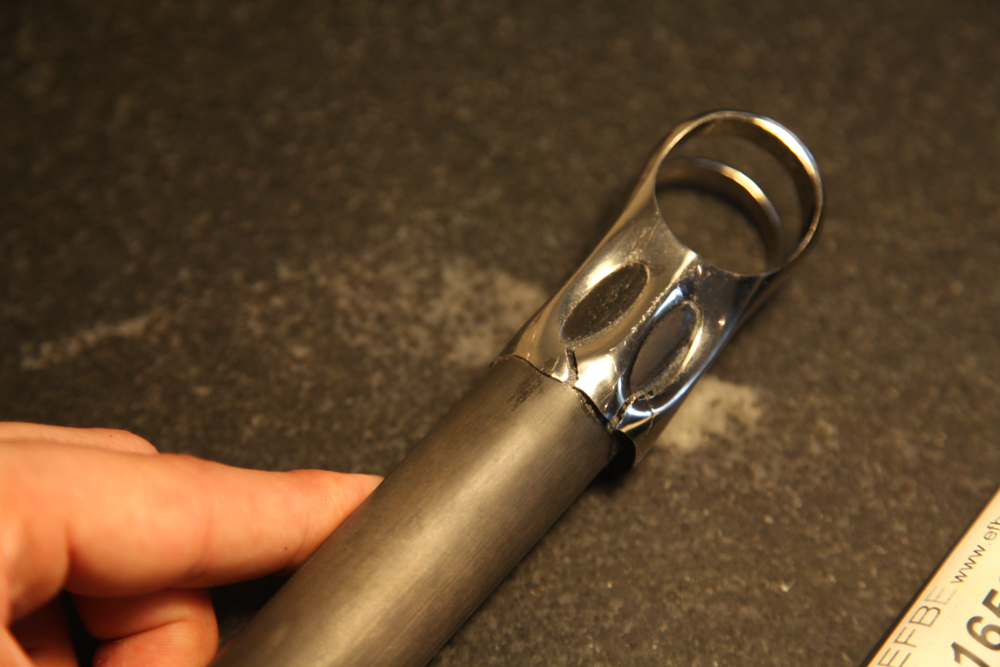
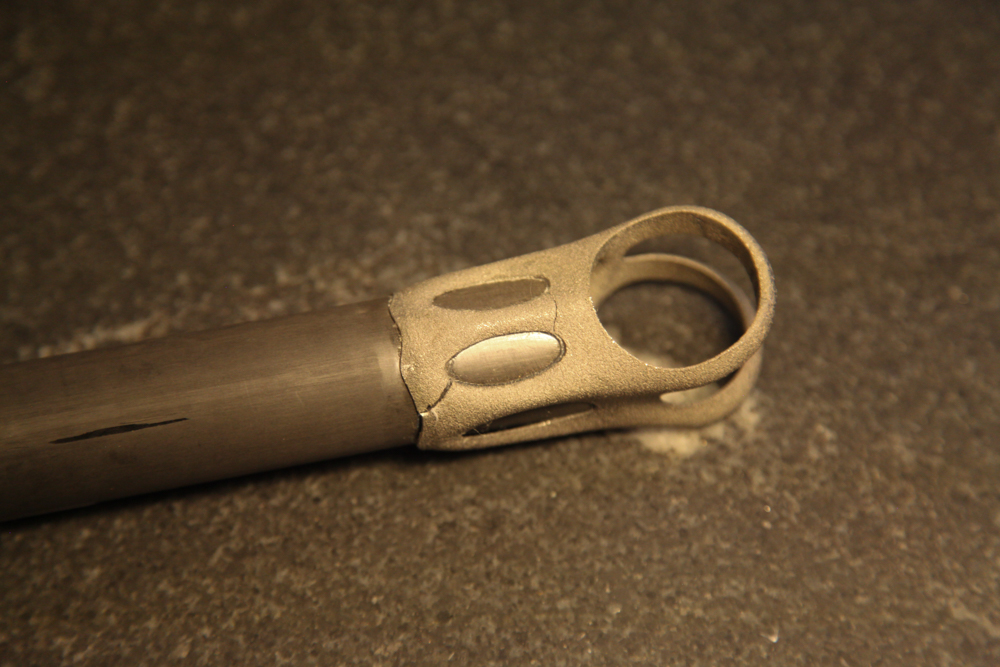
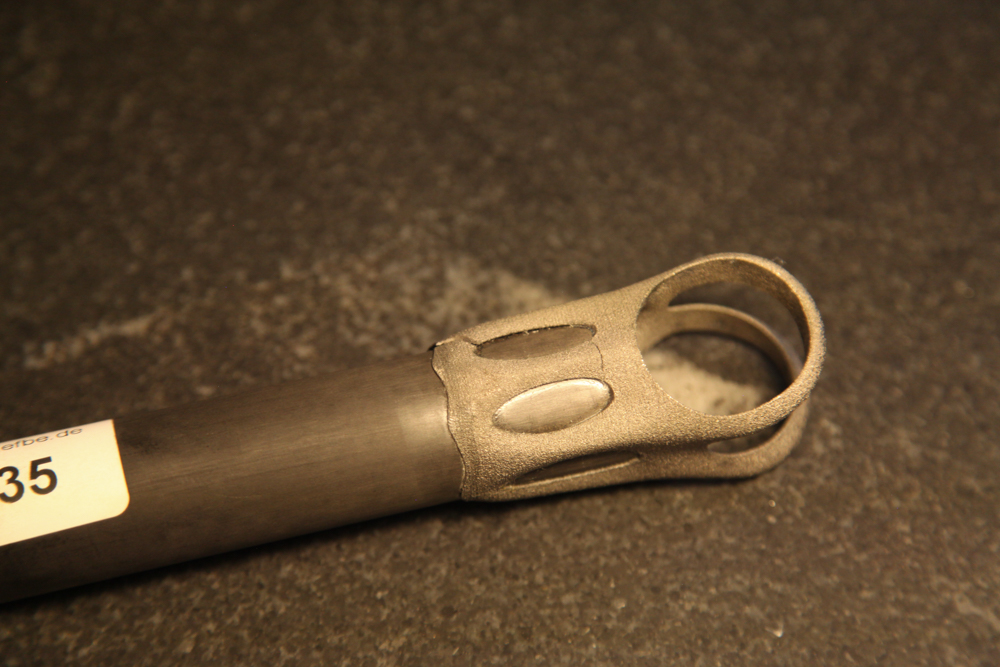
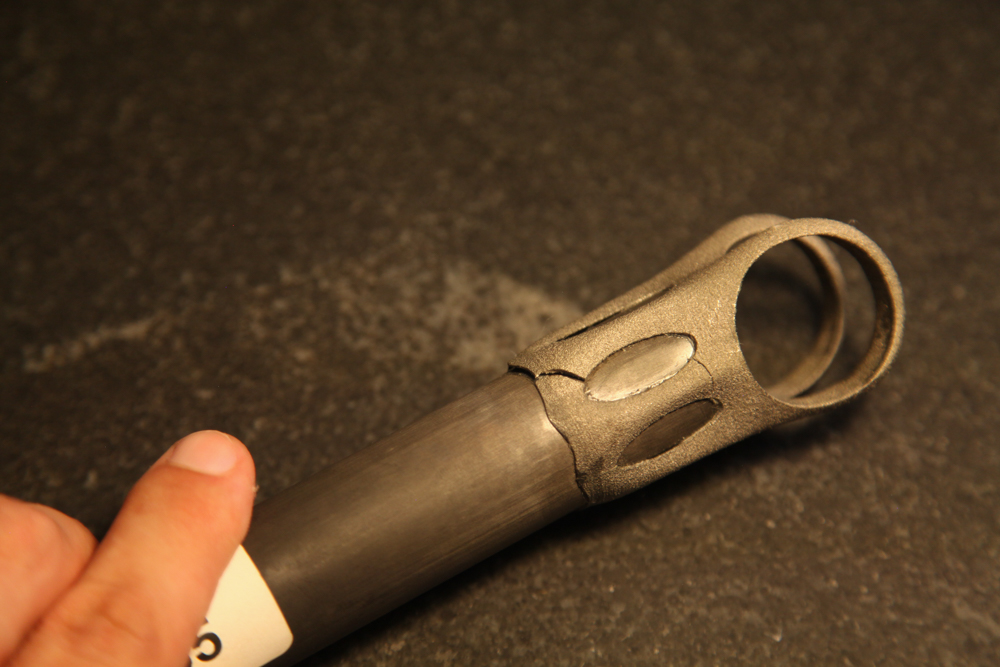
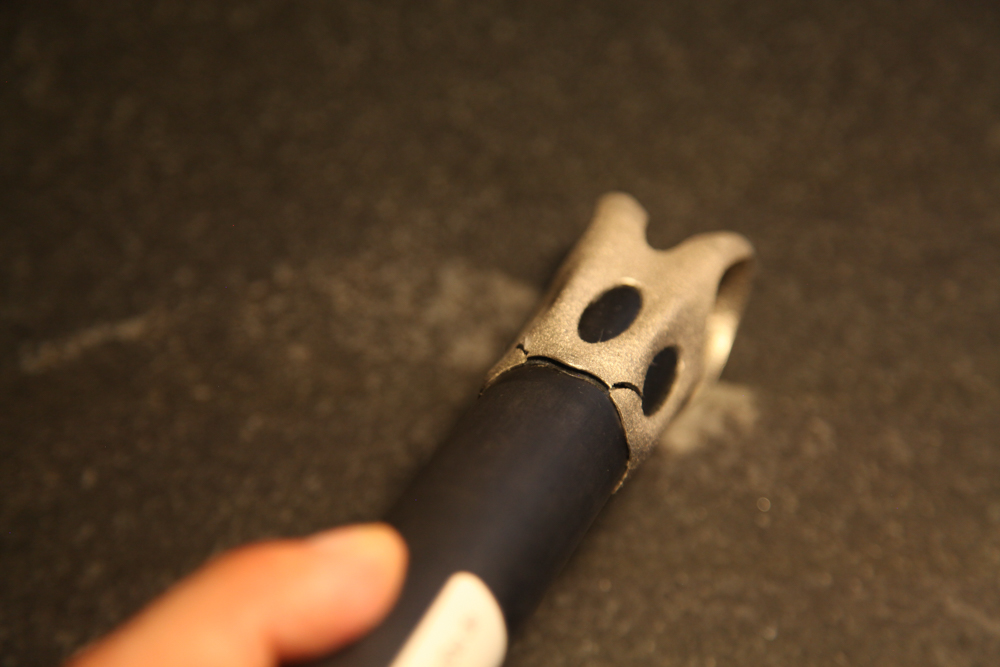
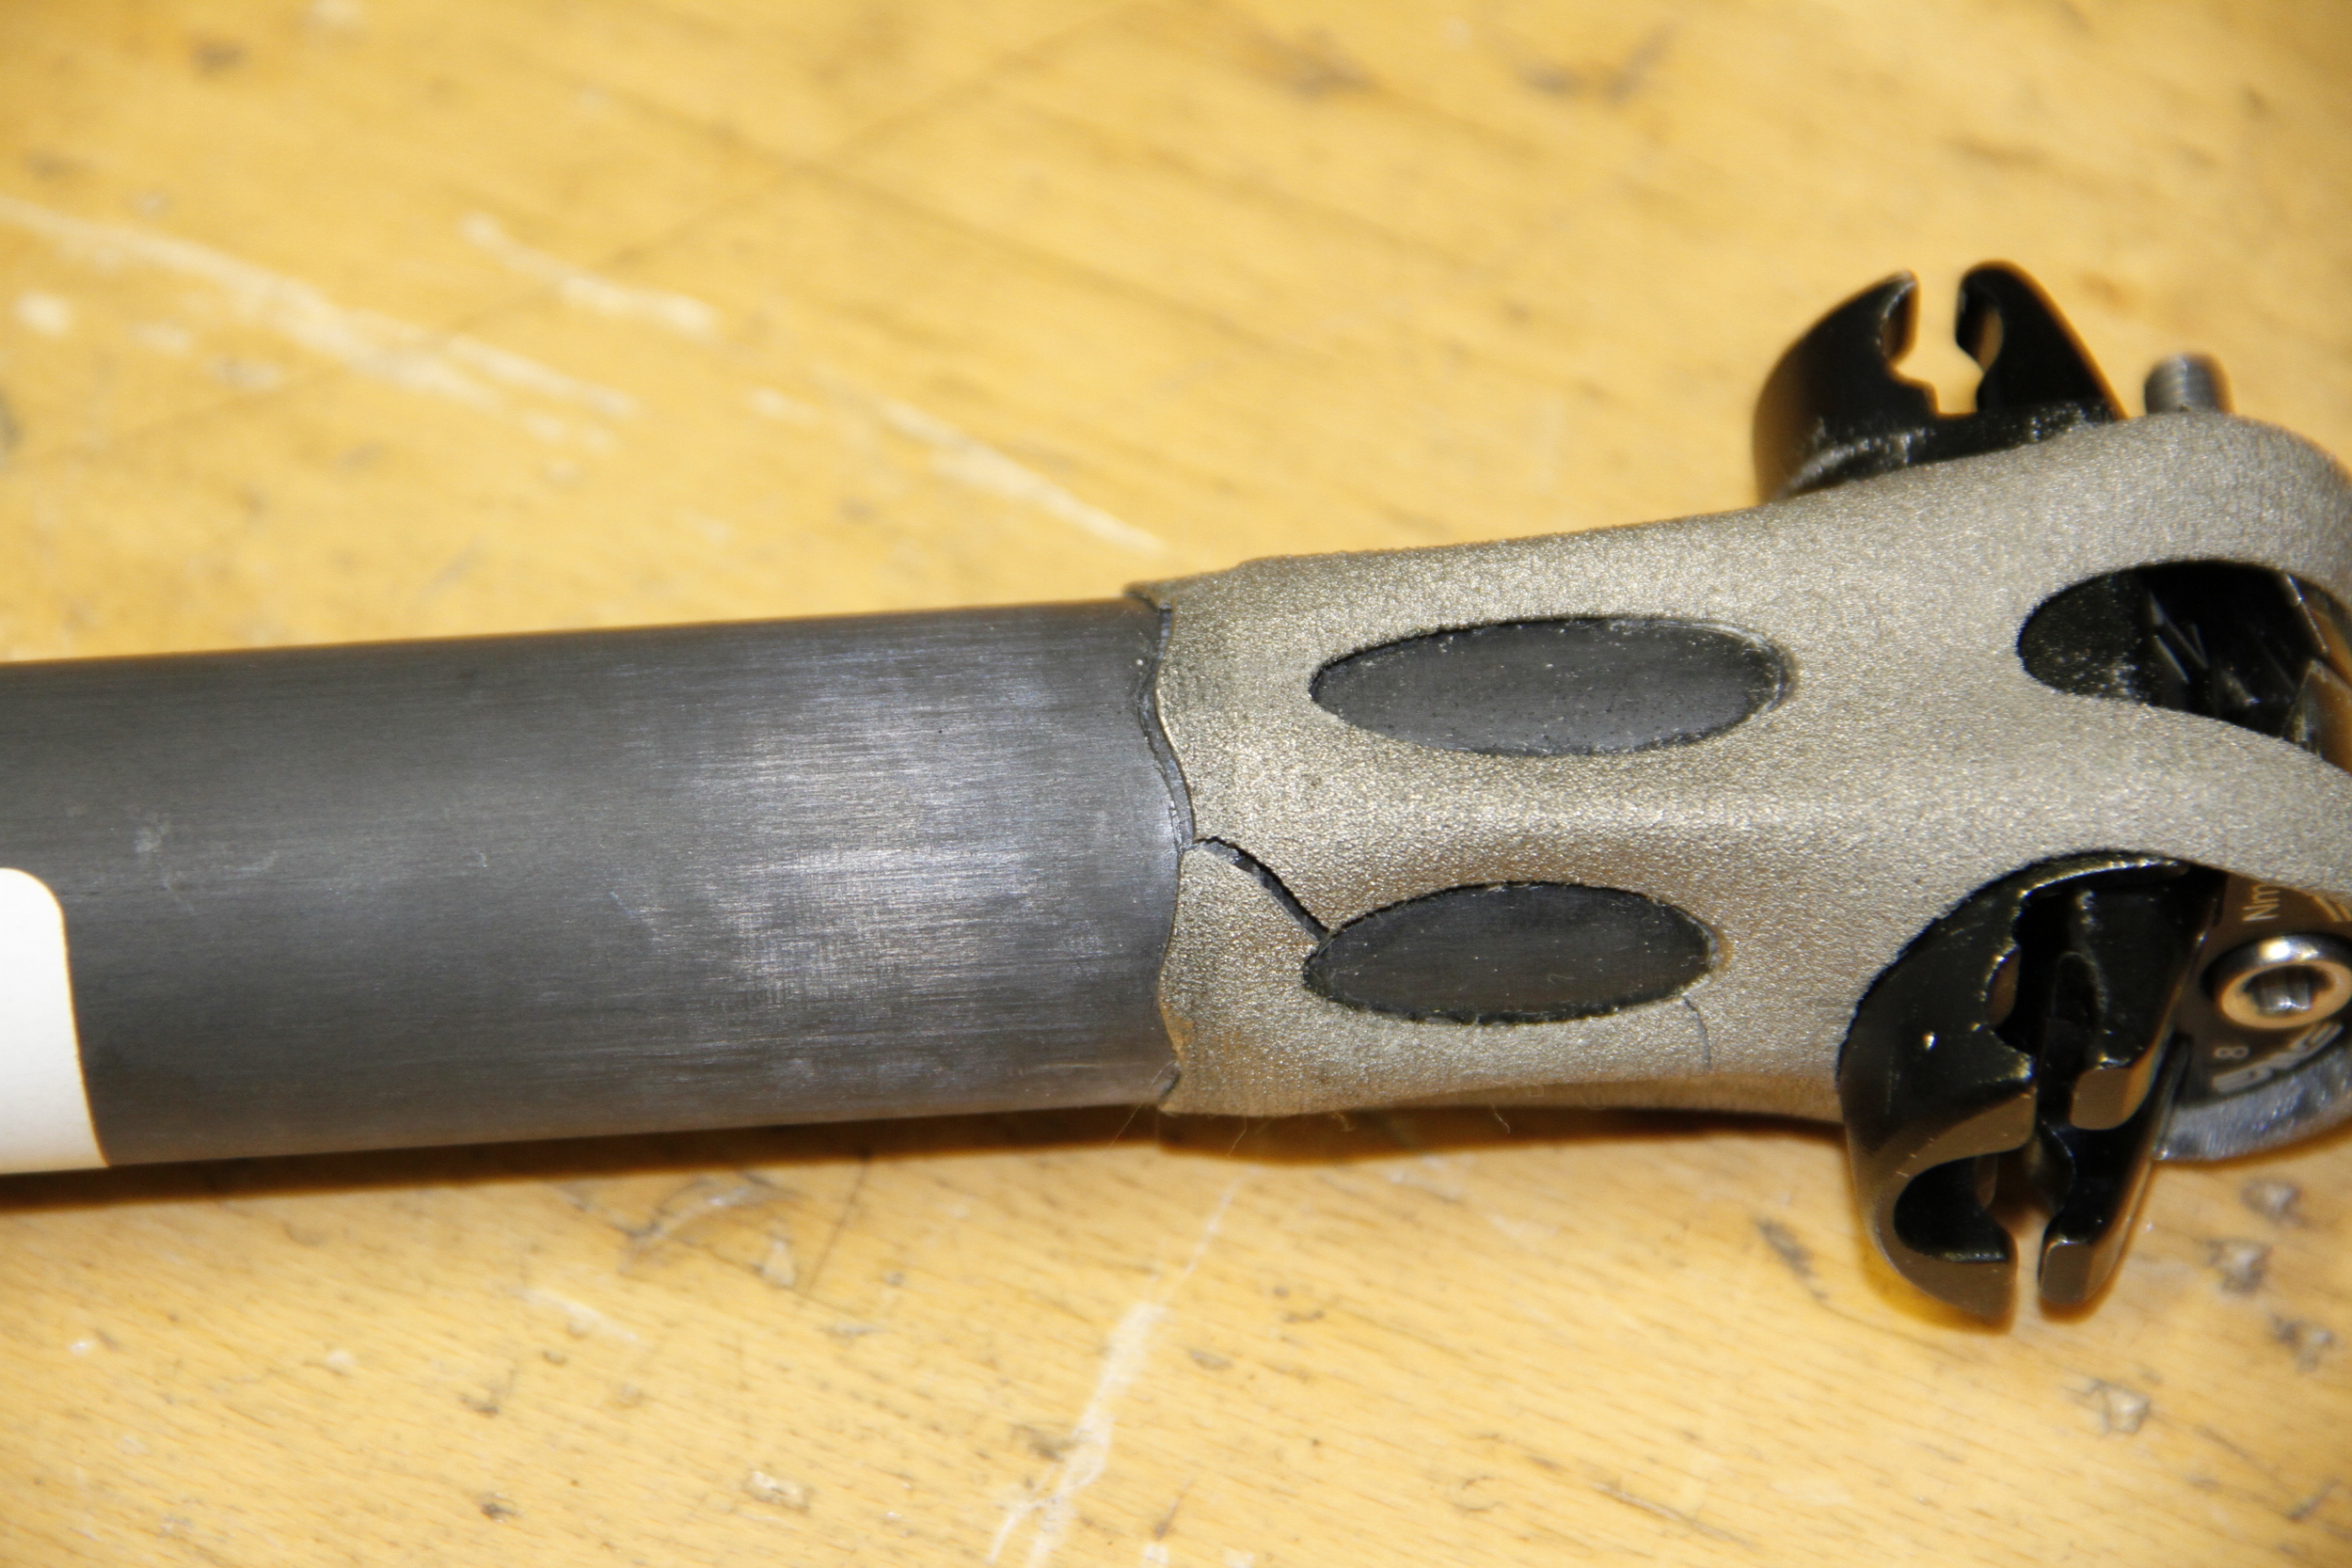
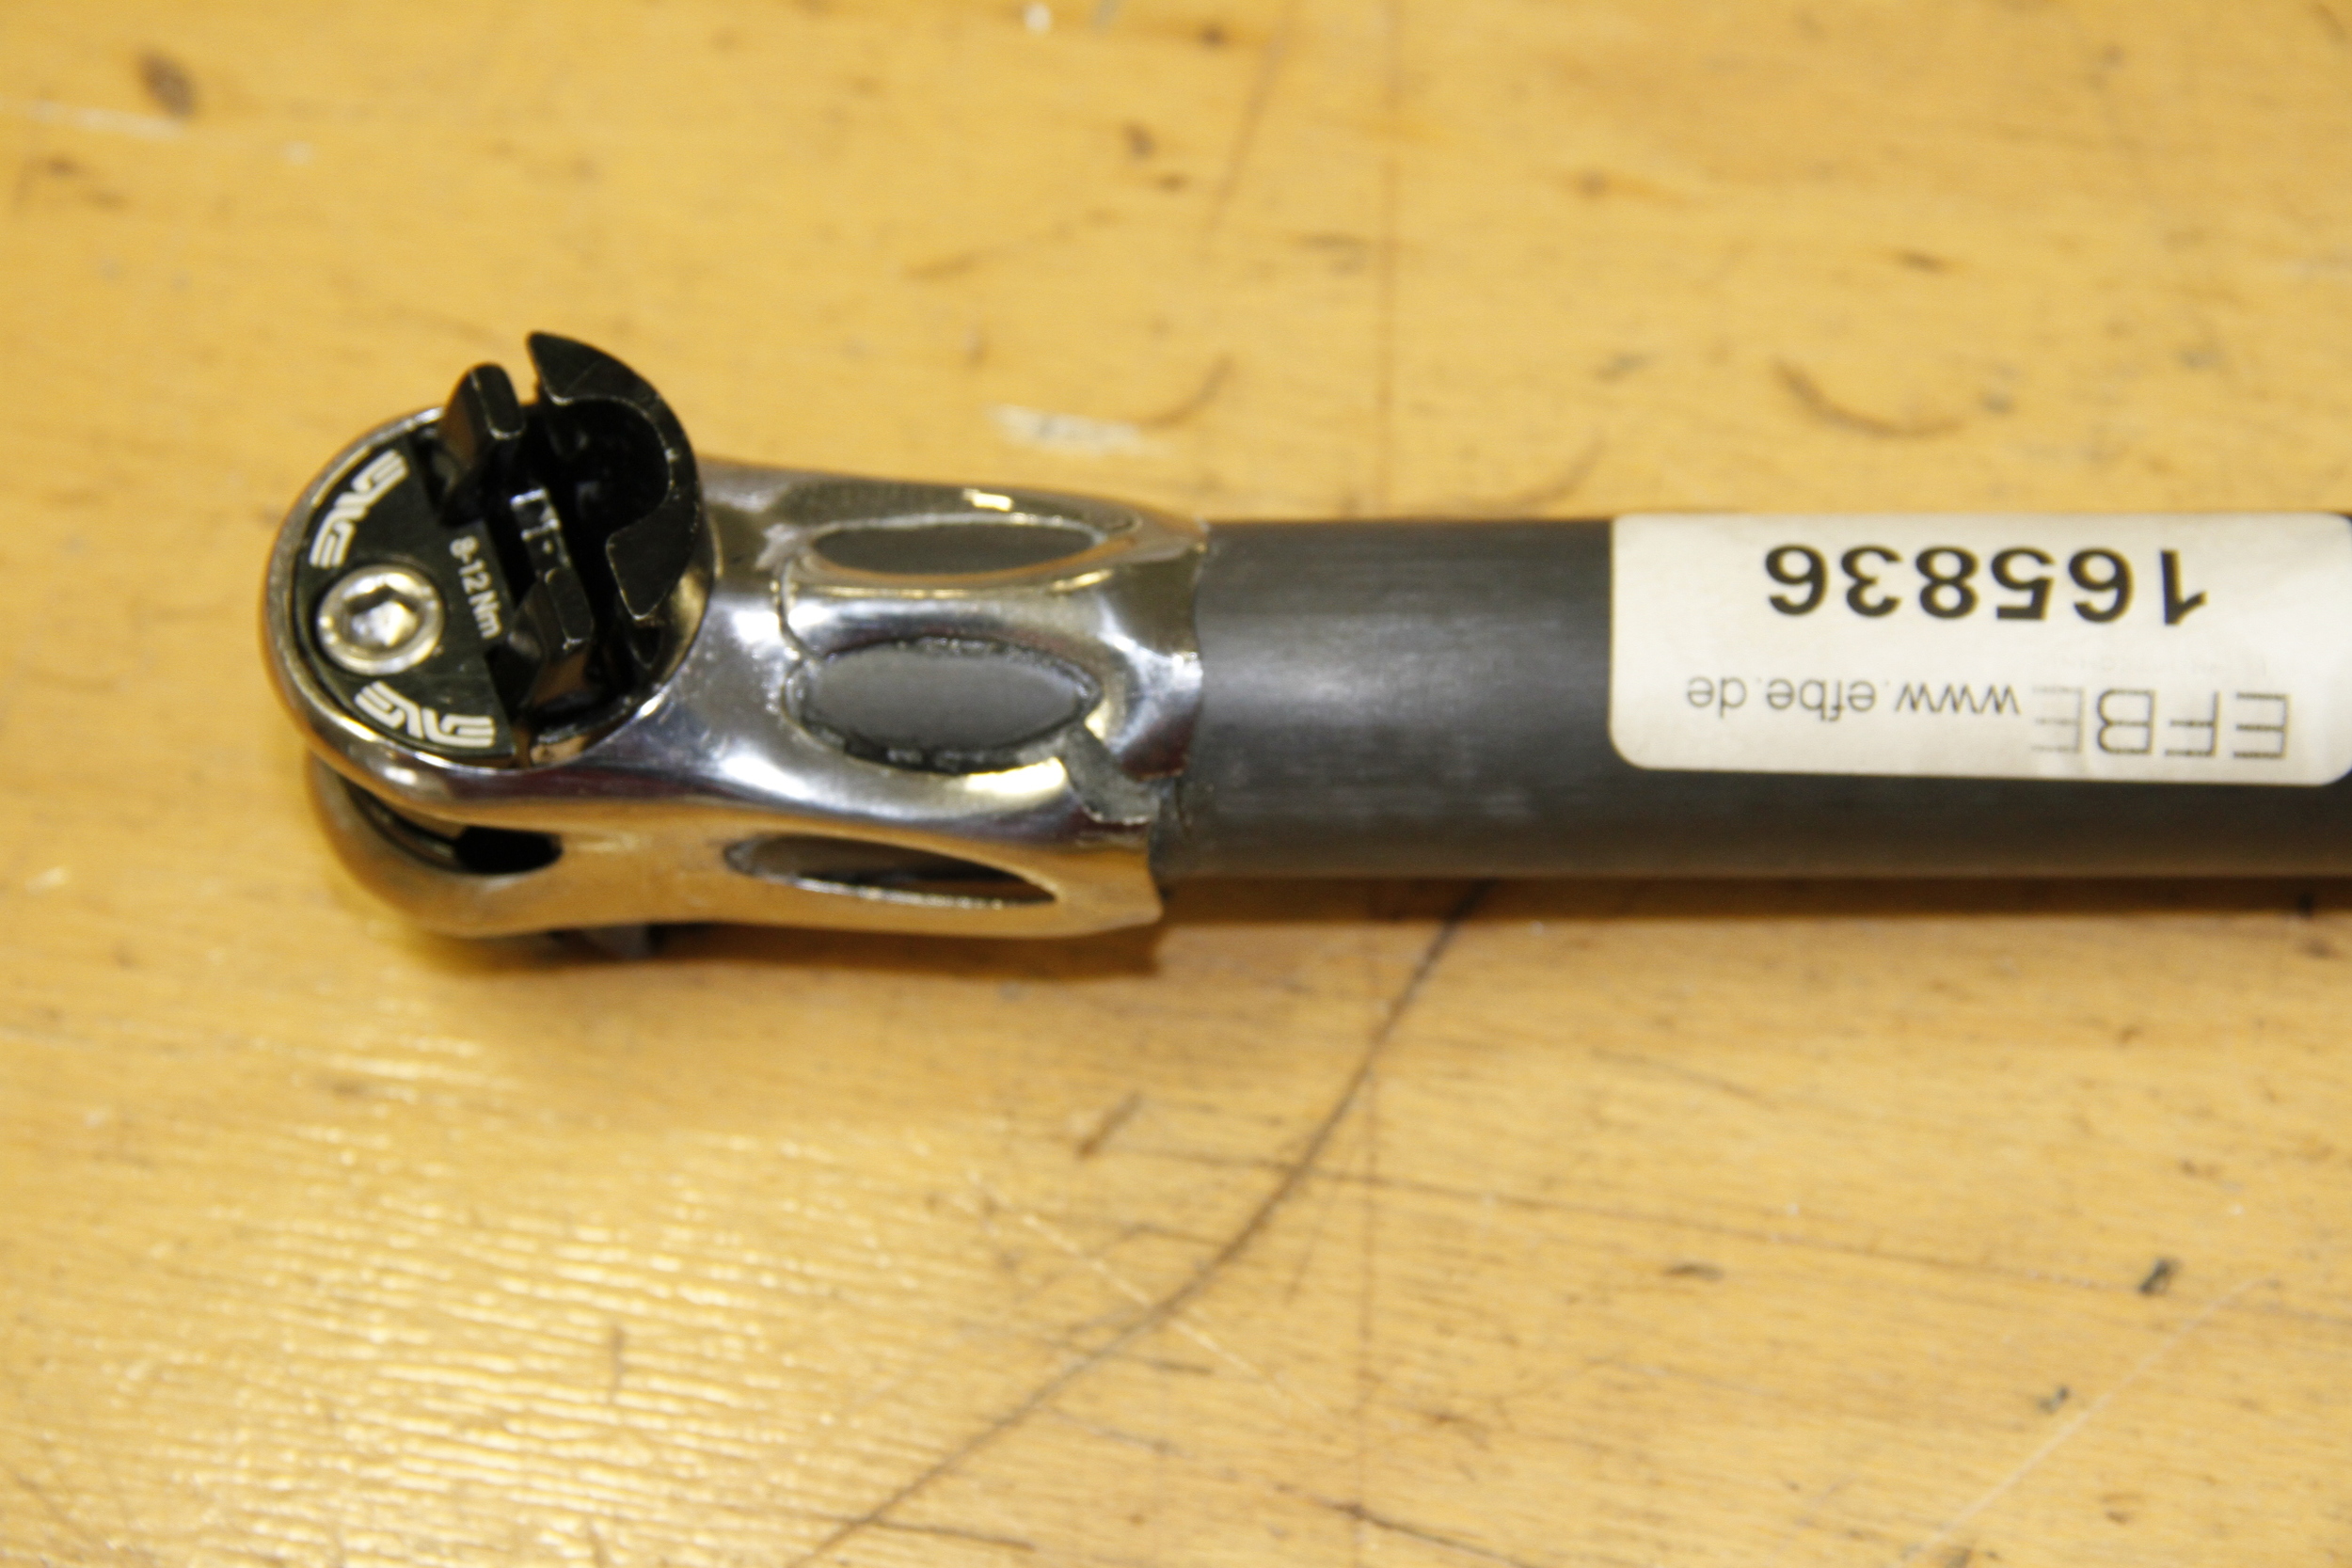
Both seatposts failed in essentially the same way: The shoulder straps rotated backwards, breaking the skirt in two locations and cracking both of the side legs as well. The front of the skirt separated completely from the carbon fiber post at the bottom, and the top/front of the seatpost cylinder appears to have slipped upwards (sheared) as well.

The "BLING" part (see this post for details on the difference between the two samples) failed slightly before the as-printed version, at 70,770 cycles. It's a bit hard to tell in the photos, but there are definitely some areas where I didn't have enough glue to form a complete bond. Part of this is operator error (i.e. my fault for not assembling the seatpost well), and part of it is engineer error (i.e. my fault for not designing the seatpost so that it could be assembled by any grease monkey). 

The as-printed part failed a bit later, at 80,904 cycles. Again, close inspection shows that the glueline had many defects.

I take a few lessons from this:

First, it's clear that my assembly design needs to be improved. It's possible that the part still would have failed with a better glue joint, but at this point in my process it's important that I'm able to isolate possible issues - and variations in bond quality makes that *really* hard. I suspect the best approach here is to make the glue cavity captive, such that during assembly the uncured adhesive is forced to fill the full volume between the seatpost head and the carbon fiber post.

This likely means eliminating the windows from the seatpost cylinder. It also means either creating a double lap shear joint (like Robot Bike uses) or making the joint blind on both sides (by capping the end of the carbon post, which I did on this assembly, *and* closing the top of the seatpost cylinder, which I didn't do). 

Second, I should probably be HIPing these parts - at least until I've isolated everything else and determined whether, and how, HIP affects performance.

Third, I'd like to dial in the inner diameters of both the seatpost cylinder and the saddle clamp cylinder. The latter can probably tolerate a bit of play, but the former directly affects the glueline and should probably be controlled more tightly.

On the upside: The failure mode on these parts wouldn't have hurt the rider, whereas failure in the shoulder straps could have been dangerous. In addition, I've got a chance to try this again - with the parts that REM treated for me recently. I won't be able to change the original design at all, but I can at least try to see whether a change in technique can improve the glue joint.

Regardless, it's good to get tested parts back. More soon!


Note: Thanks to Addaero Manufacturing for printing these parts, and to MicroTek Finishing for finishing them!

The Prepared - Where it's at, and how I'm doing with it

Added on by Spencer Wright.

Recently The Prepared, my weekly manufacturing newsletter, crossed 1000 subscribers. As a result of this (and because it's been on my mind for a few months), I wanted to post an update to the role that The Prepared plays in my life, and how I see it working in the future.

I'm going to cover three areas in this post. The first is about the actual execution of The Prepared - the time spent curating and creating the newsletter every week. The second is more operational, and covers the underlying infrastructure (and cost) required to make The Prepared happen. The third is on the impact that The Prepared has had on my own life and career - and, to the extent that I'm aware, the impact that it's had on my readers.

How The Prepared is made

The Prepared was spawned as a result of my own reading habits; its original purpose was to track and share the things that I felt might be important for me to know in the future. I read something like 50 articles per week. I don't have current stats, but in previous years that's worked out to between 4 and 5 million words per year, which at a speed of 273 words per minute (roughly my rate) averages to 5.5 hours of reading per week. Most of that happens on the subway, which I ride for roughly 5 hours per week (two half-hour commutes per day), and the rest happens in waiting rooms or while I'm on a plane taxiing around the airport (I can often blast through a backlog of reading while traveling). 

But reading is only part of it: Even after spending five or six hours a week reading and filtering down to a few dozen shareable links, I still need to actually compose the newsletter. This usually happens on weekends, and takes at least an hour or two. All in, I'd say that the average newsletter represents roughly seven hours of work - a commitment of over 250 hours per year.

I enjoy doing it, and a lot of the reading I'd do anyway. But it puts some pressure on my life - and I've spent a bit of time thinking about how that can be reduced. To start, I've asked Eric Weinhoffer - a subscriber to The Prepared - to curate the newsletter on a few occasions. I've been thinking of expanding my guest curation program, though I've been conservative about doing so. If you're interested in being a guest curator, let me know - I'll put you on my list.

Overhead & Infrastructure

The Prepared's stack goes Pocket -> IFTTT -> Gmail -> Mailchimp. For a long time, this whole process was free, but recently I've upgraded both my Pocket and Mailchimp accounts; the total annual cost of these is $344.99.

I've also put a bit of money into paid advertising. I bought ads on Twitter, Facebook, and Reddit, spending $40, $25, and $75 respectively. I did this as an experiment, to see who would sign up and how expensive it would be to expand The Prepared's reach. Of the three, I found Reddit to be a bit more effective - I got more referral traffic per dollar than Facebook, and longer session times as well (my Twitter ads were a leadgen campaign, which allowed users to sign up directly from the Twitter app; as a result it's a bit harder to compare results there). I'm not sure whether I'll continue to use ads to expand The Prepared's reach, but I'm glad to have seeded a few new users that I might not have been able to reach organically.

On the other side of the equation, I recently began soliciting donations for The Prepared. To date, I've received $76.25 from five readers, which averages out to about $0.07625 per reader. My hope is that I can bring in an average of $5 per reader in the second half of 2016 - an amount that seems ambitious, but not unrealistic. 

Speaking of which: If you read The Prepared, you should consider donating! As outlined above, it takes about 250 hours per year PLUS $344.99 in fixed costs per year. If you donate $5 per year, then that values my time composing and sending the newsletter at about $18/hr - a pretty fair wage, if you ask me.

Impact

It's a bit surprising to say, but somehow this weekly email - which I started without really wanting it to be a thing - has become one of my primary calling cards (the other big one is "the bin of broken dreams guy"). I get 3-5 emails about it every week; some are from people I knew before it started, but most are from folks who I probably would have never met otherwise. Usually one or two of these is a link submission, but many are just someone saying hi - something I never expected to happen. It feels great.

I've also developed a handful of significant relationships through The Prepared. I've met a few dozen subscribers in person, and have on many occasions turned to them for specific advice or expertise. I've also connected a few subscribers to each other, and on at least one occasion this has resulted in someone being hired for a job. 

Moving forward, I want to continue making The Prepared a way for people to connect and share ideas. Despite my slow rollout, I'm excited to have more people curate, and I want to find more ways to connect The Prepared's subscribers directly too. This probably means organizing meetups or drinks more often; I've also considered setting up an online meeting place.

The Prepared has taken up *way* more of my time than I could have ever anticipated, and has bought me more in return than I could have possibly hoped for. Here's to its continued expansion, and whatever the future brings.

Backlog

Added on by Spencer Wright.

It's been more than a month since my last blog post. This is a result of a bunch of factors. Some of these are personal (it's summer, and I'm moving into a new place soon, and I've been conscious to maintain some personal time) and some of them are businessey and good (we've been *very* busy at nTop, including some big product updates), and some of which are more random (most of my projects are in holding patterns right now and there hasn't been much to update). 

Because I care, though, here's a quick recap of what I'm working on:

  • A new run of Public Radios. I've got a few small speaker changes in my backlog, and we're still chugging away at a few circuit updates. 
  • A printed lattice stem. I hope to have an update on this in the next week.
  • An update on my printed seatpost testing. I got the failed parts back last week, and want to write up a short post on those results. I'm also still sitting on some parts that were HIP'd and treated by REM, and I'm planning on assembling and then testing one of those too.

Totally separately, I spent an hour today updating some drawings for the parts for the leather wallet I made a few years ago. I made them in order to explain how to repair the hand stitching on the wallets, but the drawing looks nice (I usually think drawings look nice) so I thought I'd post it here. 

So, there you have it. I should have some updates here on some of these things soon :)

Seatposts, tested

Added on by Spencer Wright.

Today I got word from EFBE that two of my EBM seatpost had been tested - and failed.

These are the as-printed and the "bling" samples (see this blog post for details); they failed after 80,904 and 70,770 fatigue cycles (at 1230N), respectively. As a result of their failure, I decided to not test the third "fatigue resist" part.

I'll write up a longer description of the results soon, but two thoughts here:

  • These parts were *not* HIP treated - which might possibly have helped their fatigue resistance.
  • It appears that some delamination occurred between the printed parts and the carbon fiber post, which makes me question whether the glueline itself was faulty. If so, it's possible that by improving my glue joint I could have relieved some stress from the printed part. Regardless, I will note that the glueup process was kind of a pain in the ass - and I'd like to redesign that anyway.

As it happens, I have three more of these parts on my desk now. They *were* HIP treated, and I intend to glue one of them up and send it for testing. It won't be a perfect 1:1 test (these parts were treated by REM Surface Engineering, through a different process than MicroTek uses), but the results will be interesting at the least :)

Onwards!

(Another iteration of my) Bike stem

Added on by Spencer Wright.

This.

The lattices here were, obviously, designed in nTopology Element Free (which is free!). I happen to have done the mechanical design in Inventor, but the rendering was done in Fusion 360 (effectively free, and totally capable of doing the mechanical design as well). I separated face groups and remeshed surfaces in MeshMixer (free!), and very well could have done the booleans there too (I used netfabb).

^ I just think that's a bit remarkable.

Anyway, it's ready. Printed part (DMLS titanium) soon.

An industrial map

Added on by Spencer Wright.

On a lark a week or two ago, I started putting locations of industrial stuff (factories, research centers, corporate headquarters, etc) on a custom Google Map. Many of these I've been to, on either public or private tours; others I hope to visit in the future.

If you know of somewhere that you think I should add, give a holler! I'd love to add more - especially if I can swing a tour :)