Manufacturing guy-at-large.

Filtering by Tag: lattices

Stem prints

Added on by Spencer Wright.

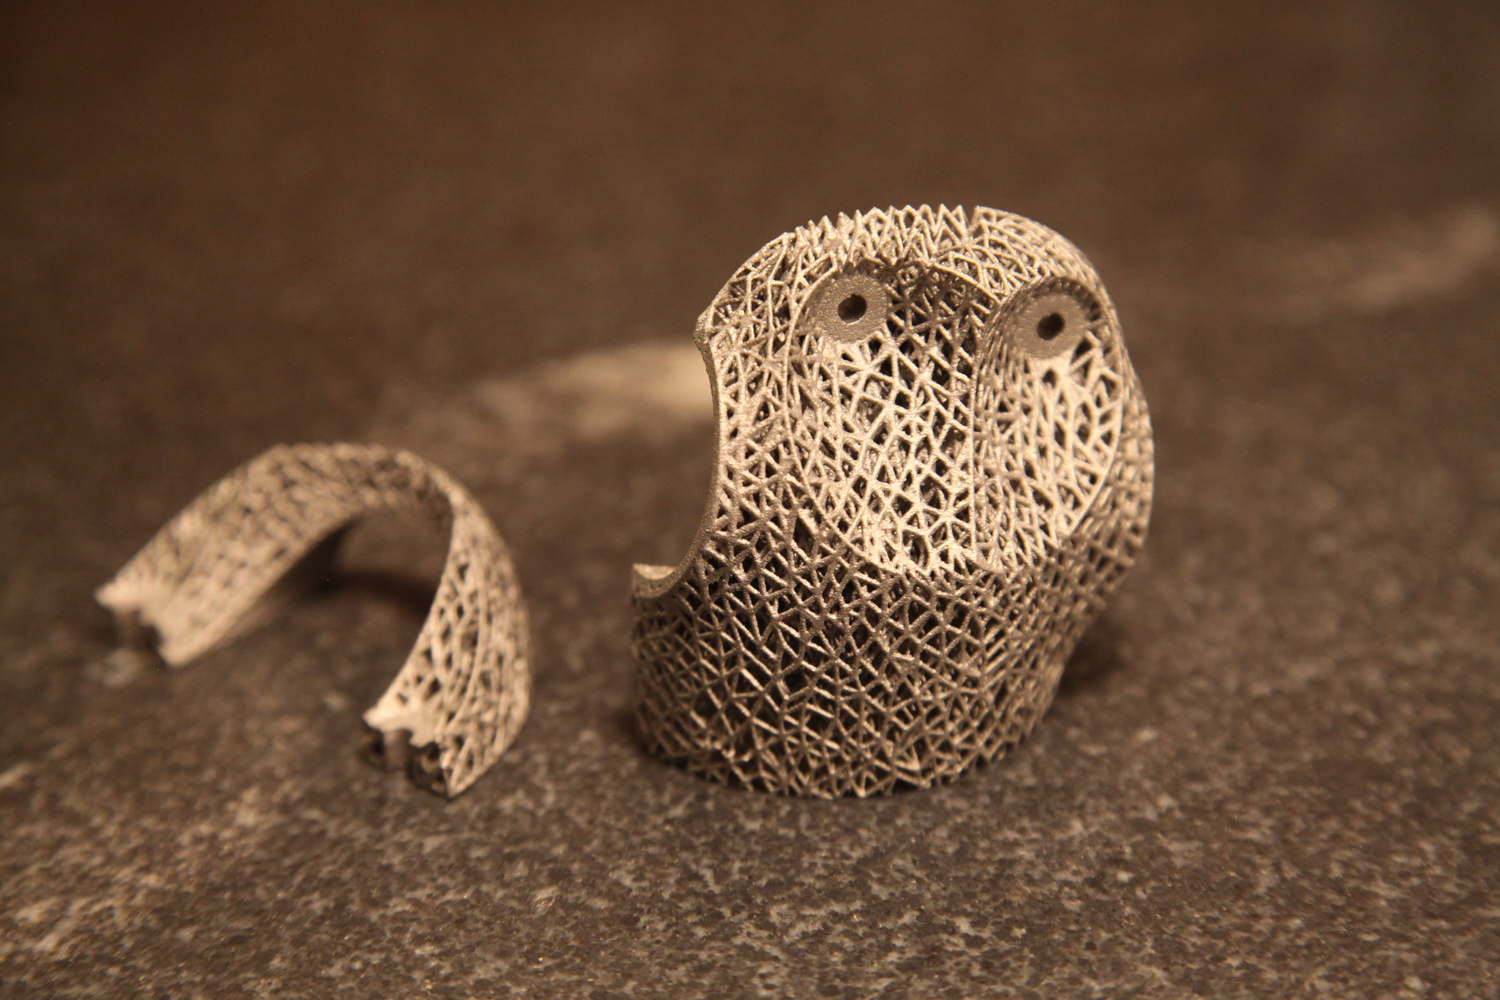
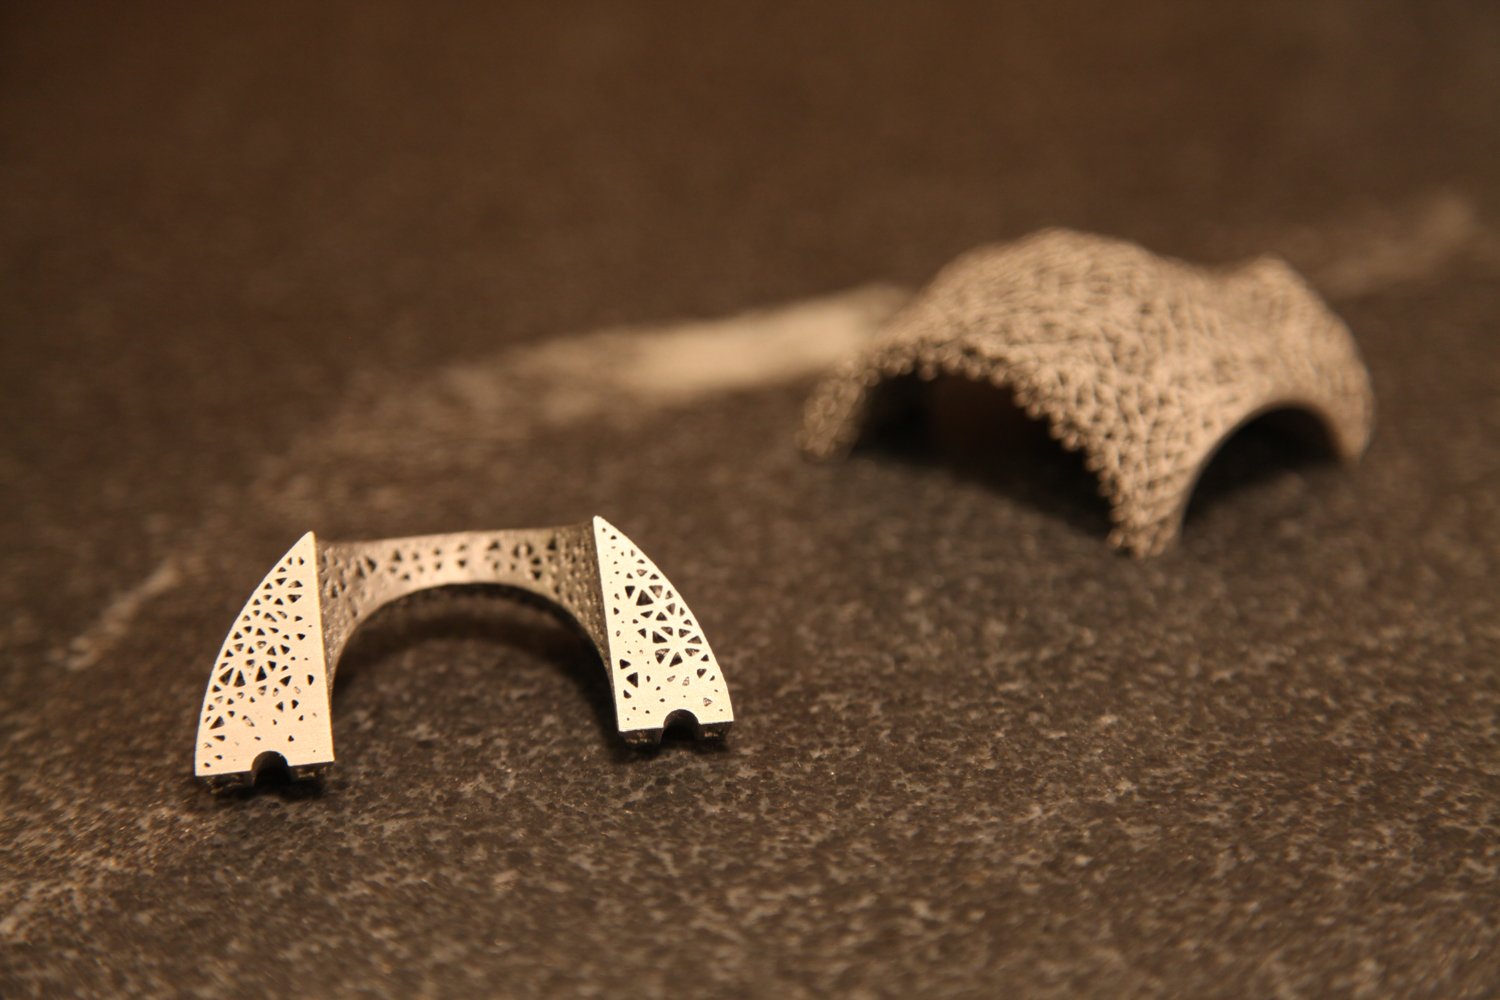
Almost a year ago, I posted a rendering of my printed bike stem on my blog here. Now:

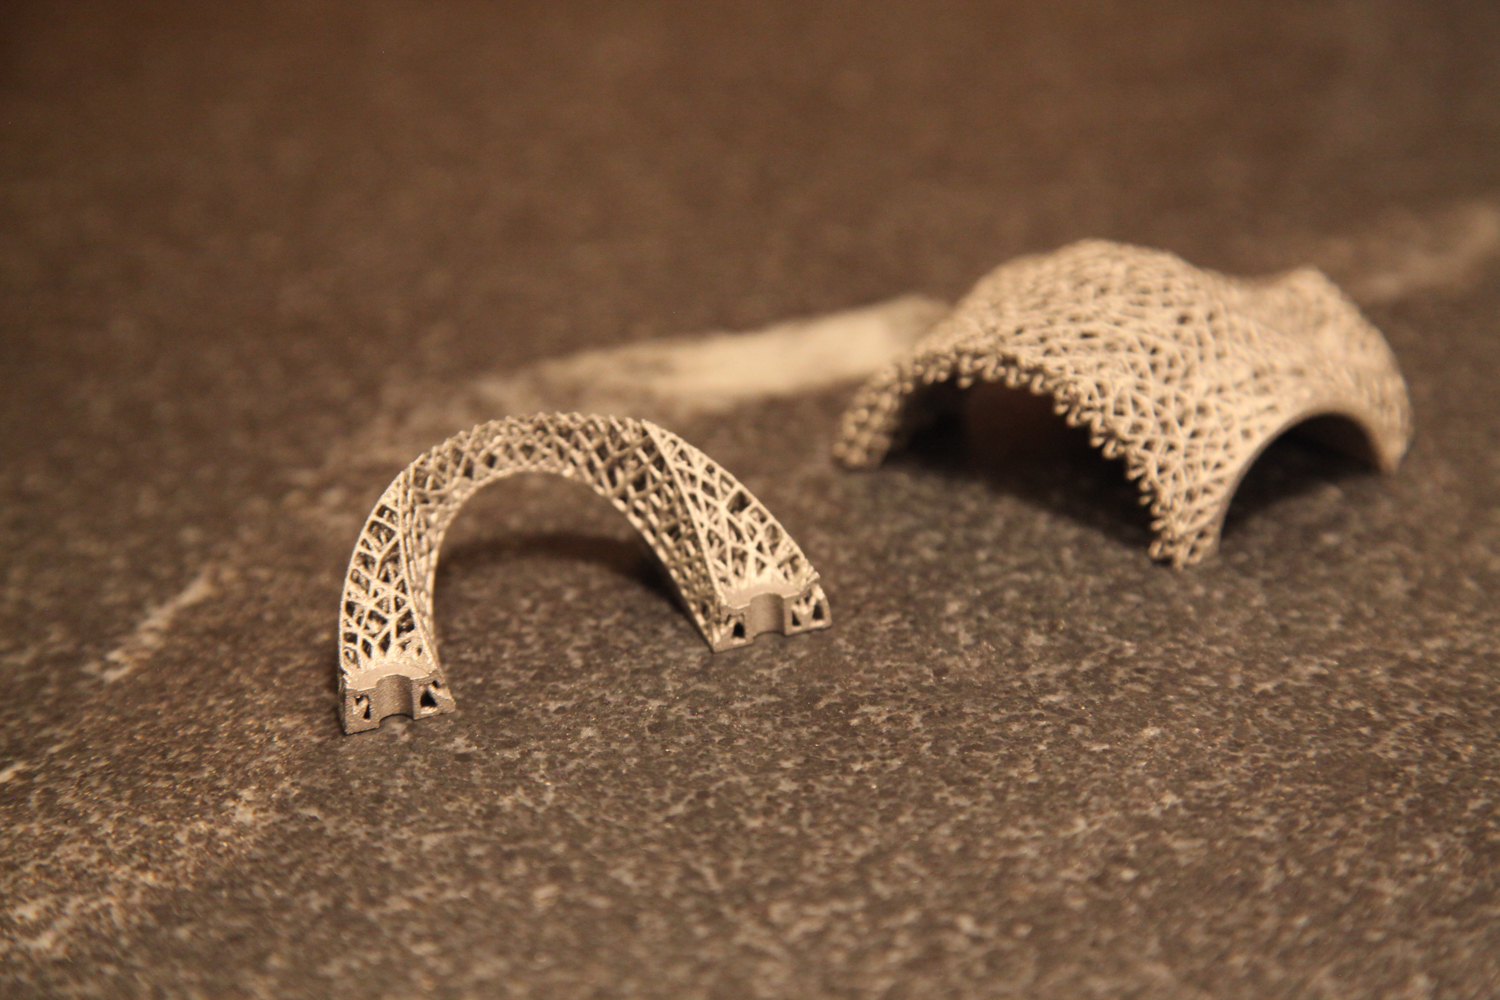
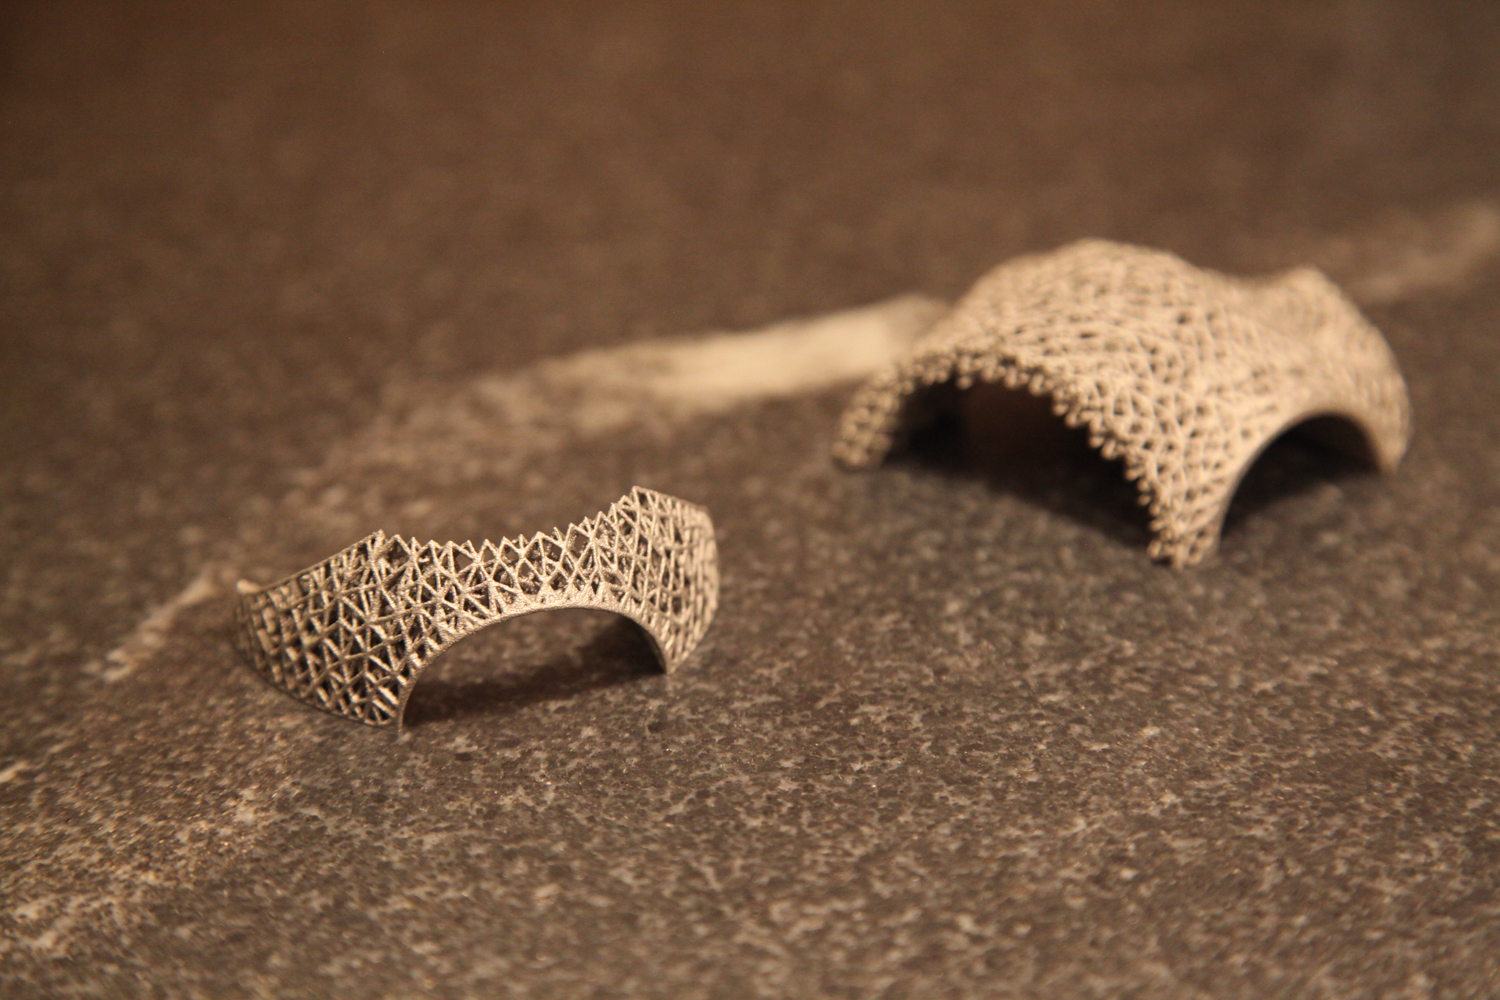
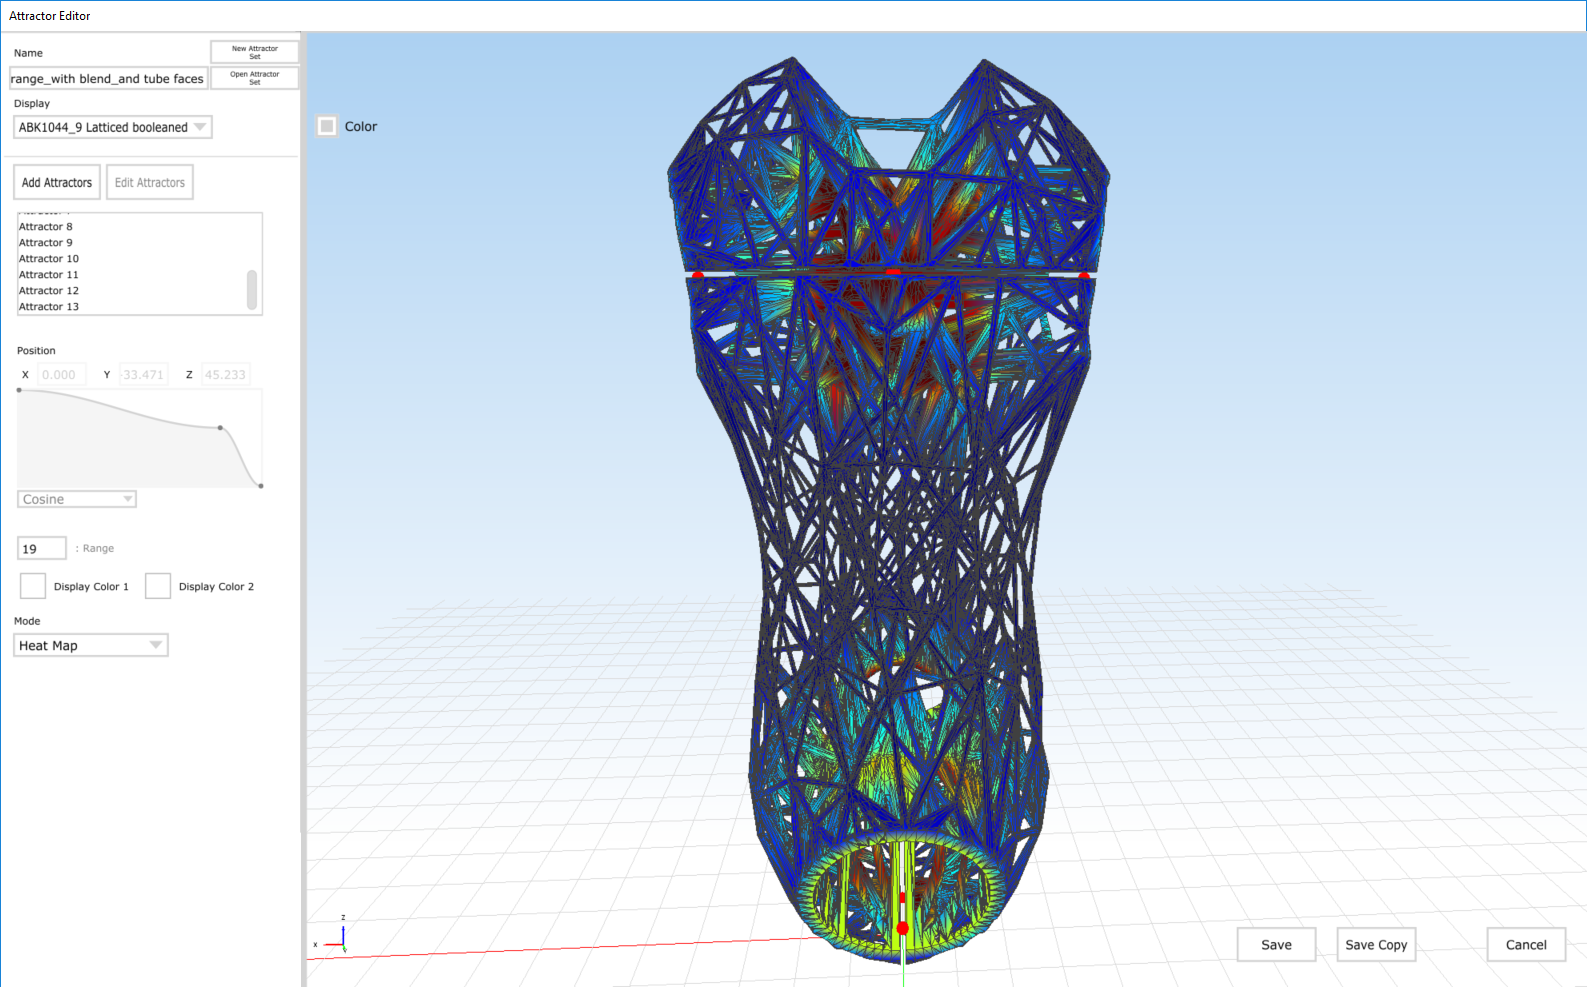
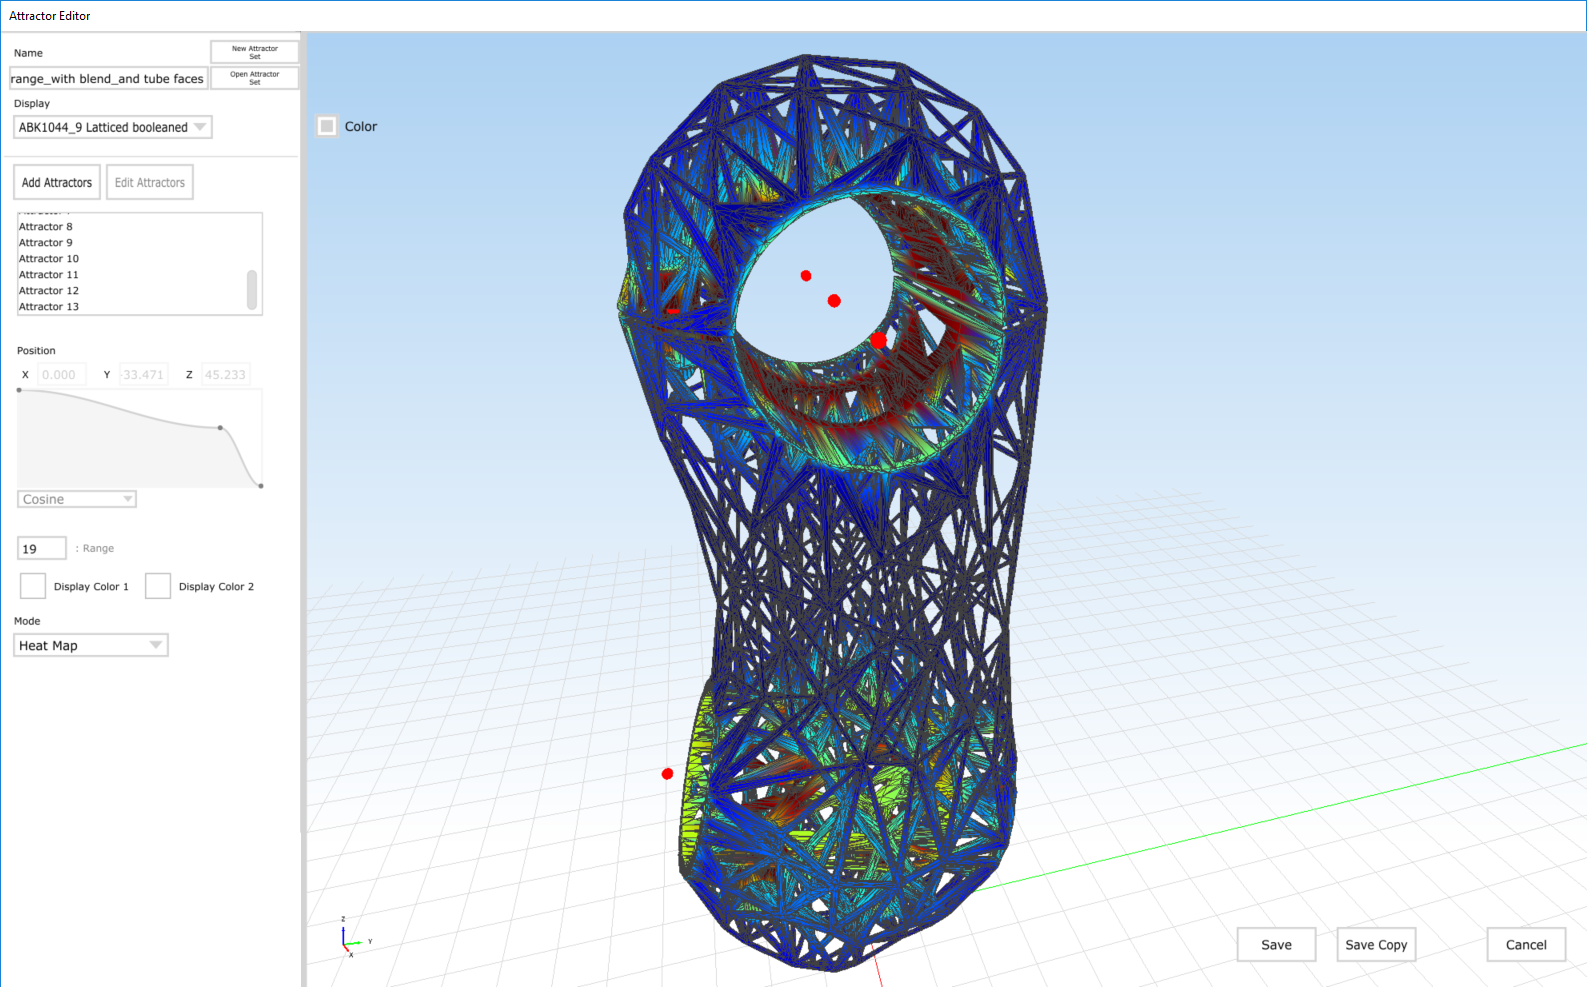
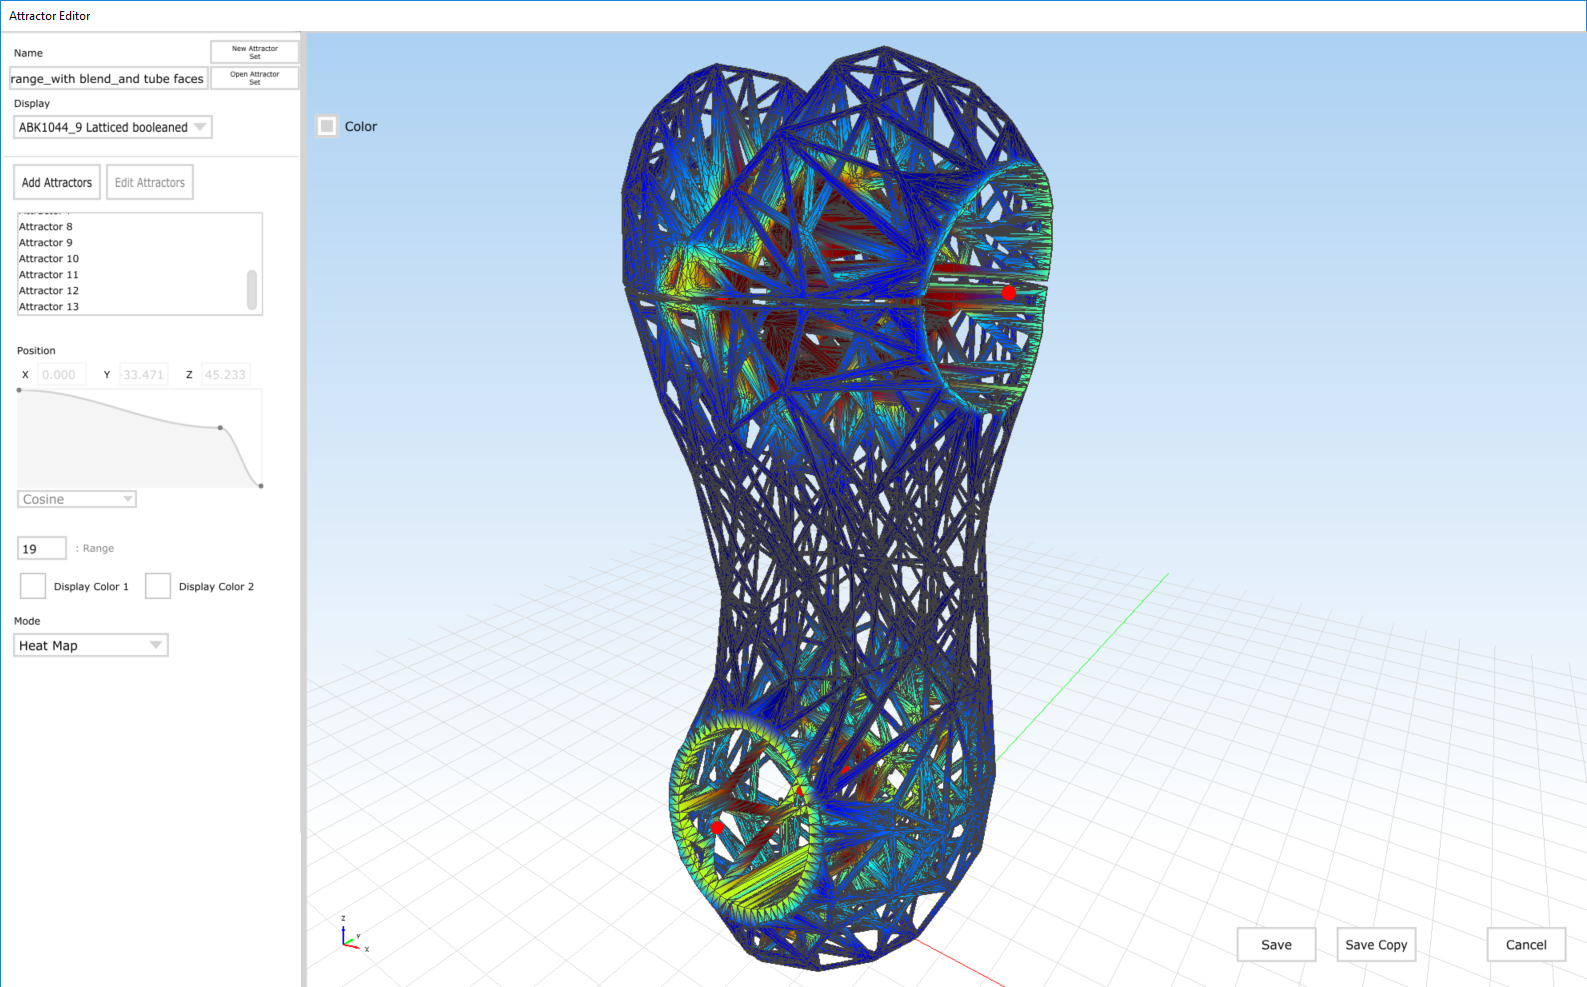
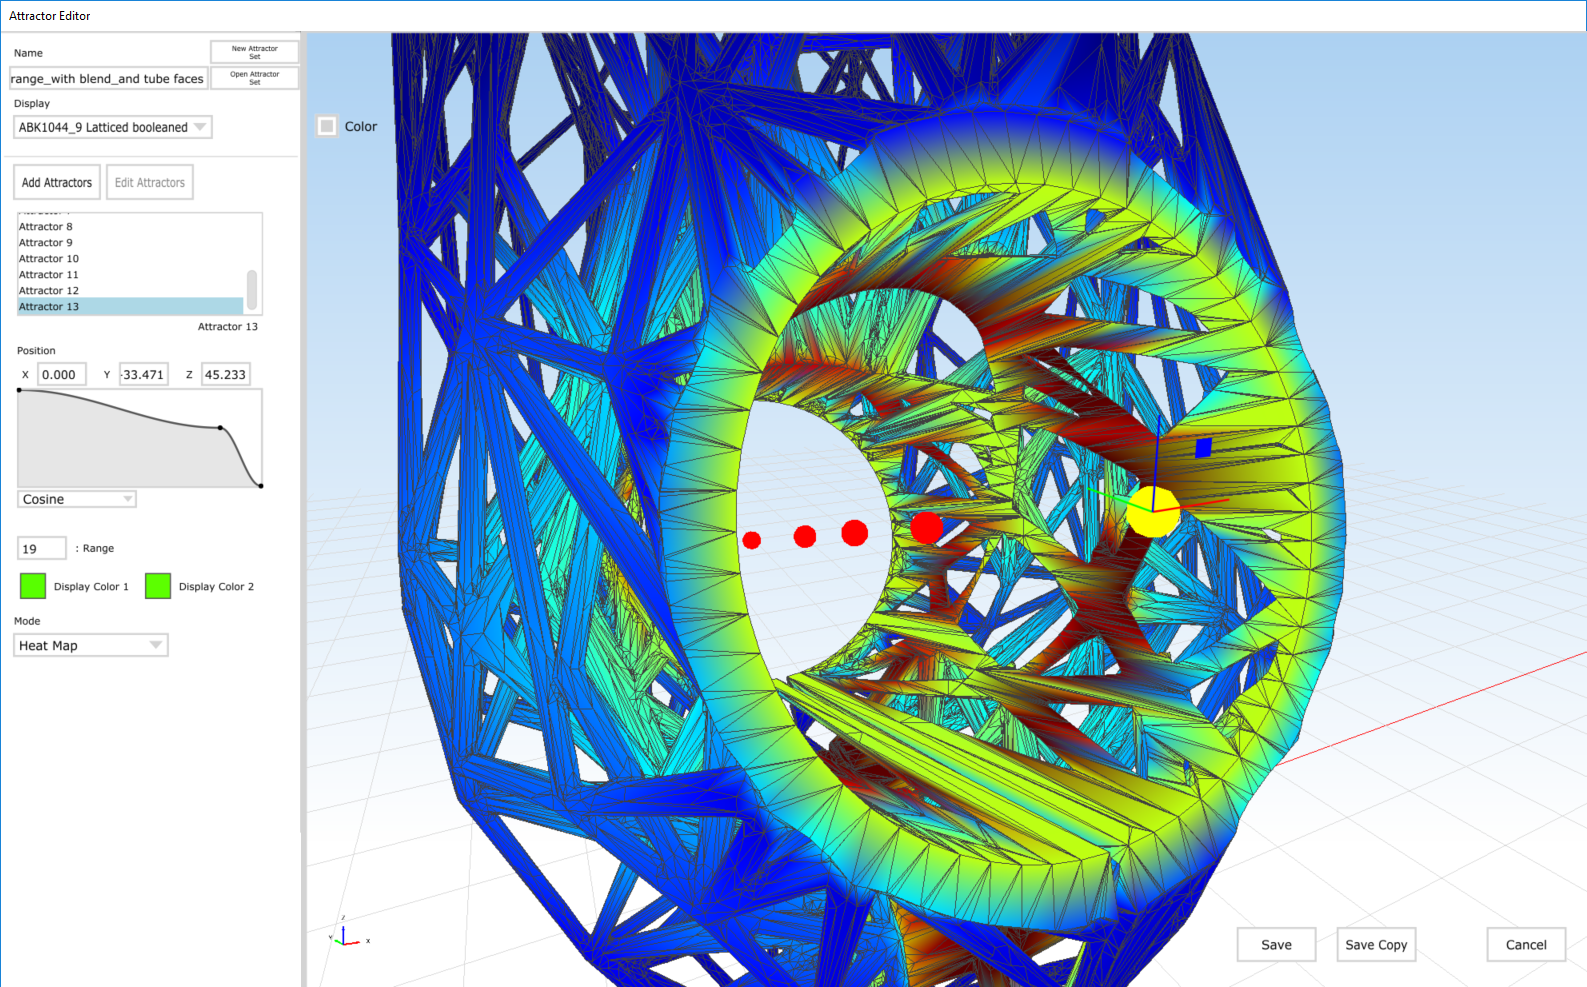
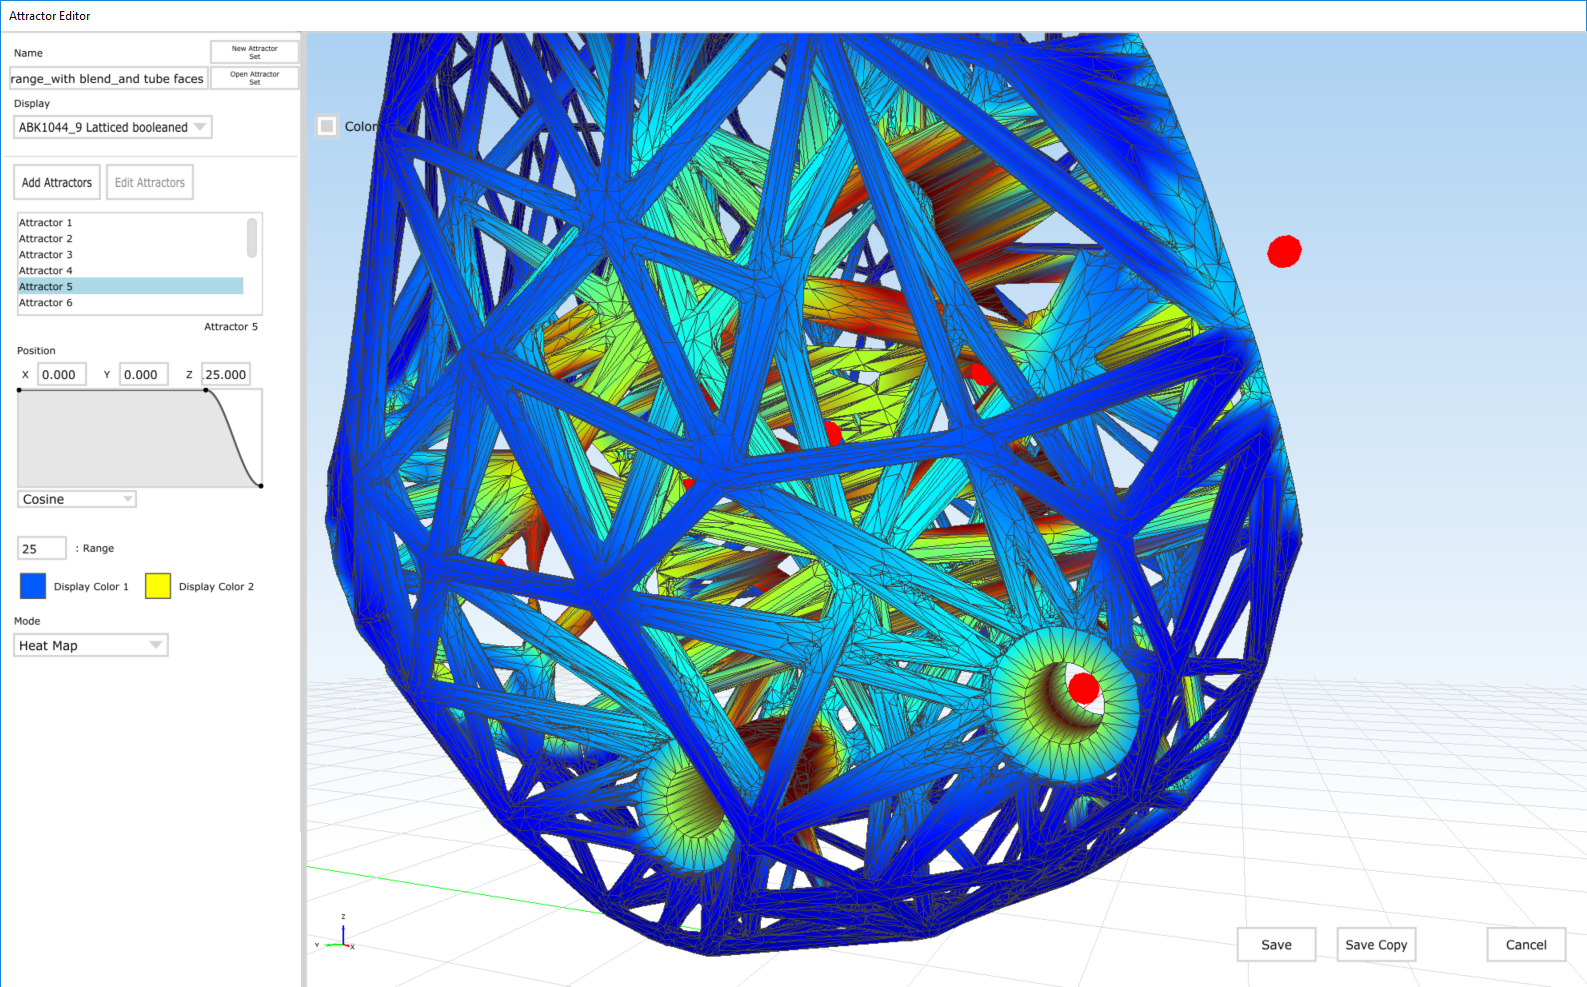
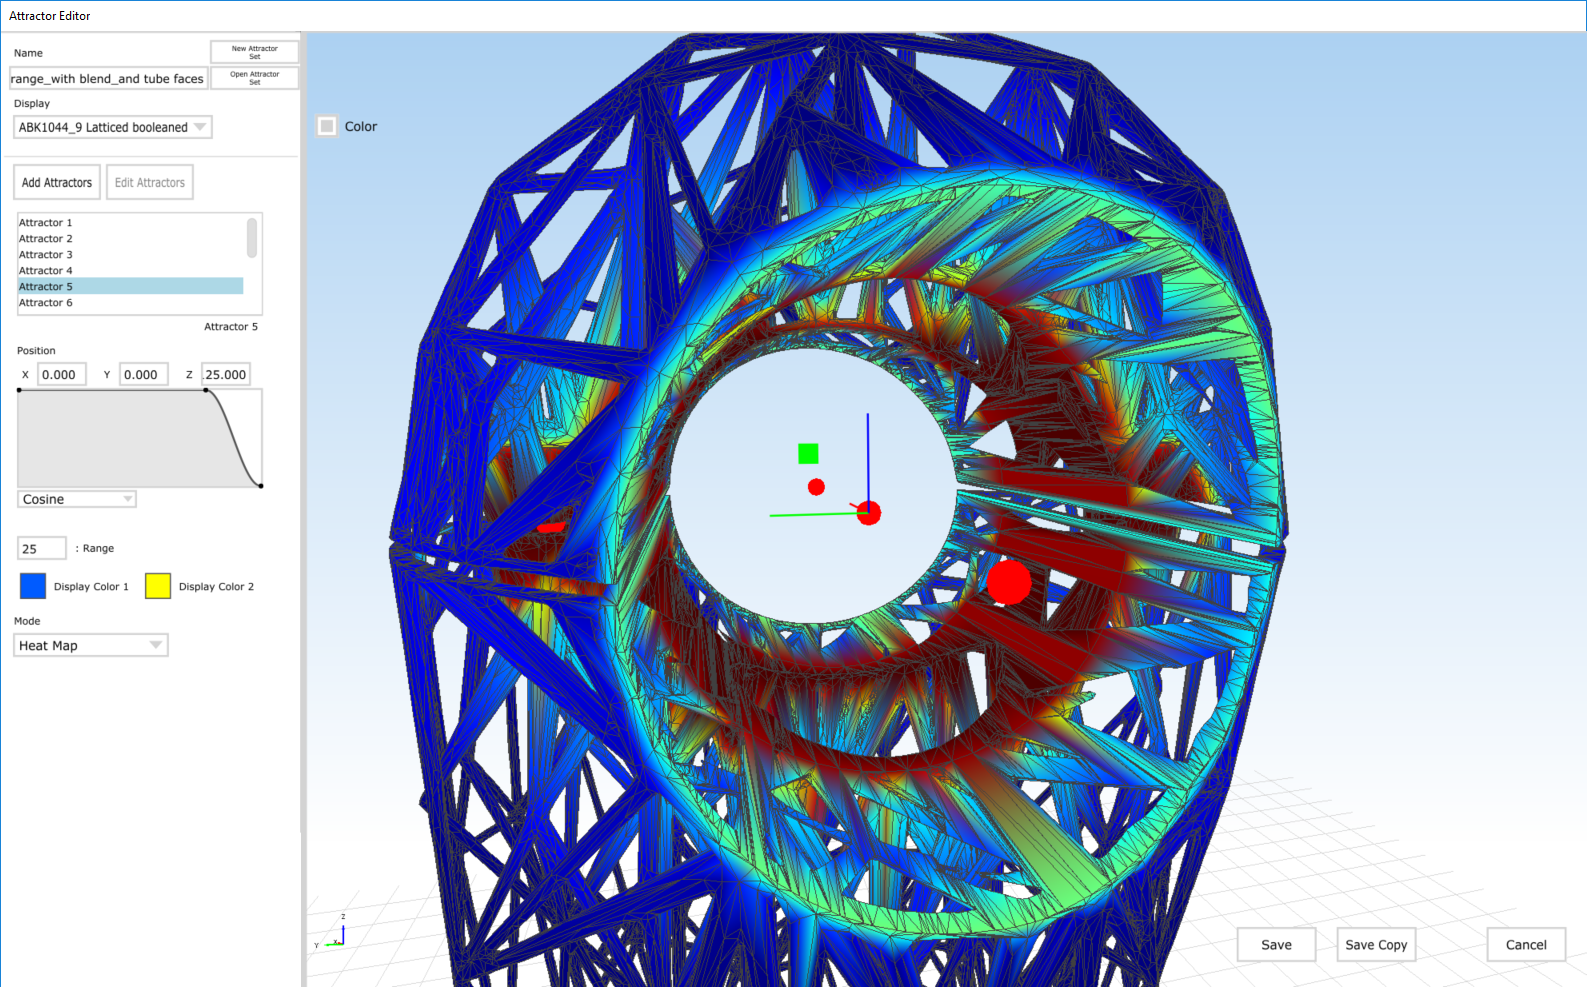
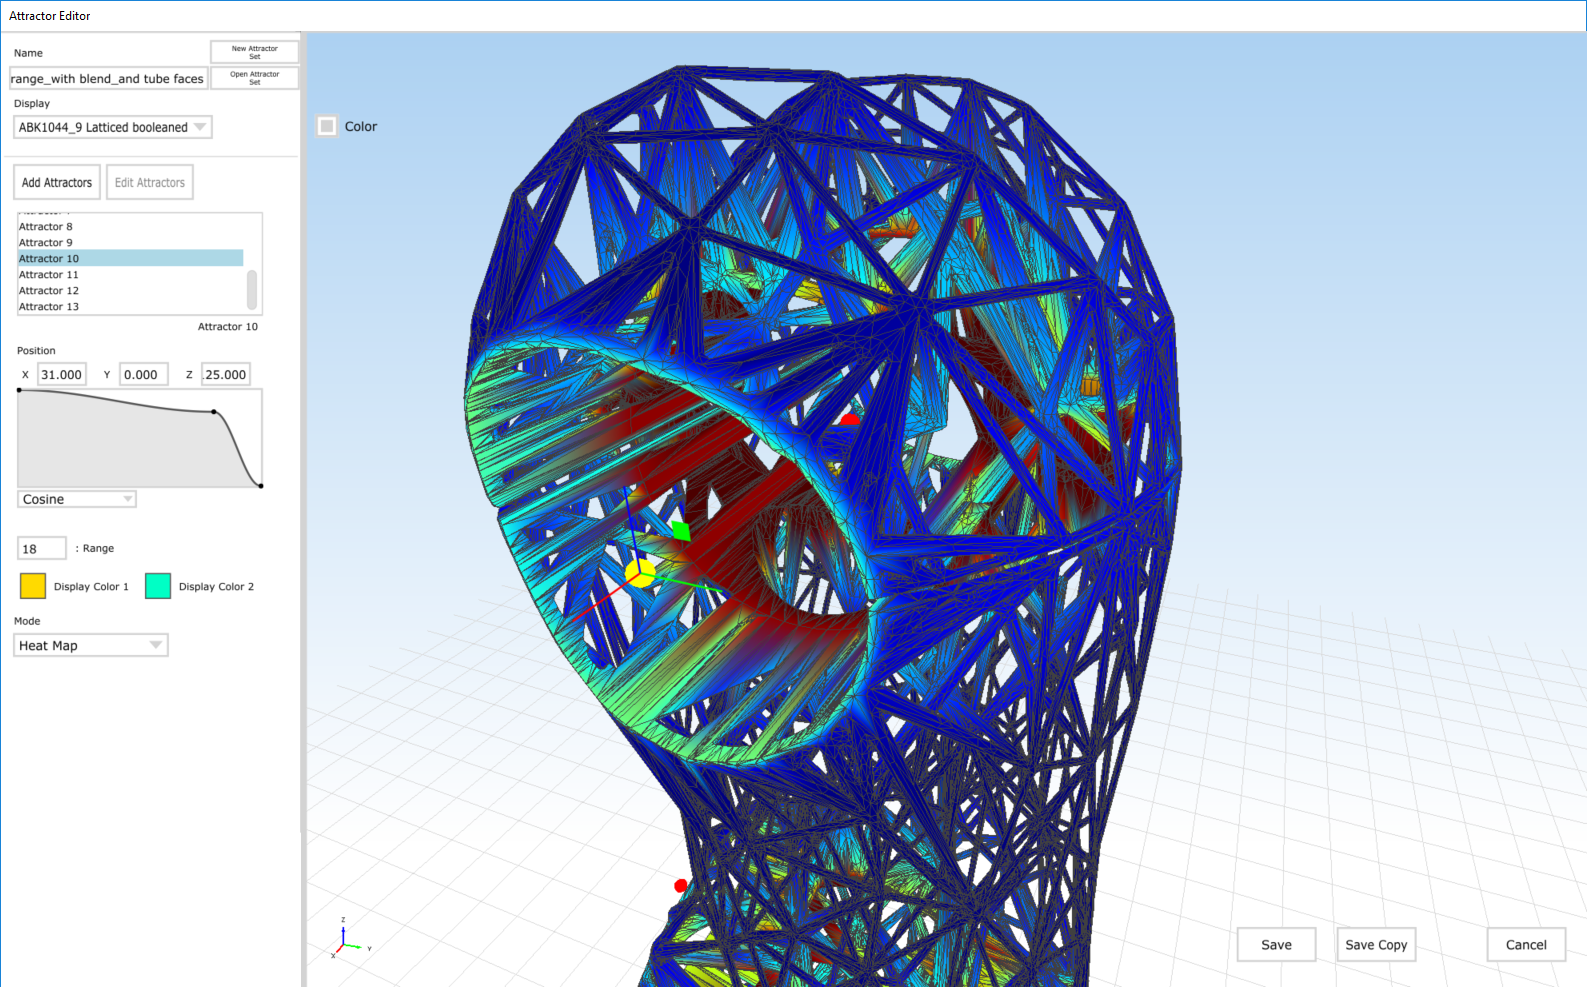
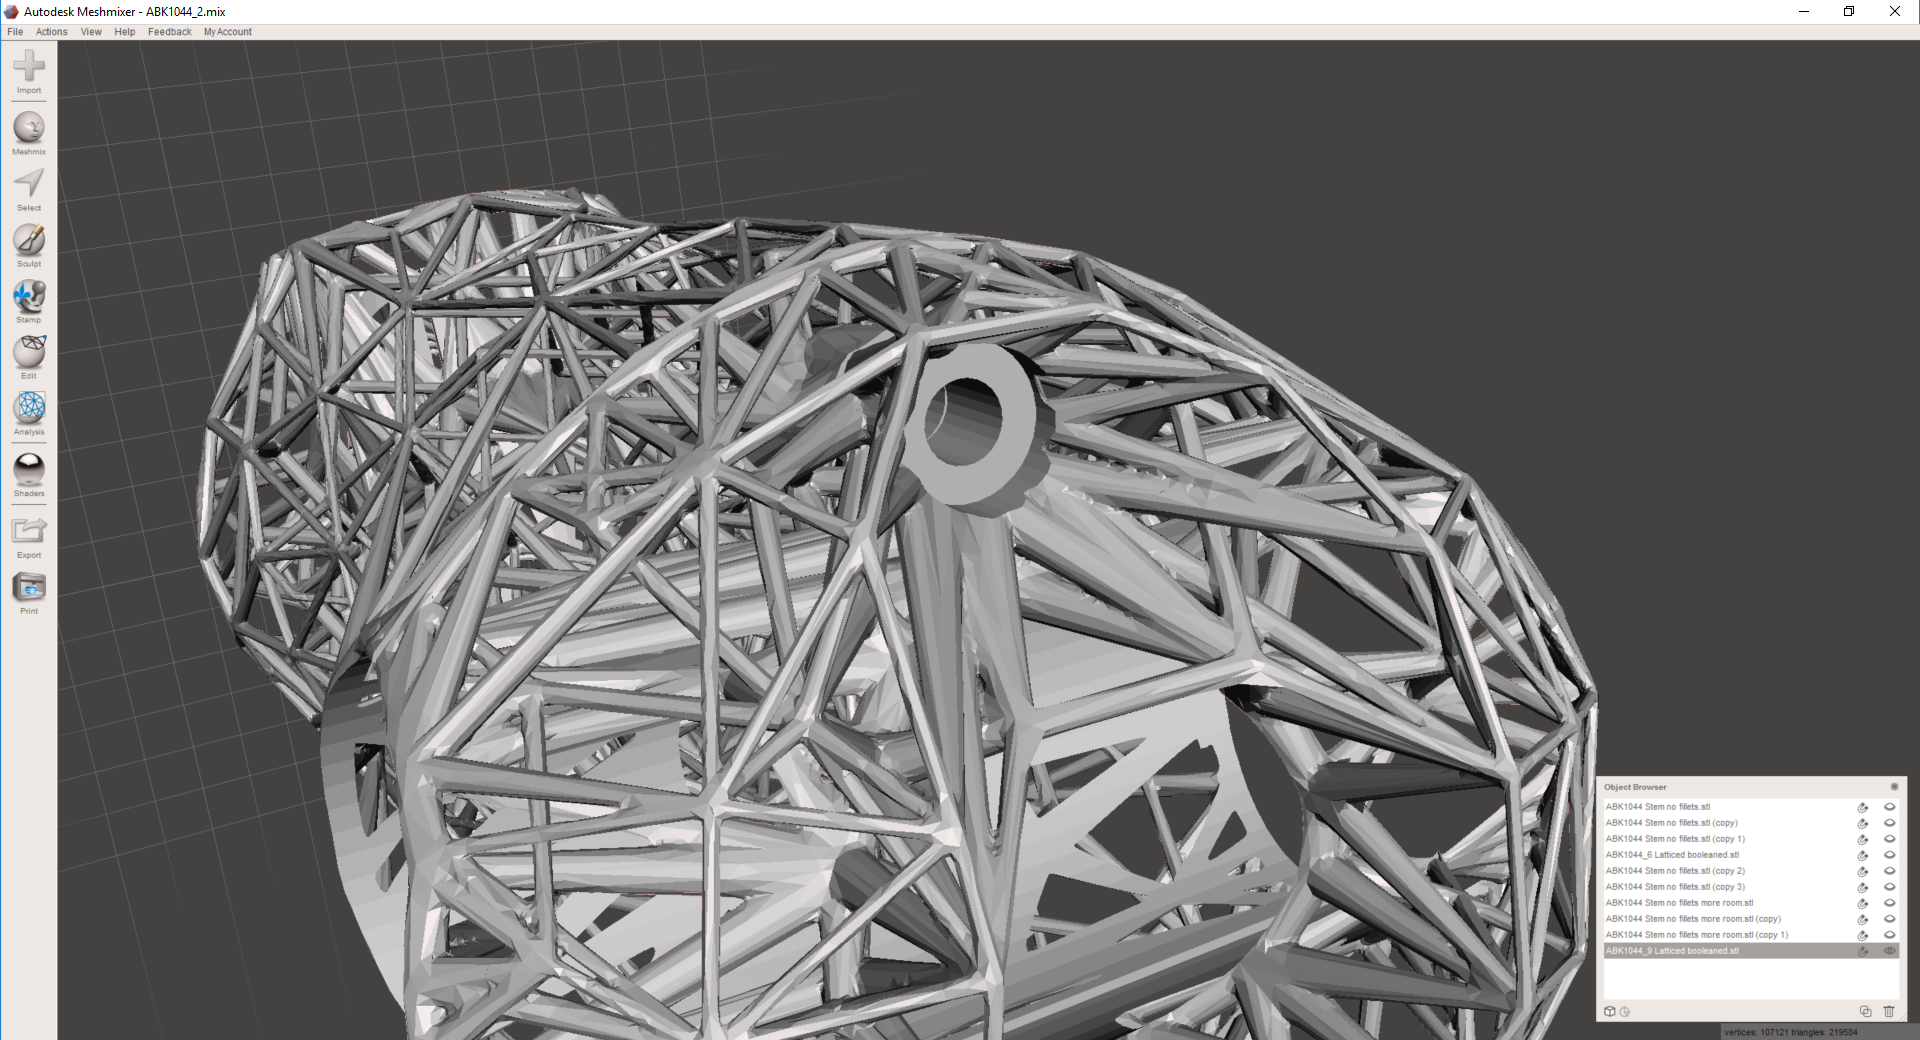
These parts were printed by my friends at Playground Global on their 3D Systems DMP320 in titanium 6/4. Like the titanium parts I've had printed (and written about extensively) in the past, these are done via laser metal powder bed fusion - the generic name that often gets referred to as "DMLS". These parts were, of course, designed in nTopology Element Pro; you can see more of my design process here

As loyal readers will know, I've put a lot of time into using Abaqus to predict these parts' mechanical properties; more on that in the near future. For the time being, the goal with this print was to test the manufacturing process - and use any lessons here to guide future design iterations. As you'd imagine, there's a *lot* that goes into printing a part that has ~45,000 beams; establishing manufacturing parameters was a good way to filter out nonviable design strategies.

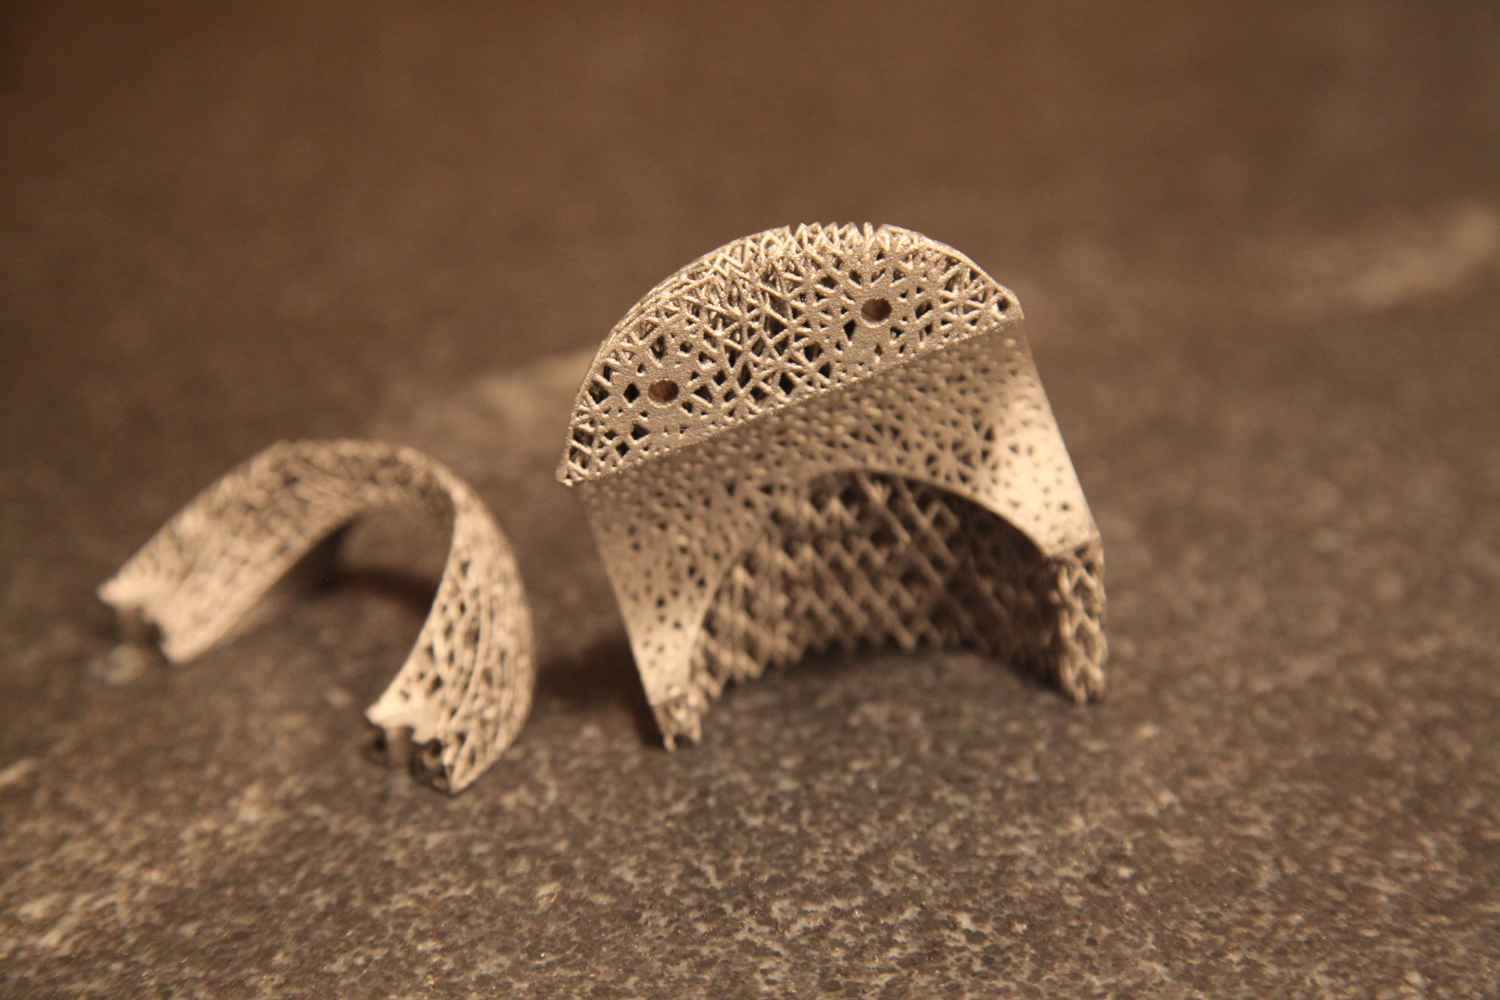
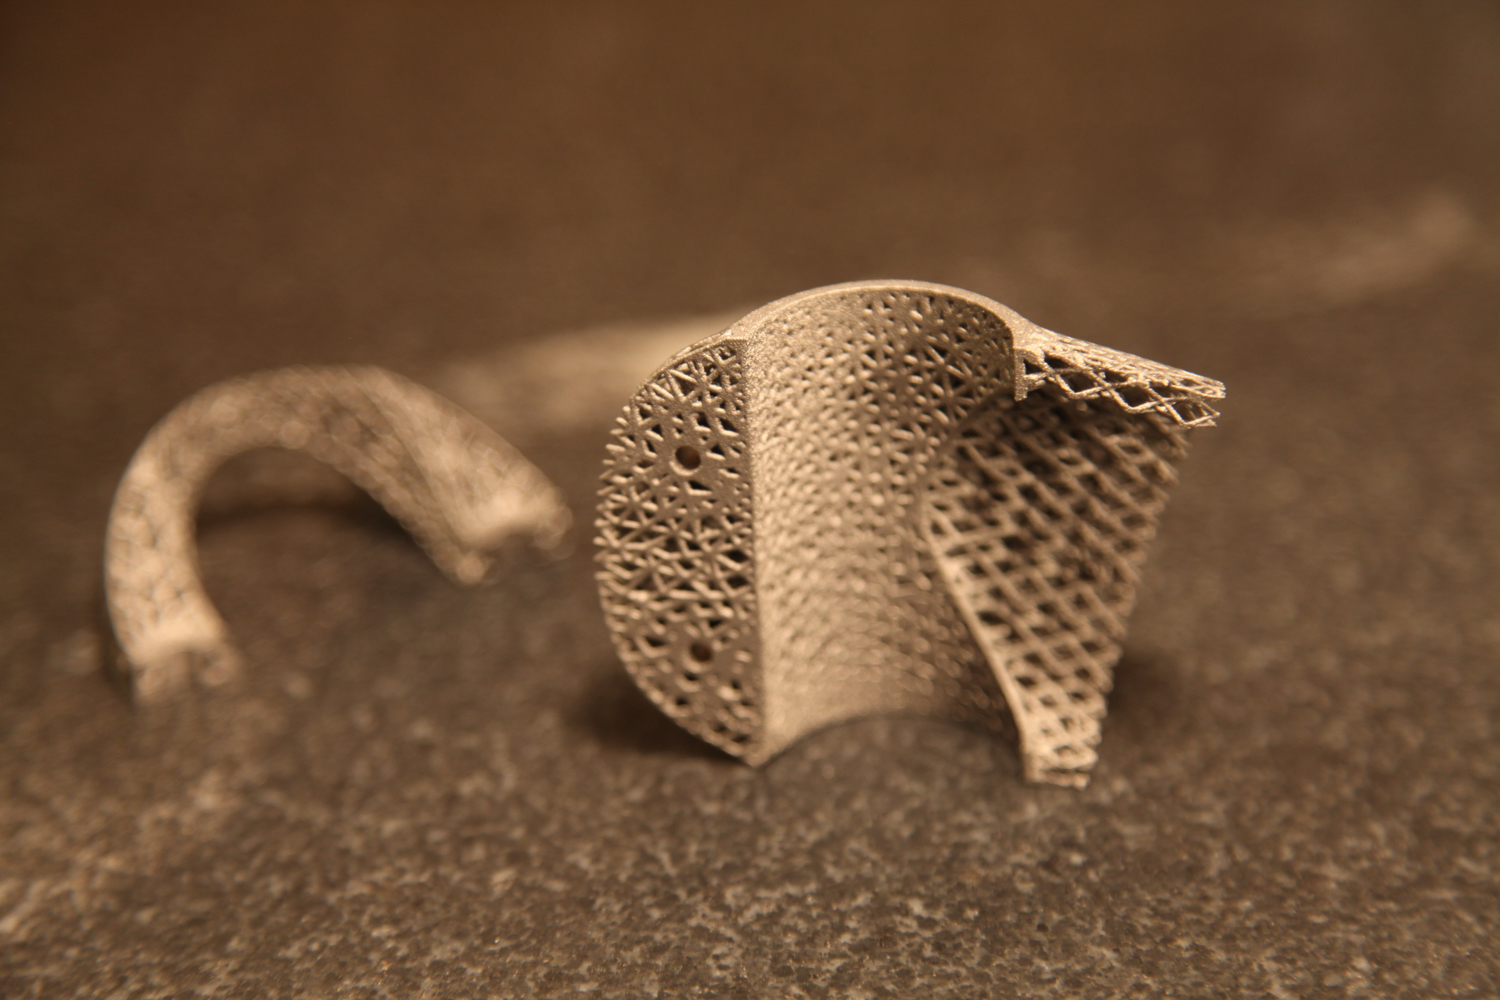
It'll take a bit more work to characterize the as-built design fully, but at first inspection it seems to have been a total success. I was careful to keep most of the beams' orientations at a high angles, thicknesses above .45 mm, and lengths below 3 mm; the result is a structure that's almost completely self supporting.

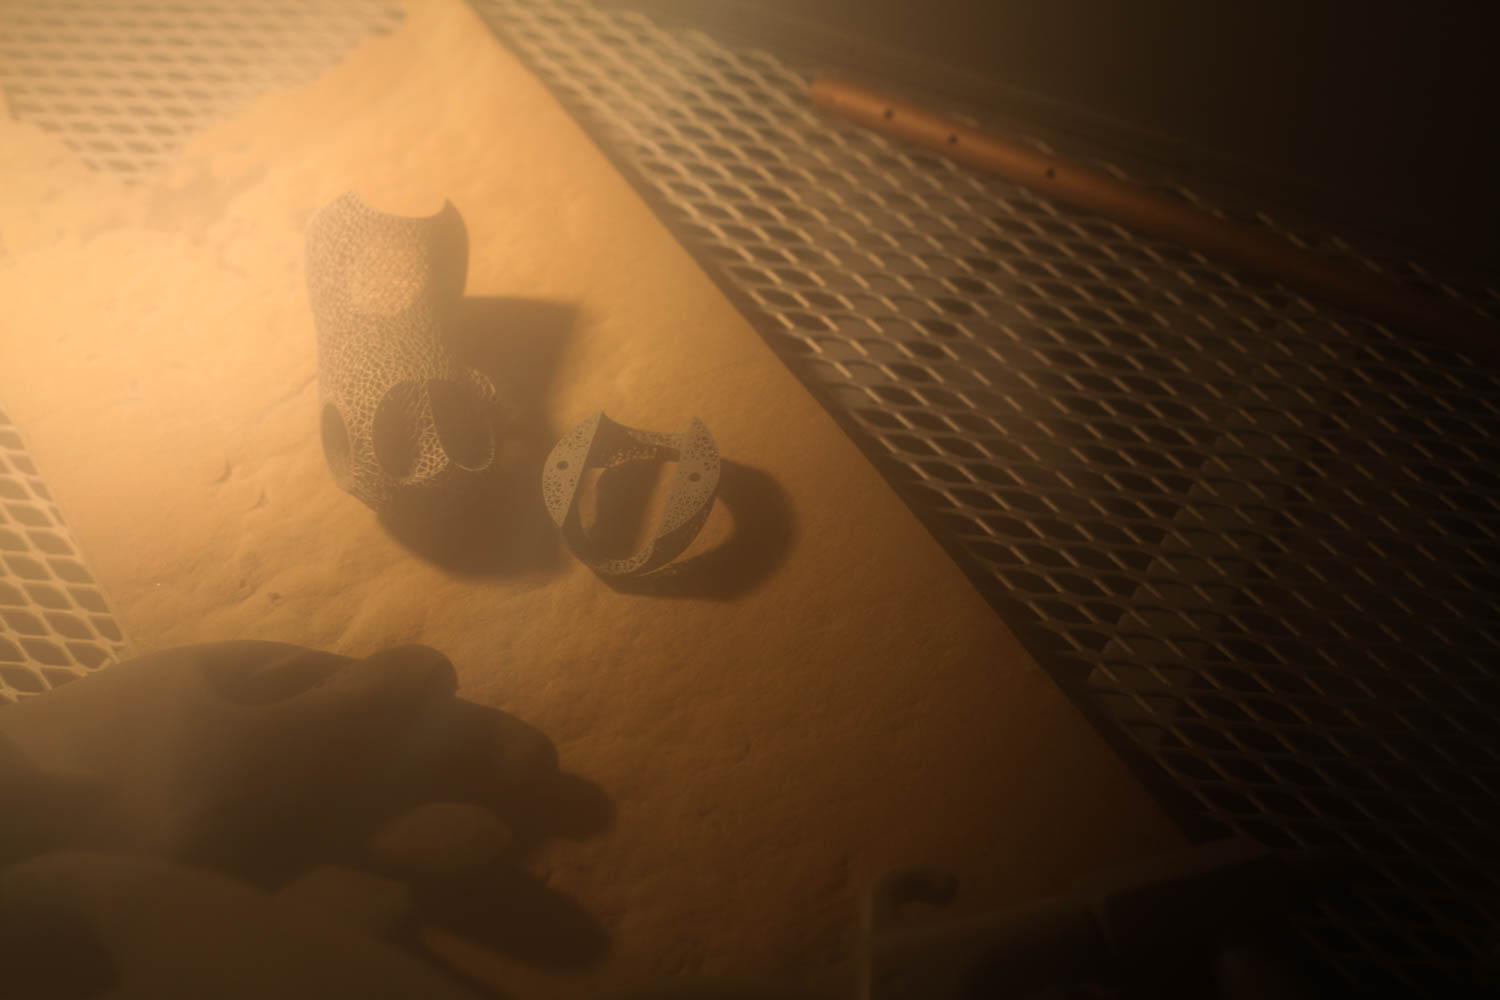
At this point, the part has been roughly cleaned up and bead blasted to remove any surface discoloration. The next step is to tap the holes, clean up the clamp surfaces, and mock the entire assembly up.

More soon :)

See also: DMLS lattice sample prints, where I describe the part's design a bit more.

DMLS lattice sample prints

Added on by Spencer Wright.

I'm *very* excited about these parts from C&A:

These parts were printed in titanium 6/4 by C&A Tool in Churubusco, Indiana; they were designed in nTopology Element. 

This is a pure lattice structure - the entire geometry is designed as beams and nodes, with no explicitly defined solid regions. The beam lengths are on the order of 2-3 mm; their thicknesses range between .45 mm and 1.1 mm. In some areas (for instance, the bolt holes) this results in a fully solid part, but the transition from lattice to solid is continuous rather than discrete. The result is a structure that's solid where it needs to be and sparse elsewhere, with no stress risers where solid and lattice meet.

The parts are, of course, sample regions of the bike stem that I've been working on for some time now. The intent of the samples was to prove the printability of the structure and identify any potential difficulties. The results were overwhelmingly positive: With the exception of a few small flaws, the parts printed very well, and I believe the problematic areas can be addressed in the design pretty easily.

Given the good quality of the sample prints, I'm planning on printing a full version of the part soon. I'm also experimenting with a few other design variations (intended for a variety of different metal AM machines), and am running them through a beam sizing optimization process with Abaqus and Tosca in order to reduce mass and decrease strain energy. More on these soon :)


Thanks to Rich Stephenson for his ongoing help on this project - and for continuing to educate me on the metal AM industry.

The first 14mm

Added on by Spencer Wright.

This week I got some good news: Researchers at The MTC had begun printing one of my latticed bike stems.

The first 14mm of my latticed bike stem, printed in titanium on an Arcam A2x. The part is upside down (relative to the build orientation) in this photo.

This part was printed in titanium 6/4 on an Arcam A2X. Unfortunately the build failed at 14mm high; on the upside, it appears that the failure was *not* caused by my part. It's a bit early to make any judgments about its feasibility, but I'm pleased to see that these beam diameters (which are between .8mm and 1.8mm) seem to print without support structures. As you can see below, many of them (almost all, in fact) had very low angles relative to the XY plane.

The build orientation of my latticed bike stem.

I'm hoping to have more progress on this soon. Thanks to my friends at The MTC for their help with printing - and with debugging the design!

(Another iteration of my) Bike stem

Added on by Spencer Wright.

This.

The lattices here were, obviously, designed in nTopology Element Free (which is free!). I happen to have done the mechanical design in Inventor, but the rendering was done in Fusion 360 (effectively free, and totally capable of doing the mechanical design as well). I separated face groups and remeshed surfaces in MeshMixer (free!), and very well could have done the booleans there too (I used netfabb).

^ I just think that's a bit remarkable.

Anyway, it's ready. Printed part (DMLS titanium) soon.

Point modifiers

Added on by Spencer Wright.

Just a quick update to yesterday's post - here are some screenshots showing a little bit of how I'm controlling thickness on my lattice stem.

Our variable thickening algorithm allows the user to input minimum and maximum beam diameters. If a beam isn't within the range of any point modifiers, then it's thickened to the minimum value. If it's within range, then its thickness is determined by the falloff curve of the modifier that it's within range of. If it's within range of multiple point modifiers, then the greater thickness value is used.

As you can see above, the Modifier Editor allows the user to preview the effect that the modifiers will have on a part; blue means that a region is not within range of a modifier (and will be the minimum thickness), and red means that it's within range (and the maximum thickness will be applied). We allow you to preview this on any mesh in your project. Here I'm looking at a variably thickened lattice, but generally I'd start with a uniform thickness lattice and then play around from there.

The big change in the design yesterday was adding point modifiers in four locations: On either side of the handle bar clamp, and on the top and bottom of the steerer clamp. These modifiers have steep cosine falloff curves, meaning that they have a big effect on a relatively small region of the part. I've controlled the range and falloff so that just the beams on the edges of those surfaces are affected.

I also have point modifiers at all of the bolt holes, and a few that control thickness on the rest of the clamp surfaces, and then two point modifiers that make the transition from the clamp surfaces to the center of the extension a bit more gradual.

We've been thinking a bit more about how to develop modifiers in the future - stay tuned!

Stem update

Added on by Spencer Wright.

A friend asked me yesterday what was going on with my lattice bike stem design, and after telling him that it's been on the back burner I played with it a bit and made some real (if subtle) improvements. 

First, I should note here that I'm *not* worrying about overhanging faces. That's mostly because I'm working at nTopology to break down manufacturability of lattices into its component parts, and am tabling all of my DFM concerns until I have real data to back them up. In addition, I'm focusing on using variable thickening to maximum effect right now. I've used variable thickening a lot in the past, but the next software update of nTopology Element pushes it even more into the forefront, and I want to dogfood myself a little before we release it into the public :)

I don't have screenshots of the whole process, but this part was designed in much the same method that I was using last fall. I used Inventor to make a design space, and Meshmixer to generate surfaces to grow a lattice on. Then I used Element to:

  1. Create a surface lattice with beams at every edge in the Meshmixer model
  2. Create a volumetric lattice (based on a hex prism cell shape) inside the part
  3. Merge the two lattices by snapping nodes on the volumetric lattice to nearby nodes on the surface lattice
  4. Creating attractor modifiers at locations that I know I'll need more thickness in my lattice, e.g. mechanical features
  5. Applying variable thickness to the lattice based on those modifiers
  6. Refining the resulting mesh & reintroducing mechanical features via Booleans

The trickiest thing by far here is setting the attractor modifiers to the right range & falloff. I've got three things going on here:

  • Bolt holes. These need to be maximum thickness (1.5mm) to accept threads and distribute the load from the bolts.
  • Clamp surfaces. Where the stem clamps to the steer tube and handlebar, the part needs to have relatively high surface area. All lattice beams should lay on the surface itself, and thickness should be high as well.
  • Mechanical stress. I haven't done a full analysis of this part, but in general stress will be concentrated near the clamp surfaces and will be lower in the middle of the part.

Clearly this blog post would be more effective if I ran through every attractor one-by-one and explained how editing them changed the resulting structure, but we'll have to forego that for now. Suffice it to say that the part above weighs 105g and has roughly the mass distribution I was looking for; I'll update with more details soon :)